


ECW – resurrection after 40 years


Recommendations: 640
About the Project
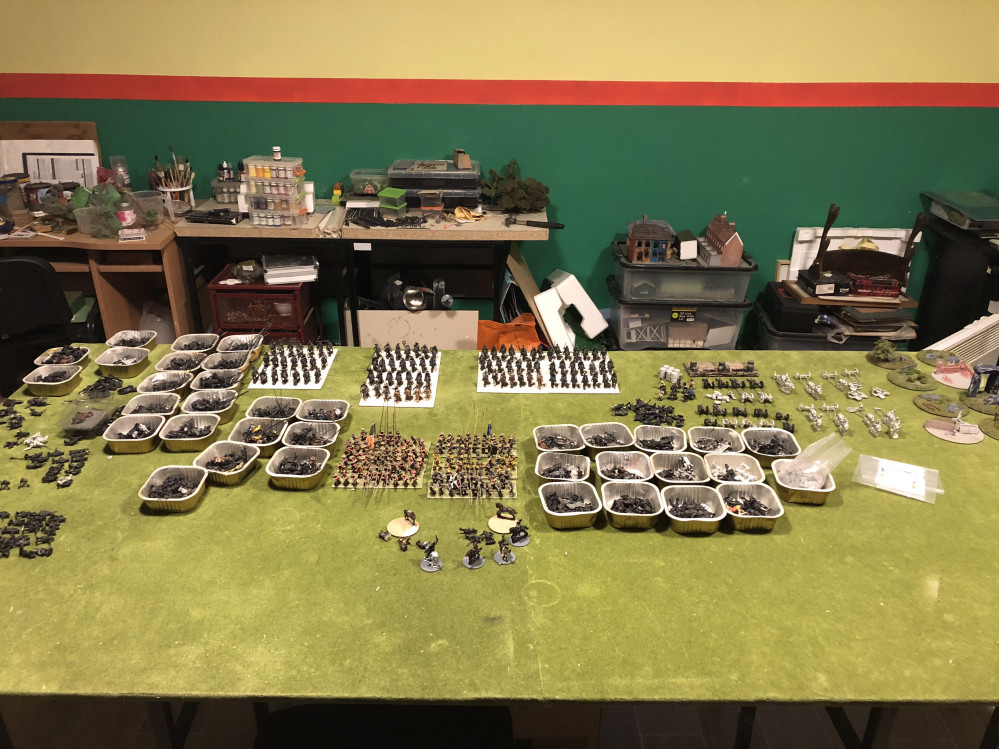
Shortly after Wargames Foundry established itself back in the 1980s, I purchased a sample pack of their ECW figures and I loved them. So, I thought, why not build two armies (I'm a solo player) and set about looking at rules etc. 40 years later in the basement of our newly built home (outwith the UK) my 10 year old says, "Dad can we play with these", pointing to the shelves of partially painted, and based minies, with the remainder still in packs. So I thought, with the OTT Spring clean challenge, maybe I'll get closer to finishing (actually, it's more like starting properly) my ECW project! This is the task: to turn the mountain of lead into something playable. What you can see in the header picture are the six paint/based foot regiments, and the variously based cavalry (for play testing) and the little tin boxes of all the other minis! Our new home has a basement, part of which will be my War-game room. Still need shelving and other assorted finalizing, but it will be where I hope I will spend a lot of time with my boy as he also develops an interest in the hobby. So, the next step is to determine my plan of campaign and what to do first!
Related Genre: Historical
Related Contest: Spring Clean Hobby Challenge (Old)
This Project is Completed
All that Basing and painting - what was it for?
As Gerry alluded to in his kind commentary on my project challenge, I still have quite a few units to finish off. Together with houses, trees, rivers, roads etc. (You know the drill).
But the point was to create a game that I could play with my young son (10 yo) and also to have a more complex game for me to play solo. So what will follow shortly will be a first play through of the simple rules below.
The Rules
The core rules are based on a combination of Principles of War: Renaissance, Give no Quarter, and some things lifted from more recent rule sets.
I’m toying with using the Bolt Action dice mechanism, but restricting this to the number of sub commanders, and the artillery. This may seem odd or daft, and we will soon see if I really am off my head. But my thinking is that in a “normal” sized battle, there is likely to be 18+ units on the table and at the time, these would ONLY act according to the relevant commander. This may require additional sub-commanders.
So, each army will comprise three distinct groups. e.g. Right wing, Centre, Left wing (or Vanguard, Main force, and Rear guard) PLUS the artillery. Typically then, 3-5 dice, but if sub-commanders used, this could double the number of dice, which may be better.
In addition, I’ll add an extra 2 Black dice. When the second one is drawn, the turn ends. So there is an element of uncertainty in whether or not you’ll get to move/act with all your units each turn.
Otherwise, a commander can instruct his group to Move, Move & Fire, Fire, Rally, Re-load, or Ambush.
Pike & Shot Units fire to hit 4+ on 6 dice. (7 dice if first volley). Once fired unit has a reload marker and loses the extra dice unless they use a turn to reload. NO saving throws.
Morale will typically be based on quality of troop (as in BA): Raw <7; Trained <8; Veteran <9. Officer within 6″ increase by 1. (e.g. Trained would pass with 9). Morale taken on any Hit. If one attack produces 4+ hits a casualty marker is placed which reduces moral by 1 per marker (THREE markers = unit routs). A marker can be removed on a Rally order.
Units become disordered when they suffer 2 casualty markers OR lose a melee fight, OR cross uneven ground.
Movement relatively slow (as per the time). P&S unit 6″ (9″ if “run”). Cavalry 12″ (18″ if “run”). Artillery is fixed once placed (so careful placement is important).
Melee decided by unit. P&S 6 dice; Cavalry 6 dice vs. Cavalry; They can NOT charge steady troops, only disordered.
This is the basic ideas. We’ll see if it works!
The BatRep!
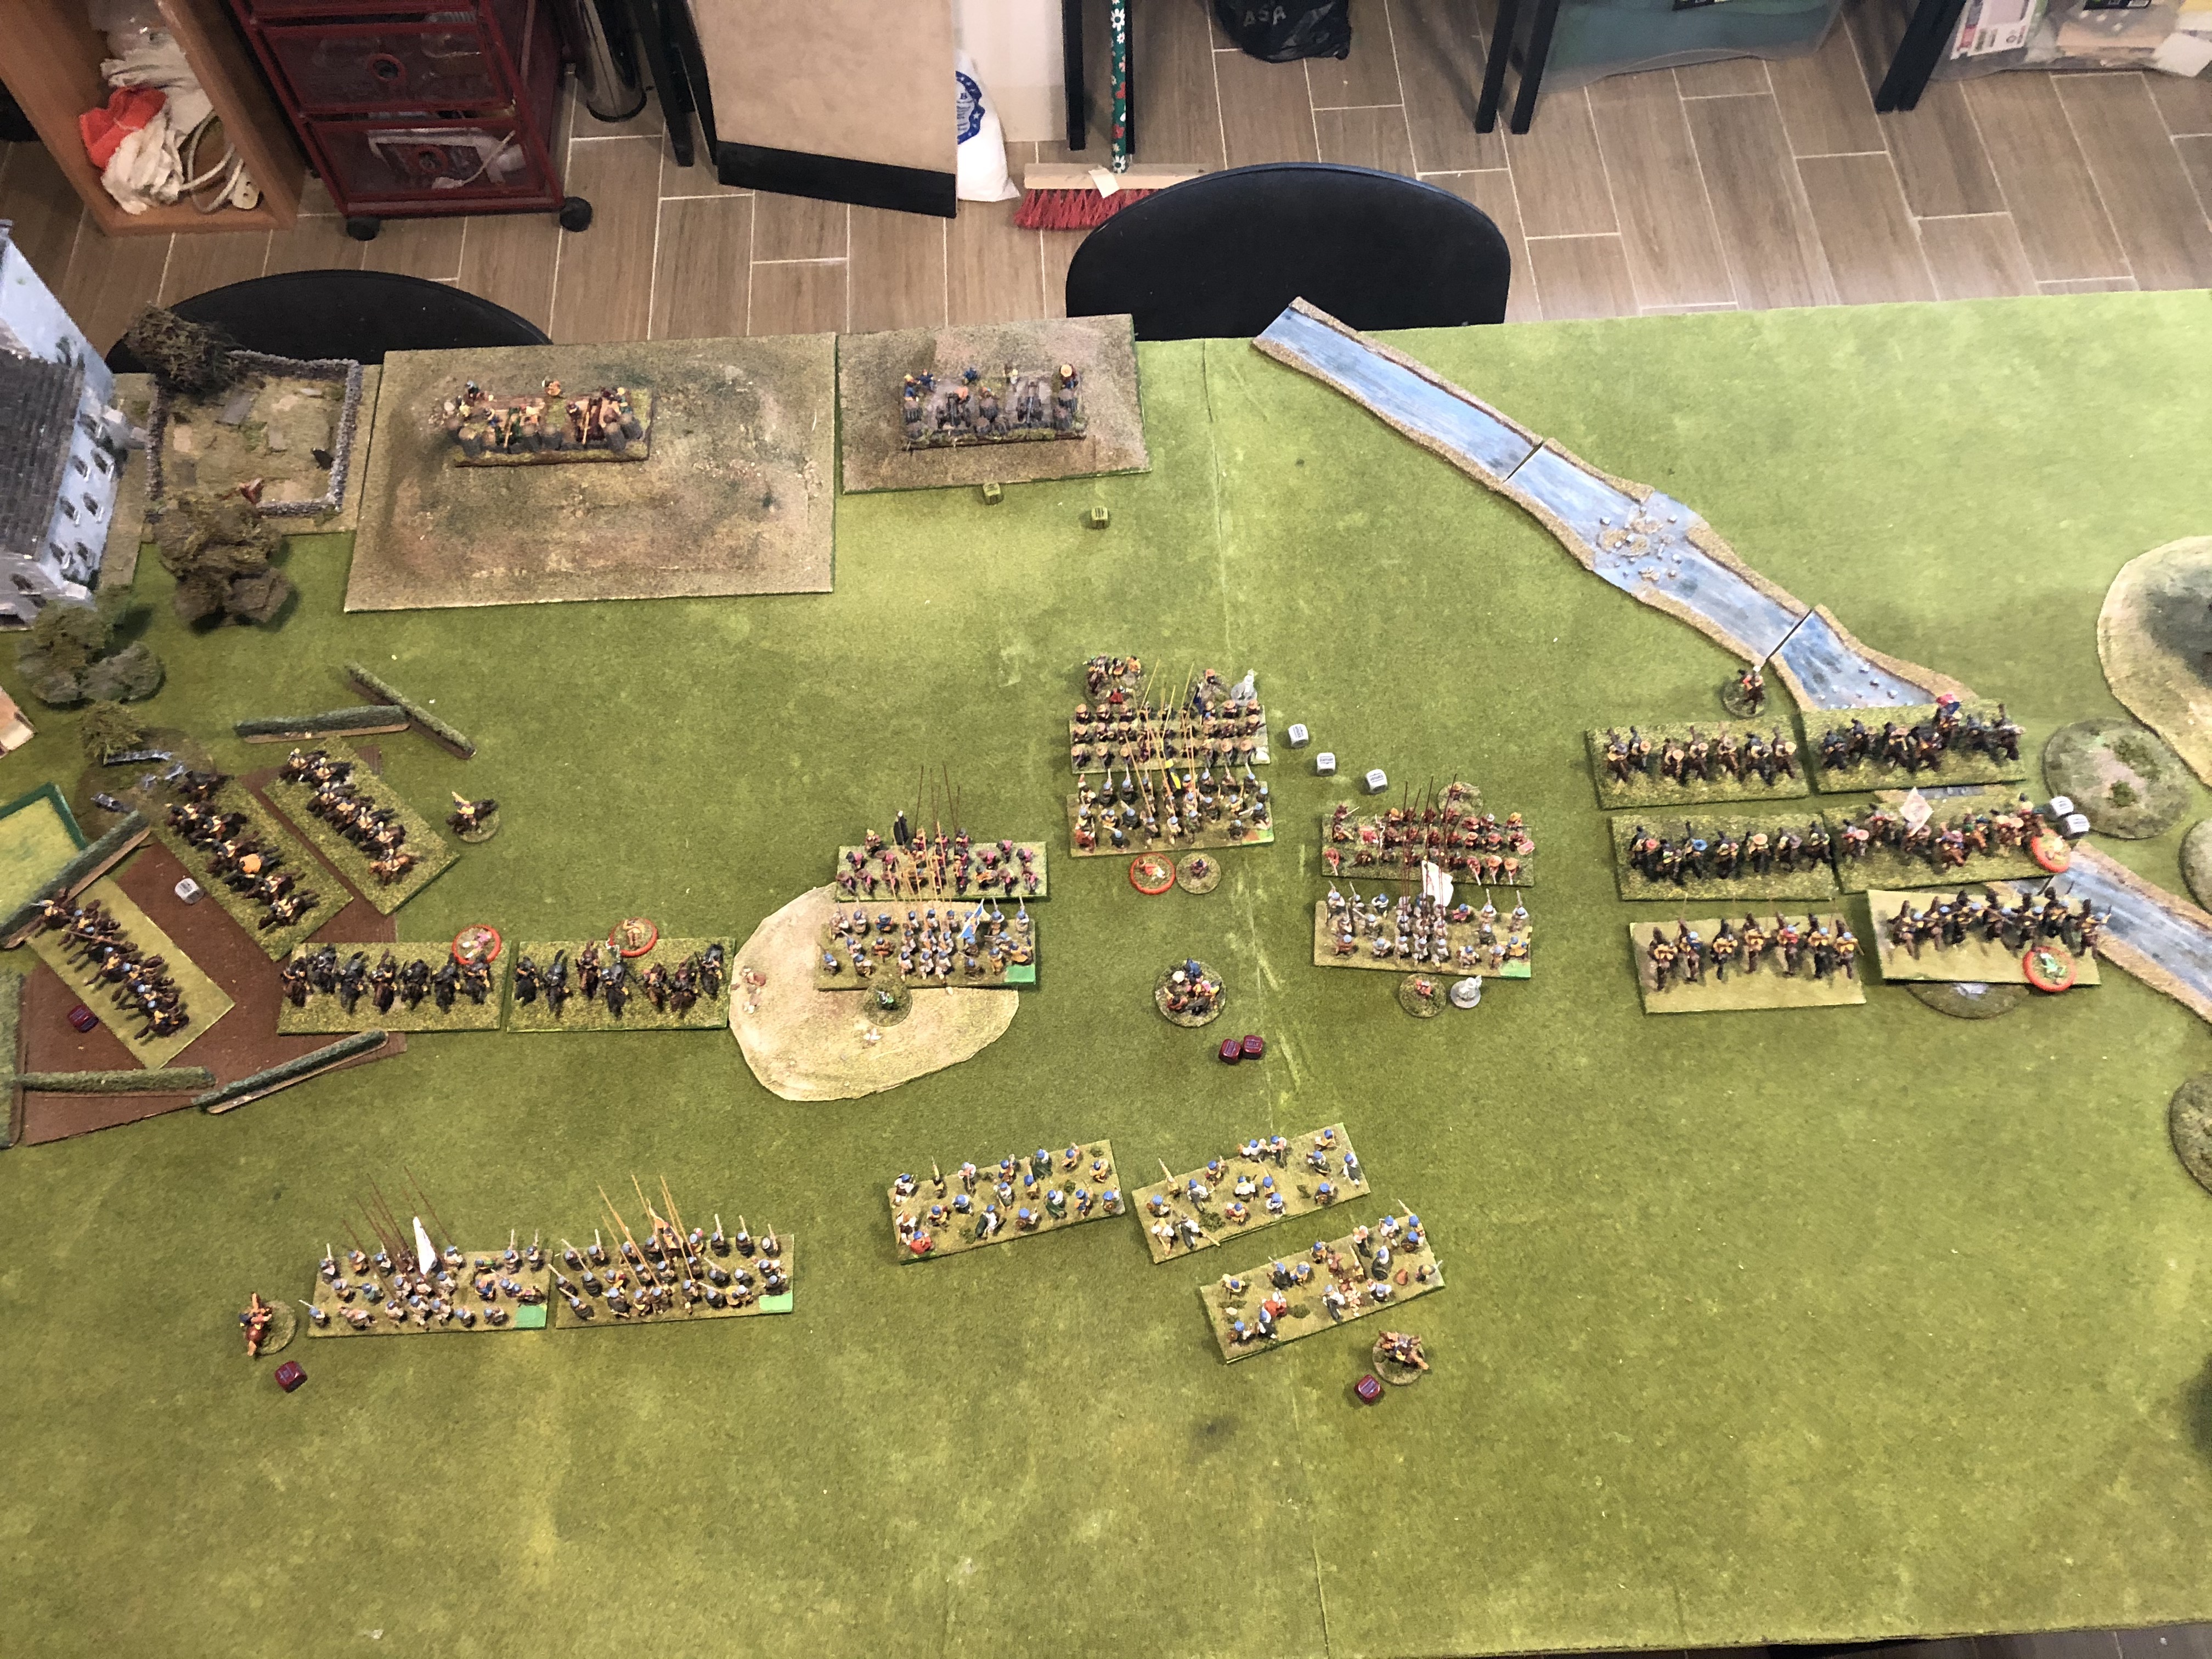
 Initial Positions
So, the Battle Report, which will be presented after each Turn “Live”. I am a solo player and ofter have hours between moves as the real world gets in the way, so trying to complete the entire game in one go should be a challenge for me!
The game is more about trying out different ideas and testing the rules, so I’m sure there will be lots of things I’ll eventually change. But as some commentators asked for a run through. Here goes.
The scenario id an uneven fight between an invading English force which has taken a town in the early years of the first ECW. A Covenanter army has been quickly raised to drive the “Auld Enemy” from Scotland.
There are no points involved, and the imbalance is deliberate. The two sides have different establishments; the English far superior Cavalry (in both numbers and quality), and the Covenanters have more infantry and a small Highland contingent.
The forces have different objectives: The English have to have at least 50% of their initial force still on the table at the end of 7 turns. The Scots have to have either driven the English from the field, or have taken at least 50% of the English army.
May the best side win!
Turn 1
 General advance across the line
The mechanism to move is based on the Bolt Action dice principle, but with some modification. Rather than each unit having a dice, only the commanders have them, but they have a different number of possible orders based on their status. The C-in-C gets 3 dice, the sub-commanders 2 each and each artillery base has one as well. The rationale (such as it is) is that at the time units did not act independently (unlike, say, in WW2) so would act on direct commands. Also I wanted to get away from the IGO-UGO type of play (although this may well be a better option – I’ll see).
The additional “fog of war” is a further two black dice in the bag. After the second one is drawn out, irrespective of how many orders have been given, the turn ends. So Commanders have a dilemma. When your army dice is drawn, which commander gets to act, and once the first Black dice is drawn, each order after this might be the last.
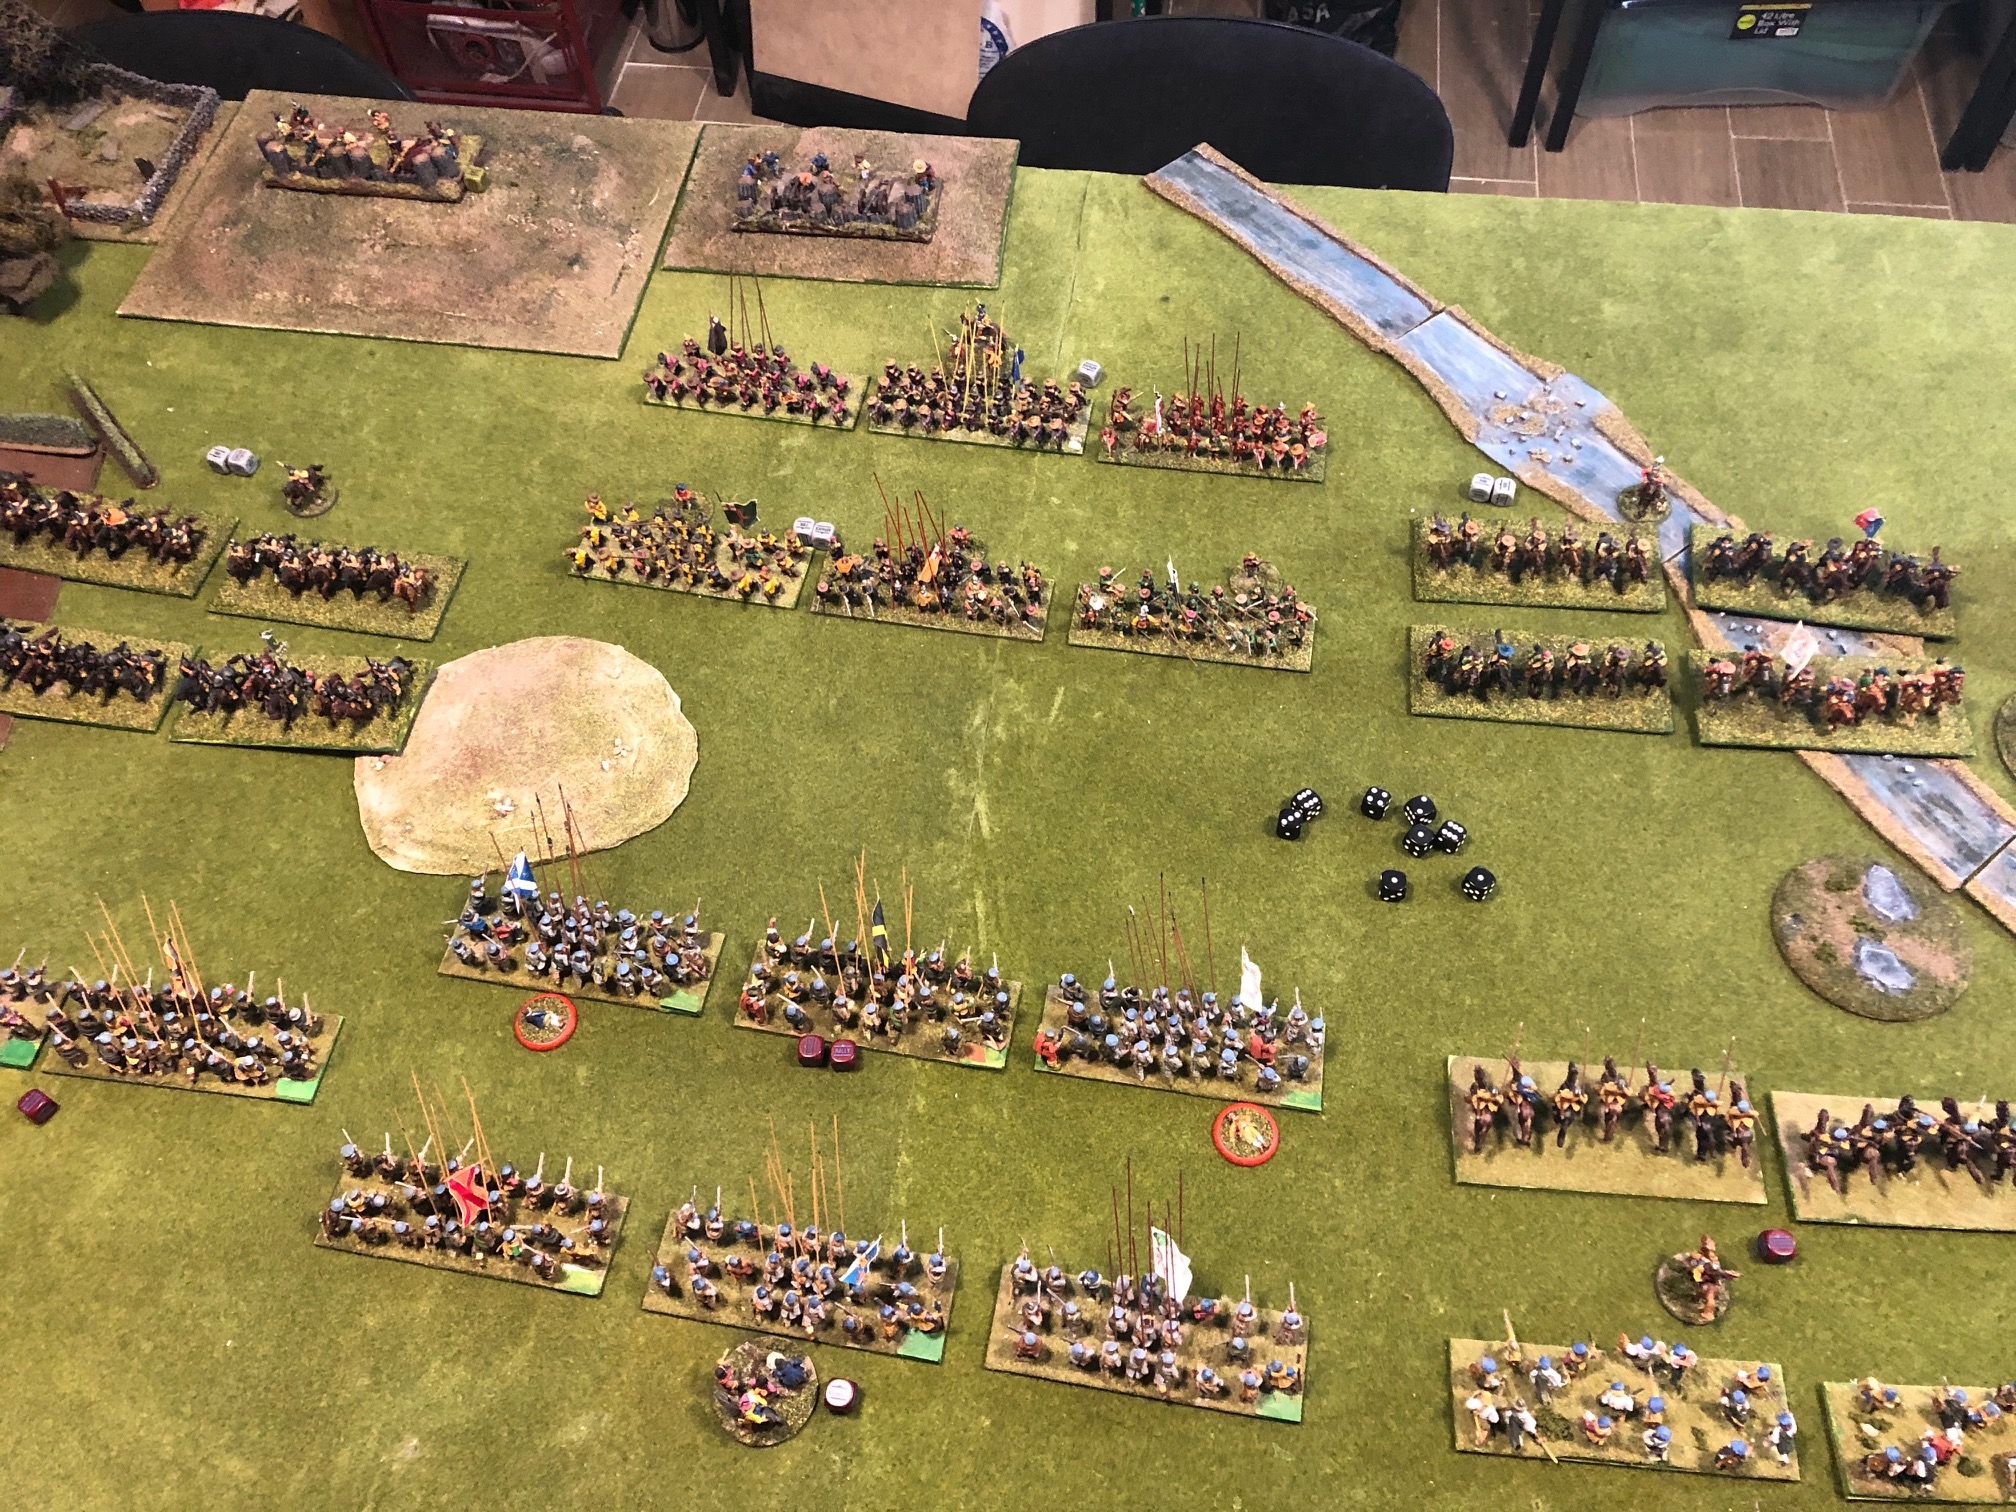
As it happened this turn there were only 2 “dead” order dice remaining. As the image shows, there was slow advance across the line. Both armies coming into range of Foot units.
Both advanced P&S have opened fire at distance and are marked with “Reload” markers. The English force was particularly successful and caused two casualty markers on two of the Covenanter units. (Each casualty marker increases the moral test by +1, so a normal 7+ for Trained troops becomes 8+ etc.) Three casualty markers = Rout. A casualty marker is added if a unit takes THREE hits from one attack and fails the Saving Throw on a 4+.
The English have come out to meet the Scots rather than be pinned on the back of the table, and both Cavalry groups have advanced to within charge distance. The Scots lancers are also in a position to charge on their Right, but on the Scottish left wing, the English heavy cavalry look about to over run the P&S units. (Note: Cavalry can not charge Steady Pike block, so some softening up will be required first).
On to Turn 2
Turn 2
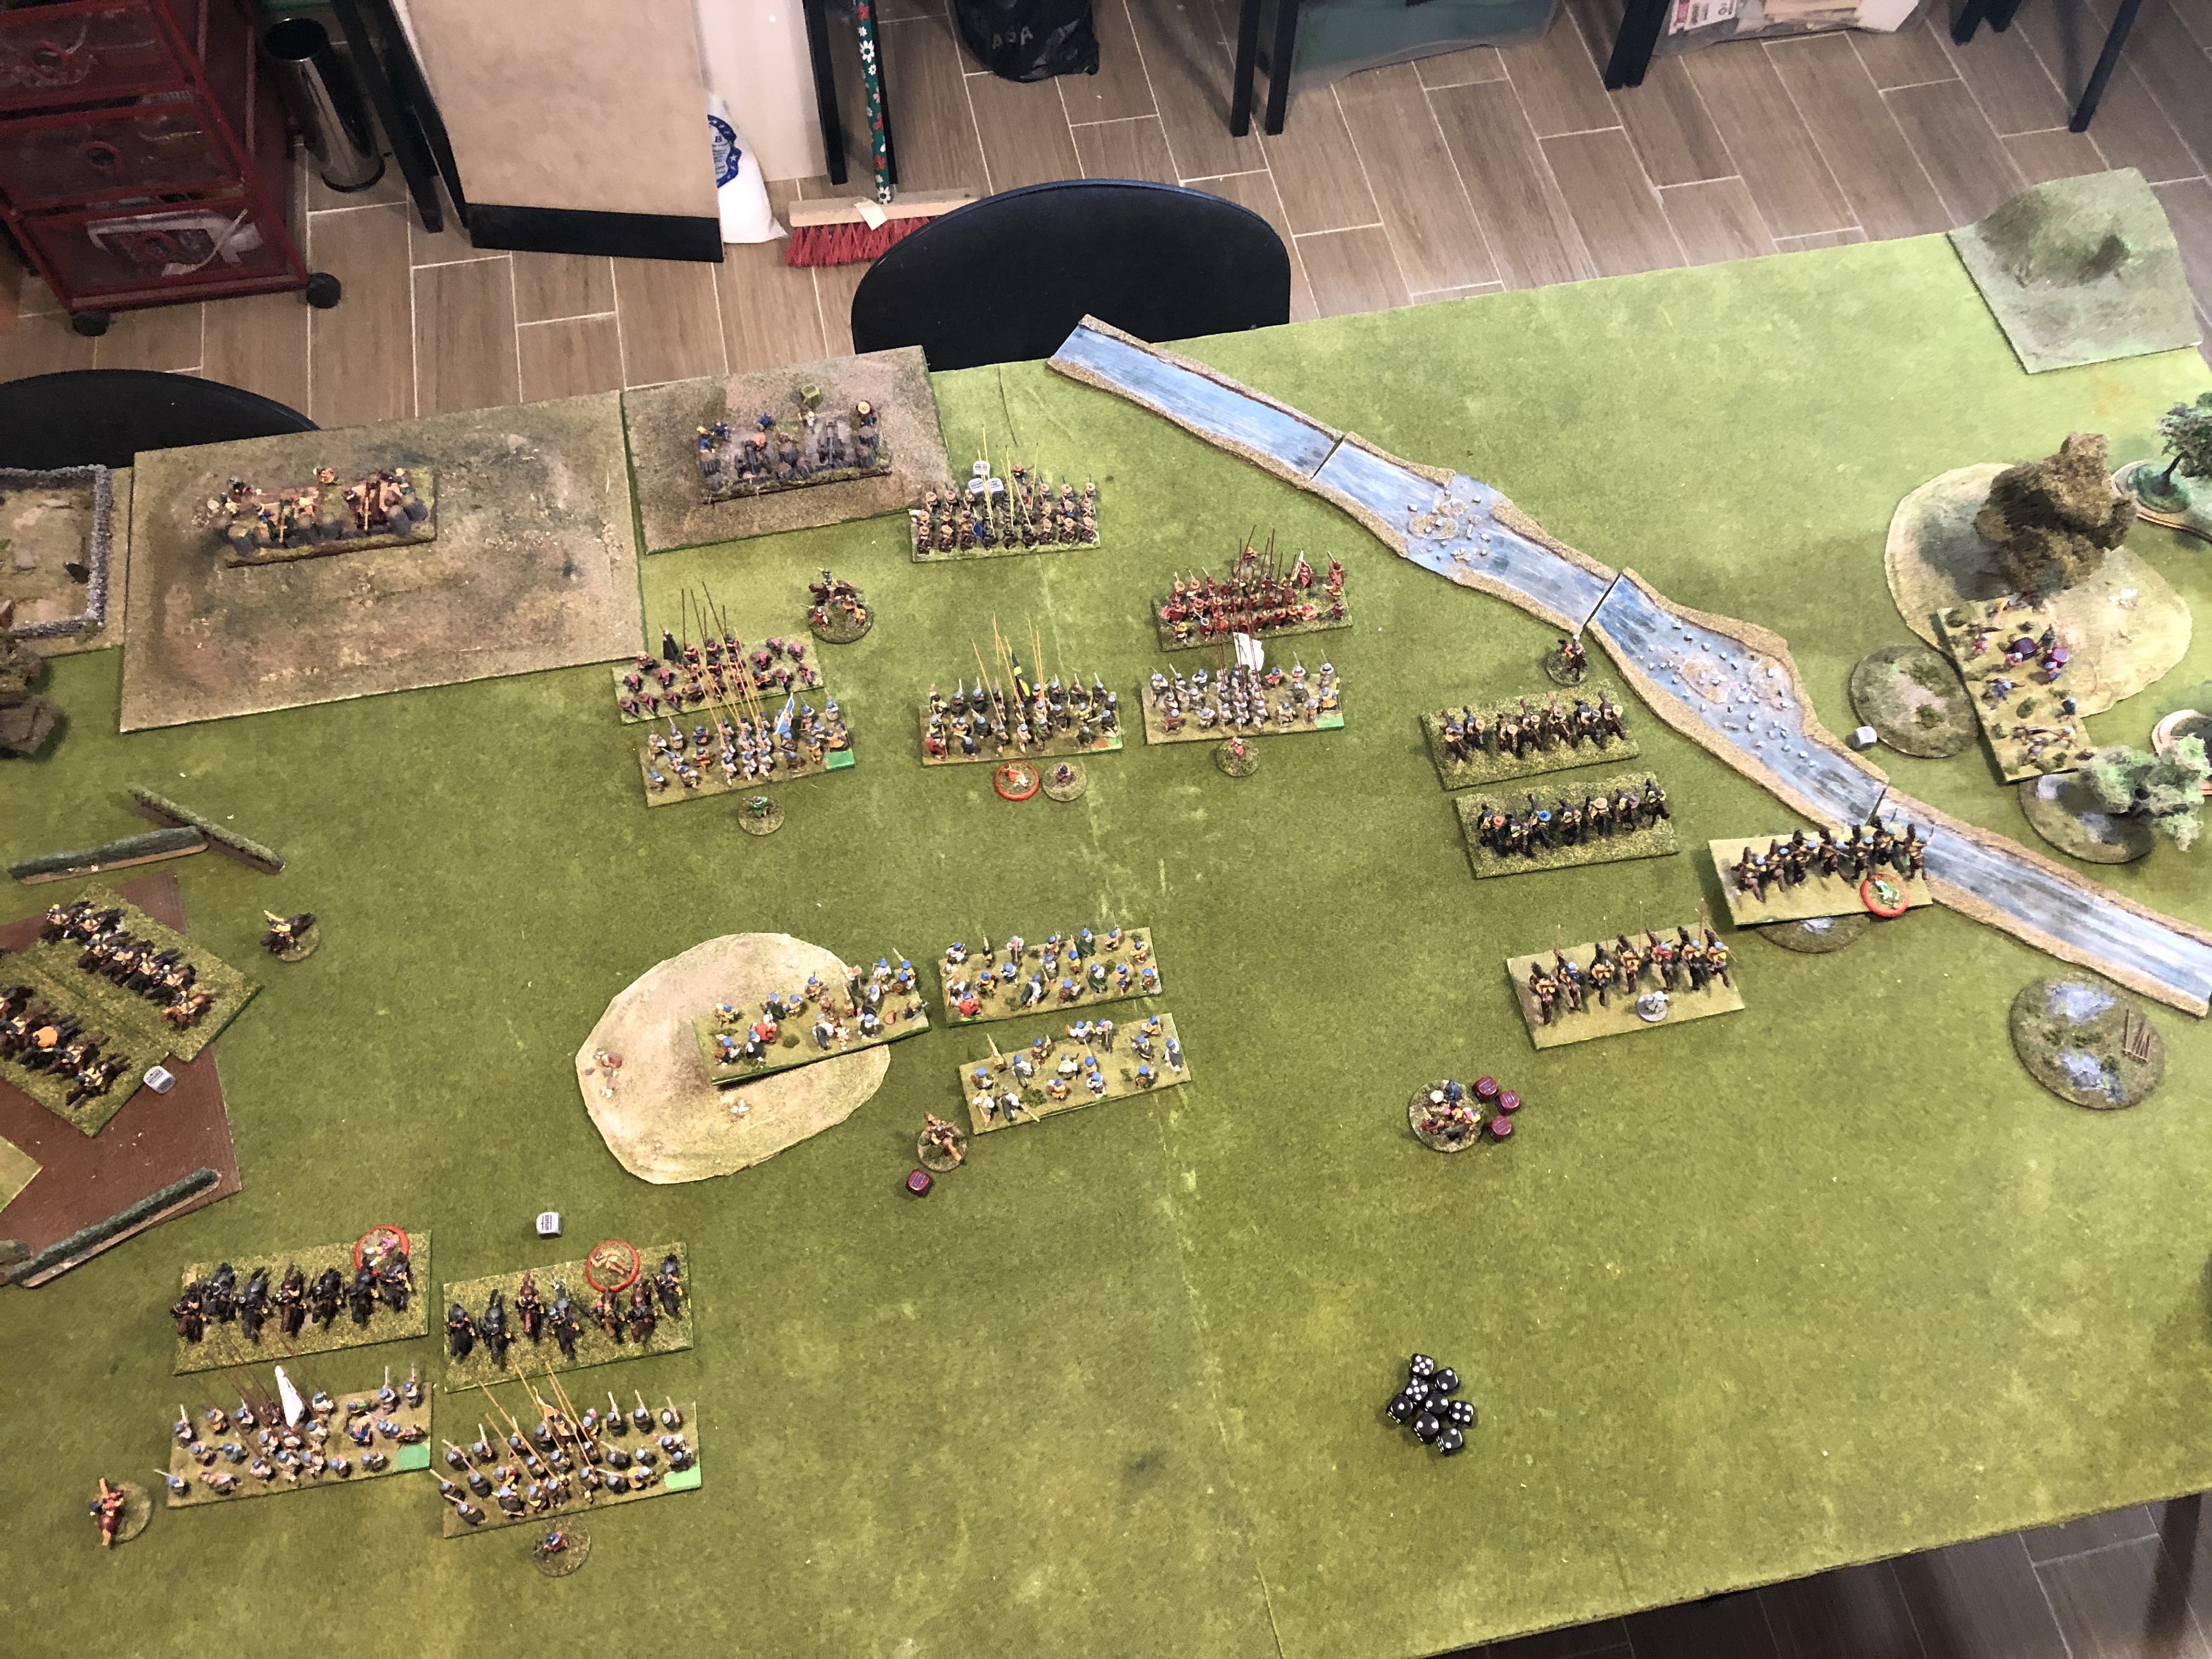
 A decimation in the centre
Well! The fighting in the center of the field was brutal. Both blocks of P&S tore into each other and five units were decimated and left the field. (I think I might need to review the number of dice per unit!).
On the Scottish Right, a Cavalry Melee is ongoing with little resolved. Unfortunately the Turn ended (2 black dice) before the Highlanders could get into the action.
On the Scottish left the Heavy Cavalry was surprisingly set back by some extraordinarily lucky dice throws by the Covenanters and have become “Shaken”, thus limiting their future orders to Rally after which if they pass their moral test, they will return to Steady status and can attack again.
The artillery is having no real effect, mainly I think do to the long distance they are shooting at. The positioning of artillery is obviously important as moving them once the battle starts is almost impossible.
As things stand, if the English can break the Scottish centre I think this will give them the day. The Scots meantime will have to hold the centre and get the Highlanders into action as soon as possible.
Turn 3
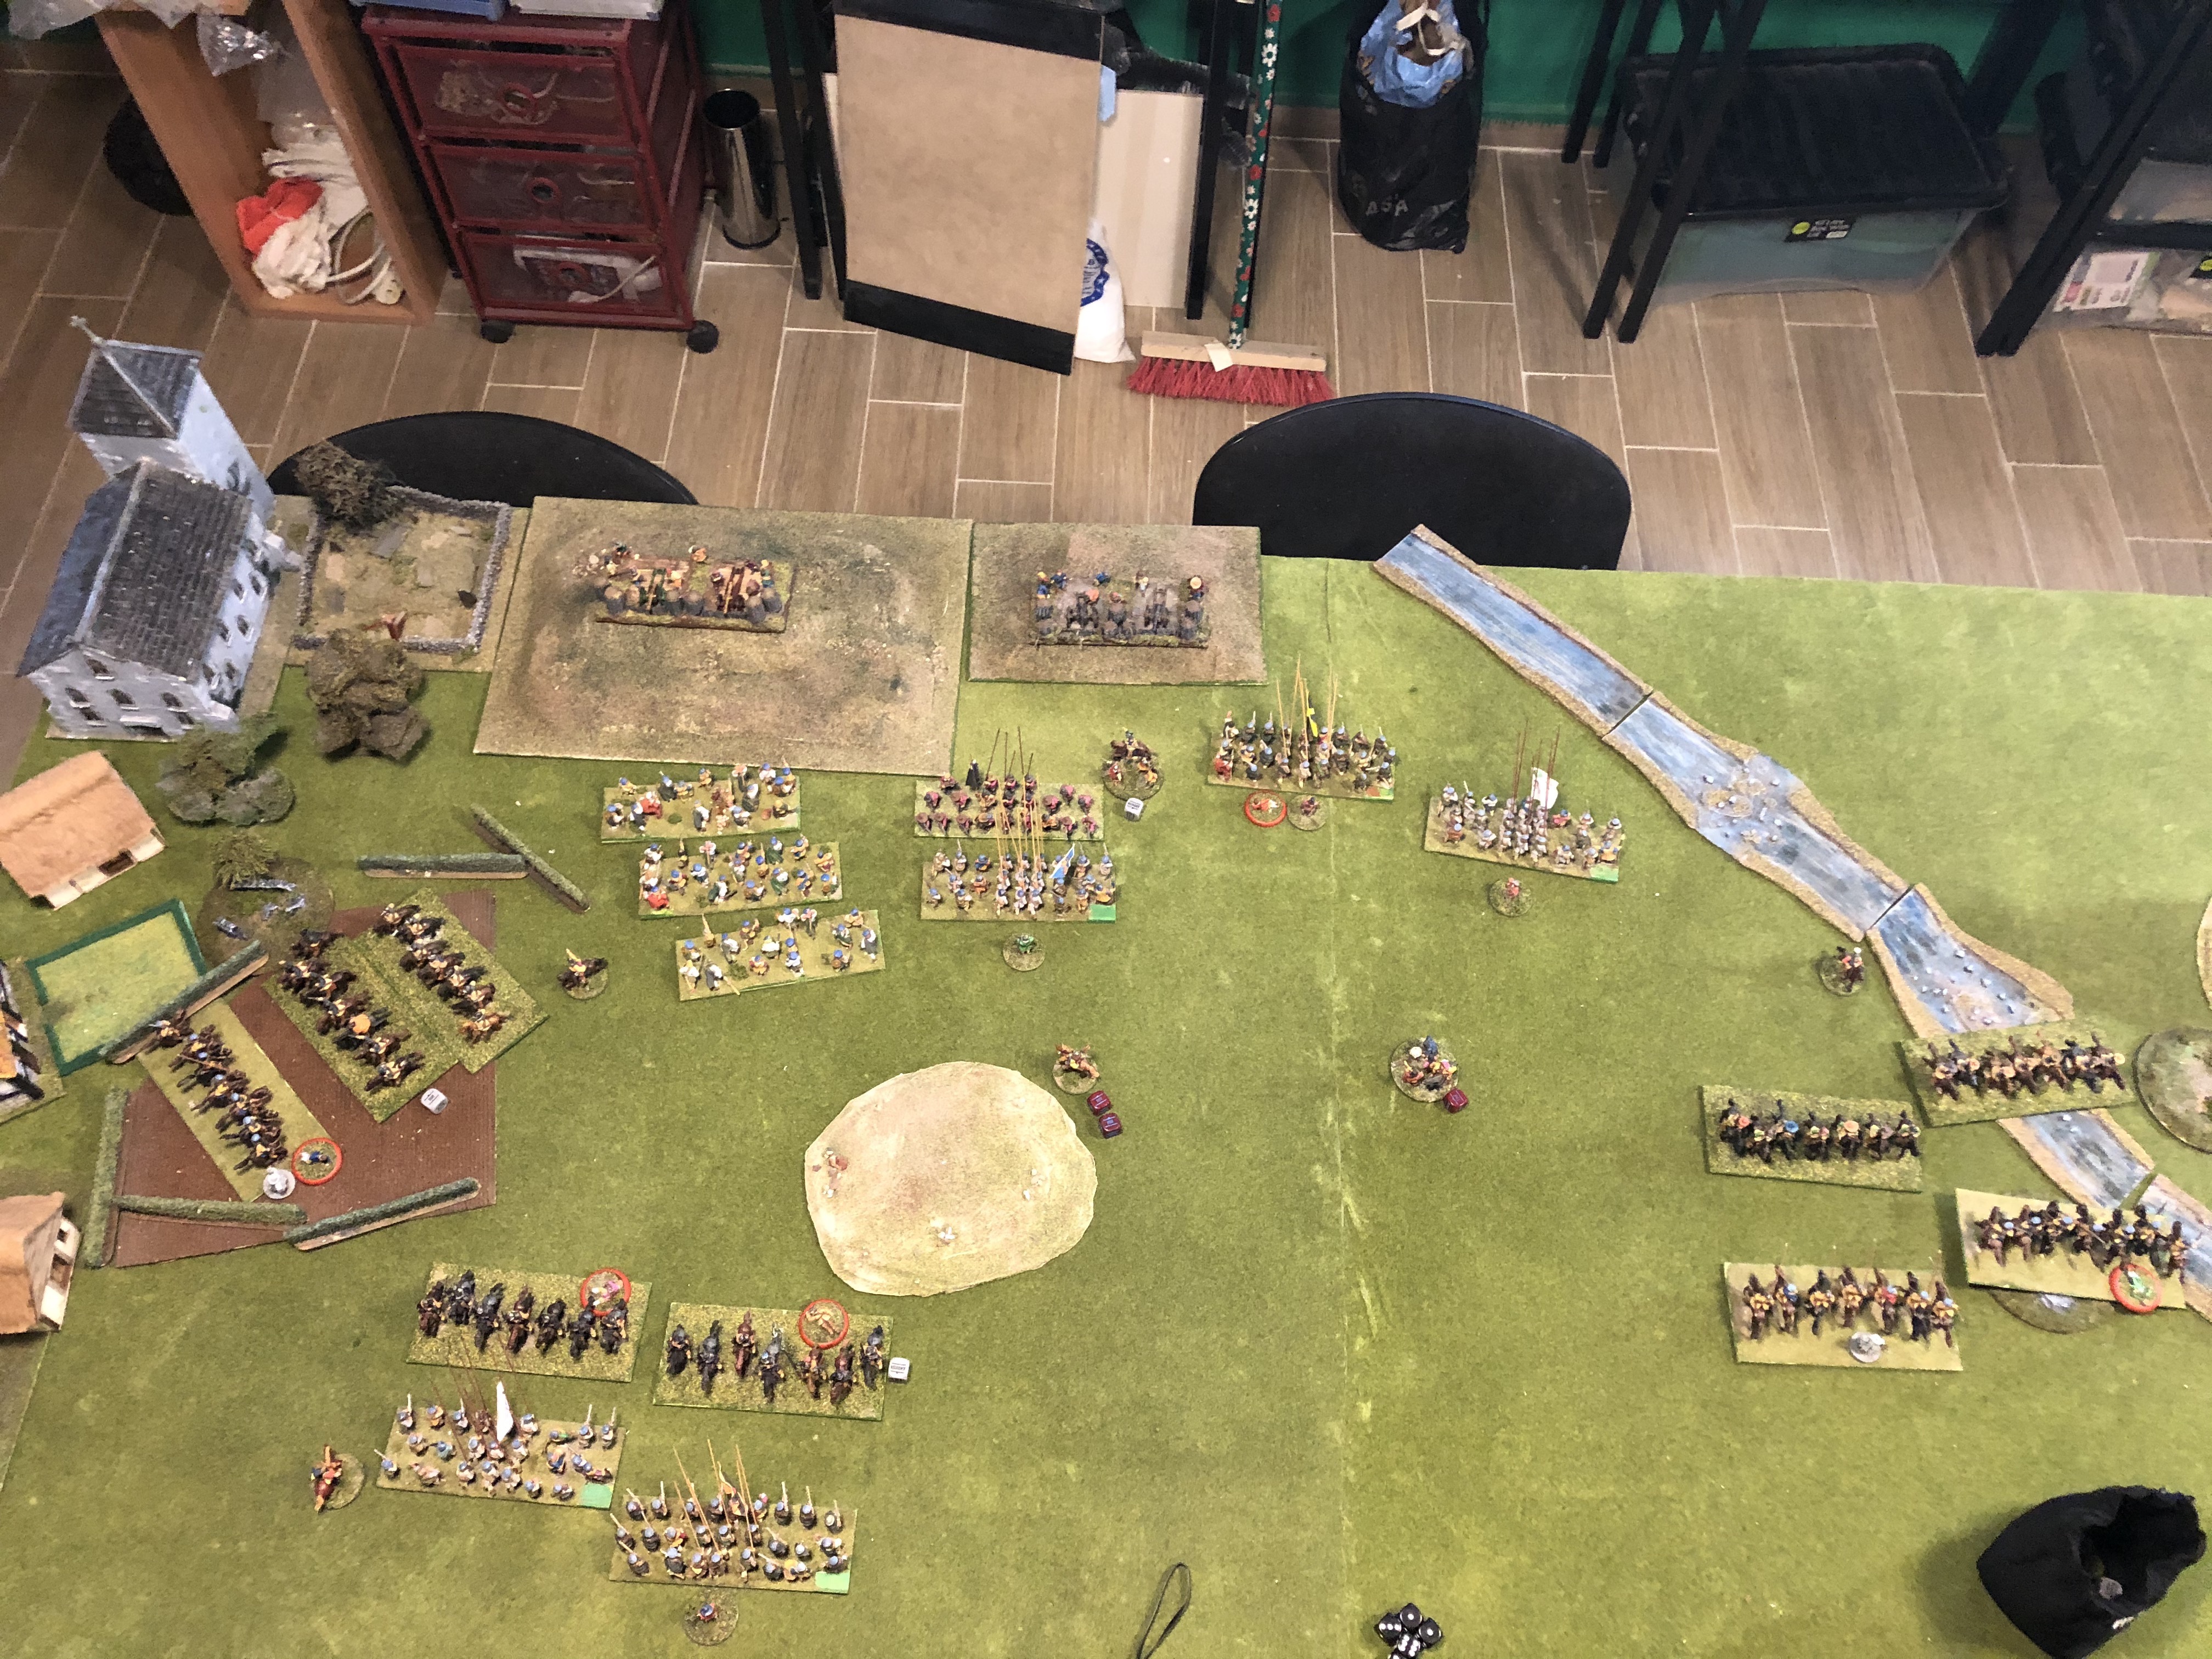
 Stagnation across the line
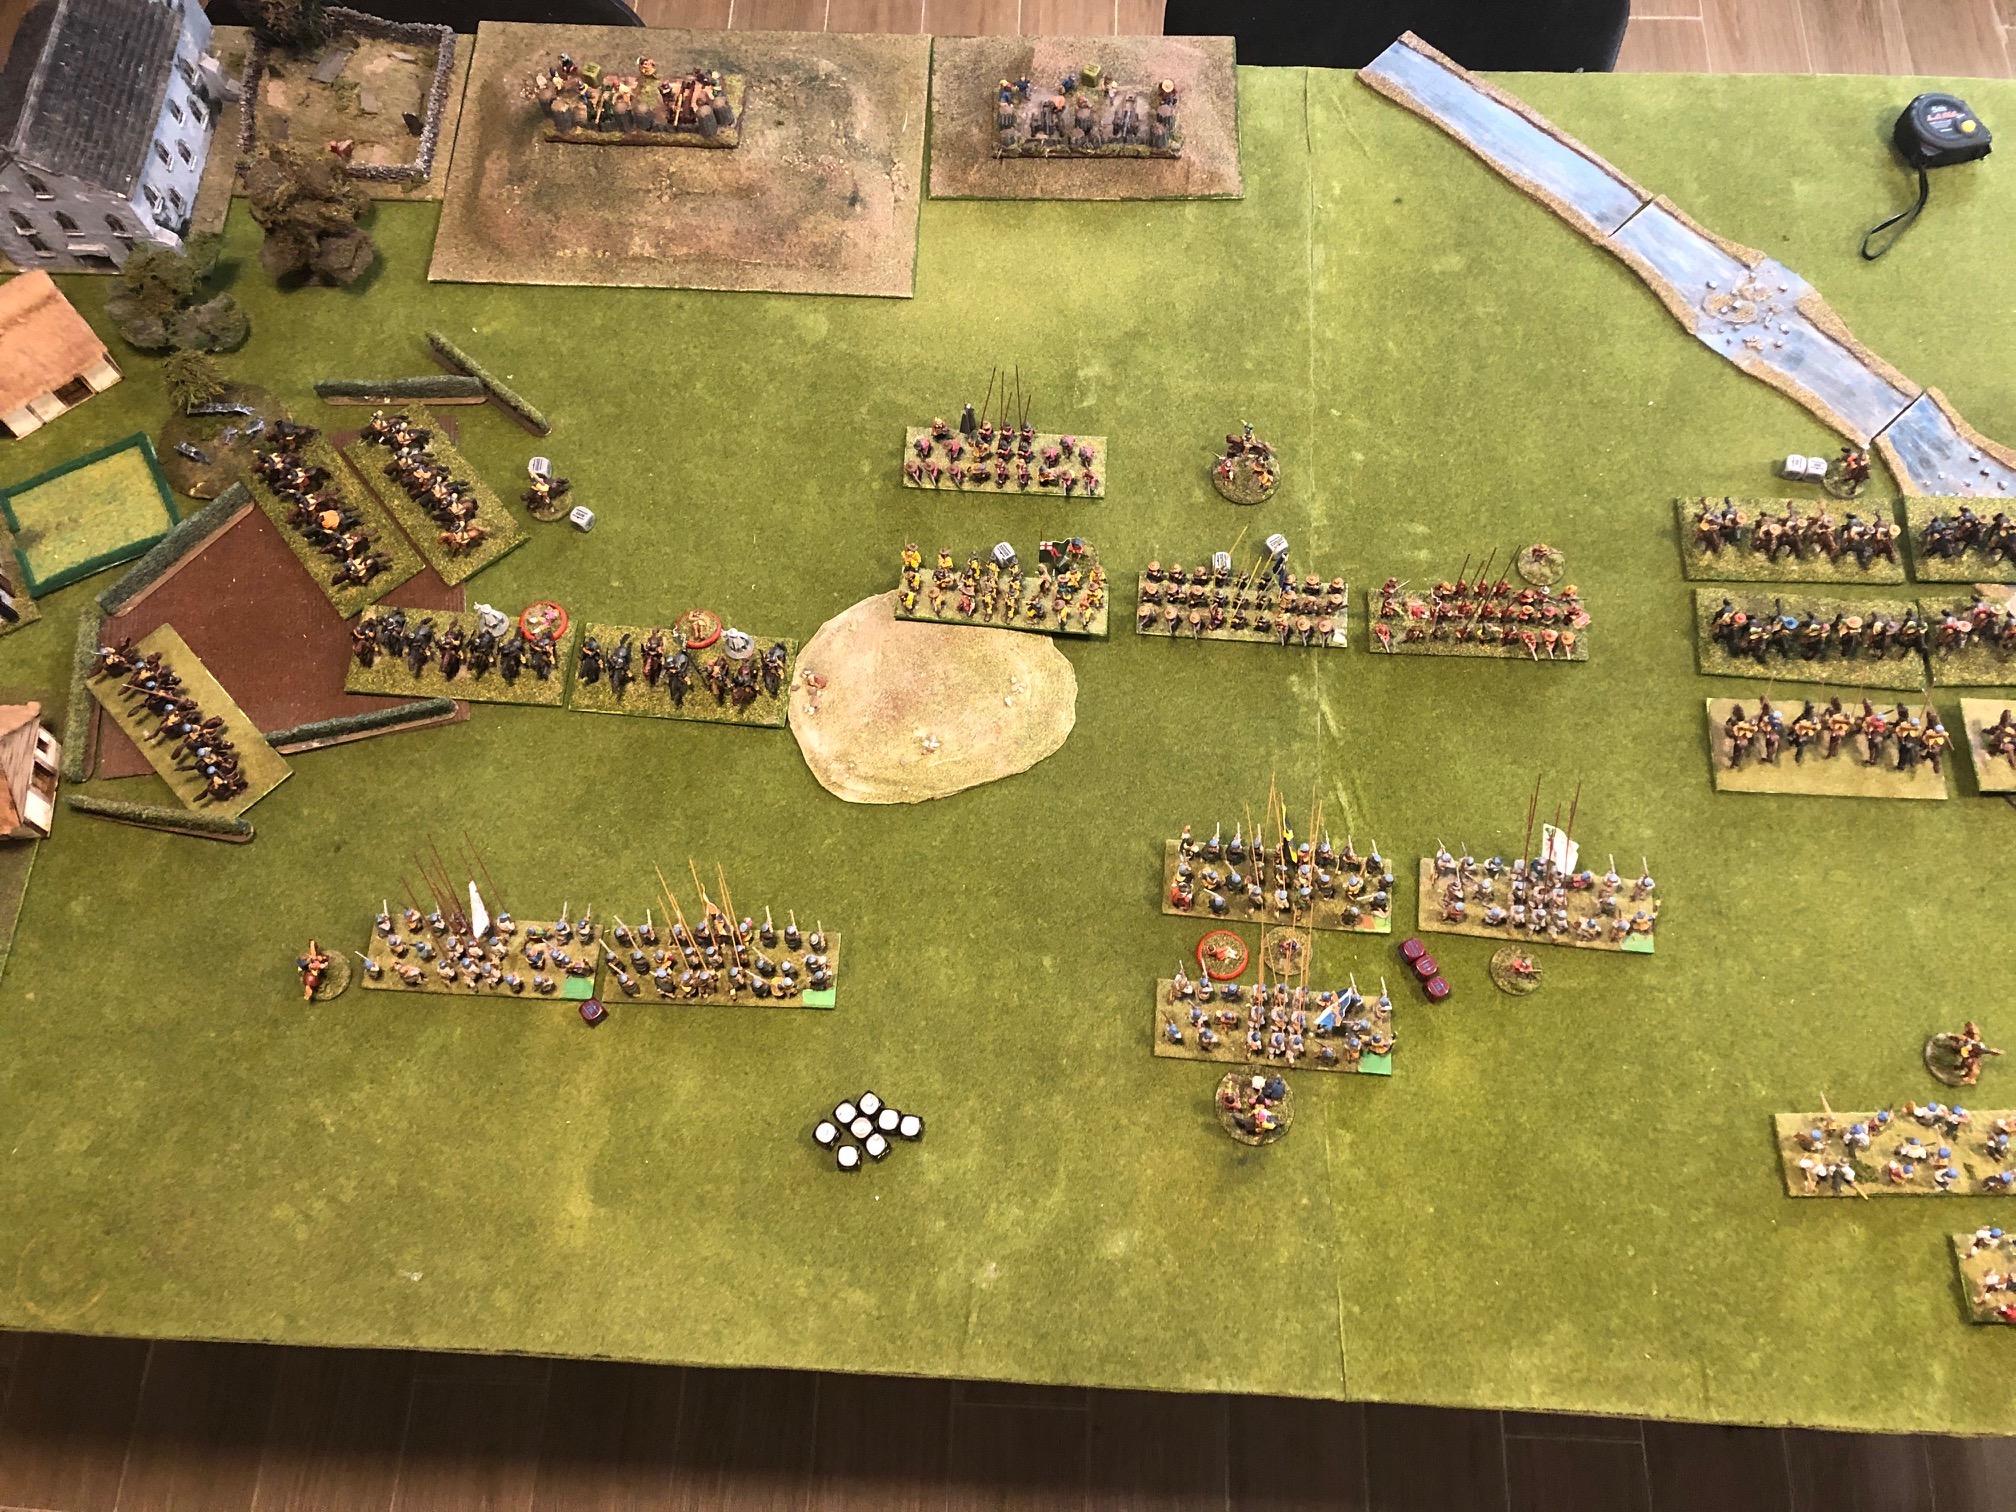
Things have become bogged down with only one decisive action, the routing if a P&S English regiment in the centre. There is now a large melee ongoing in the Centre and a cavalry melee on the English Left/Scottish Right.
The Highlanders appear to be running around aimlessly! Some poor decision making there by the officer in charge.
The English Heavy cavalry have recovered their composure and are about to charge down the Covenanter infantry regiments in the next round, while the lone Scottish cavalry is taking on the two English Trotters (i.e. pistol-armed troops) and the outcome of this little battle within the battle could well decide the entire Left wing.
Turn 4
 Deadlock continues
The melees continued across the line. The Artillery proved to be quite useless in these last two turns as they had no legitimate targets (own units too close to the potential targets) and so the placement of these is a useful experience.
There is a possible break in the middle of the English Foot line if the Covenanters can force their way through and with the highlanders coming up behind (finally).
Dice throws this turn were fairly uneventful with only one casualty marker success. Lots of good saving throws. (Another thing to revisit).
So, this turn was a bit of a non-event really!
Turn 5
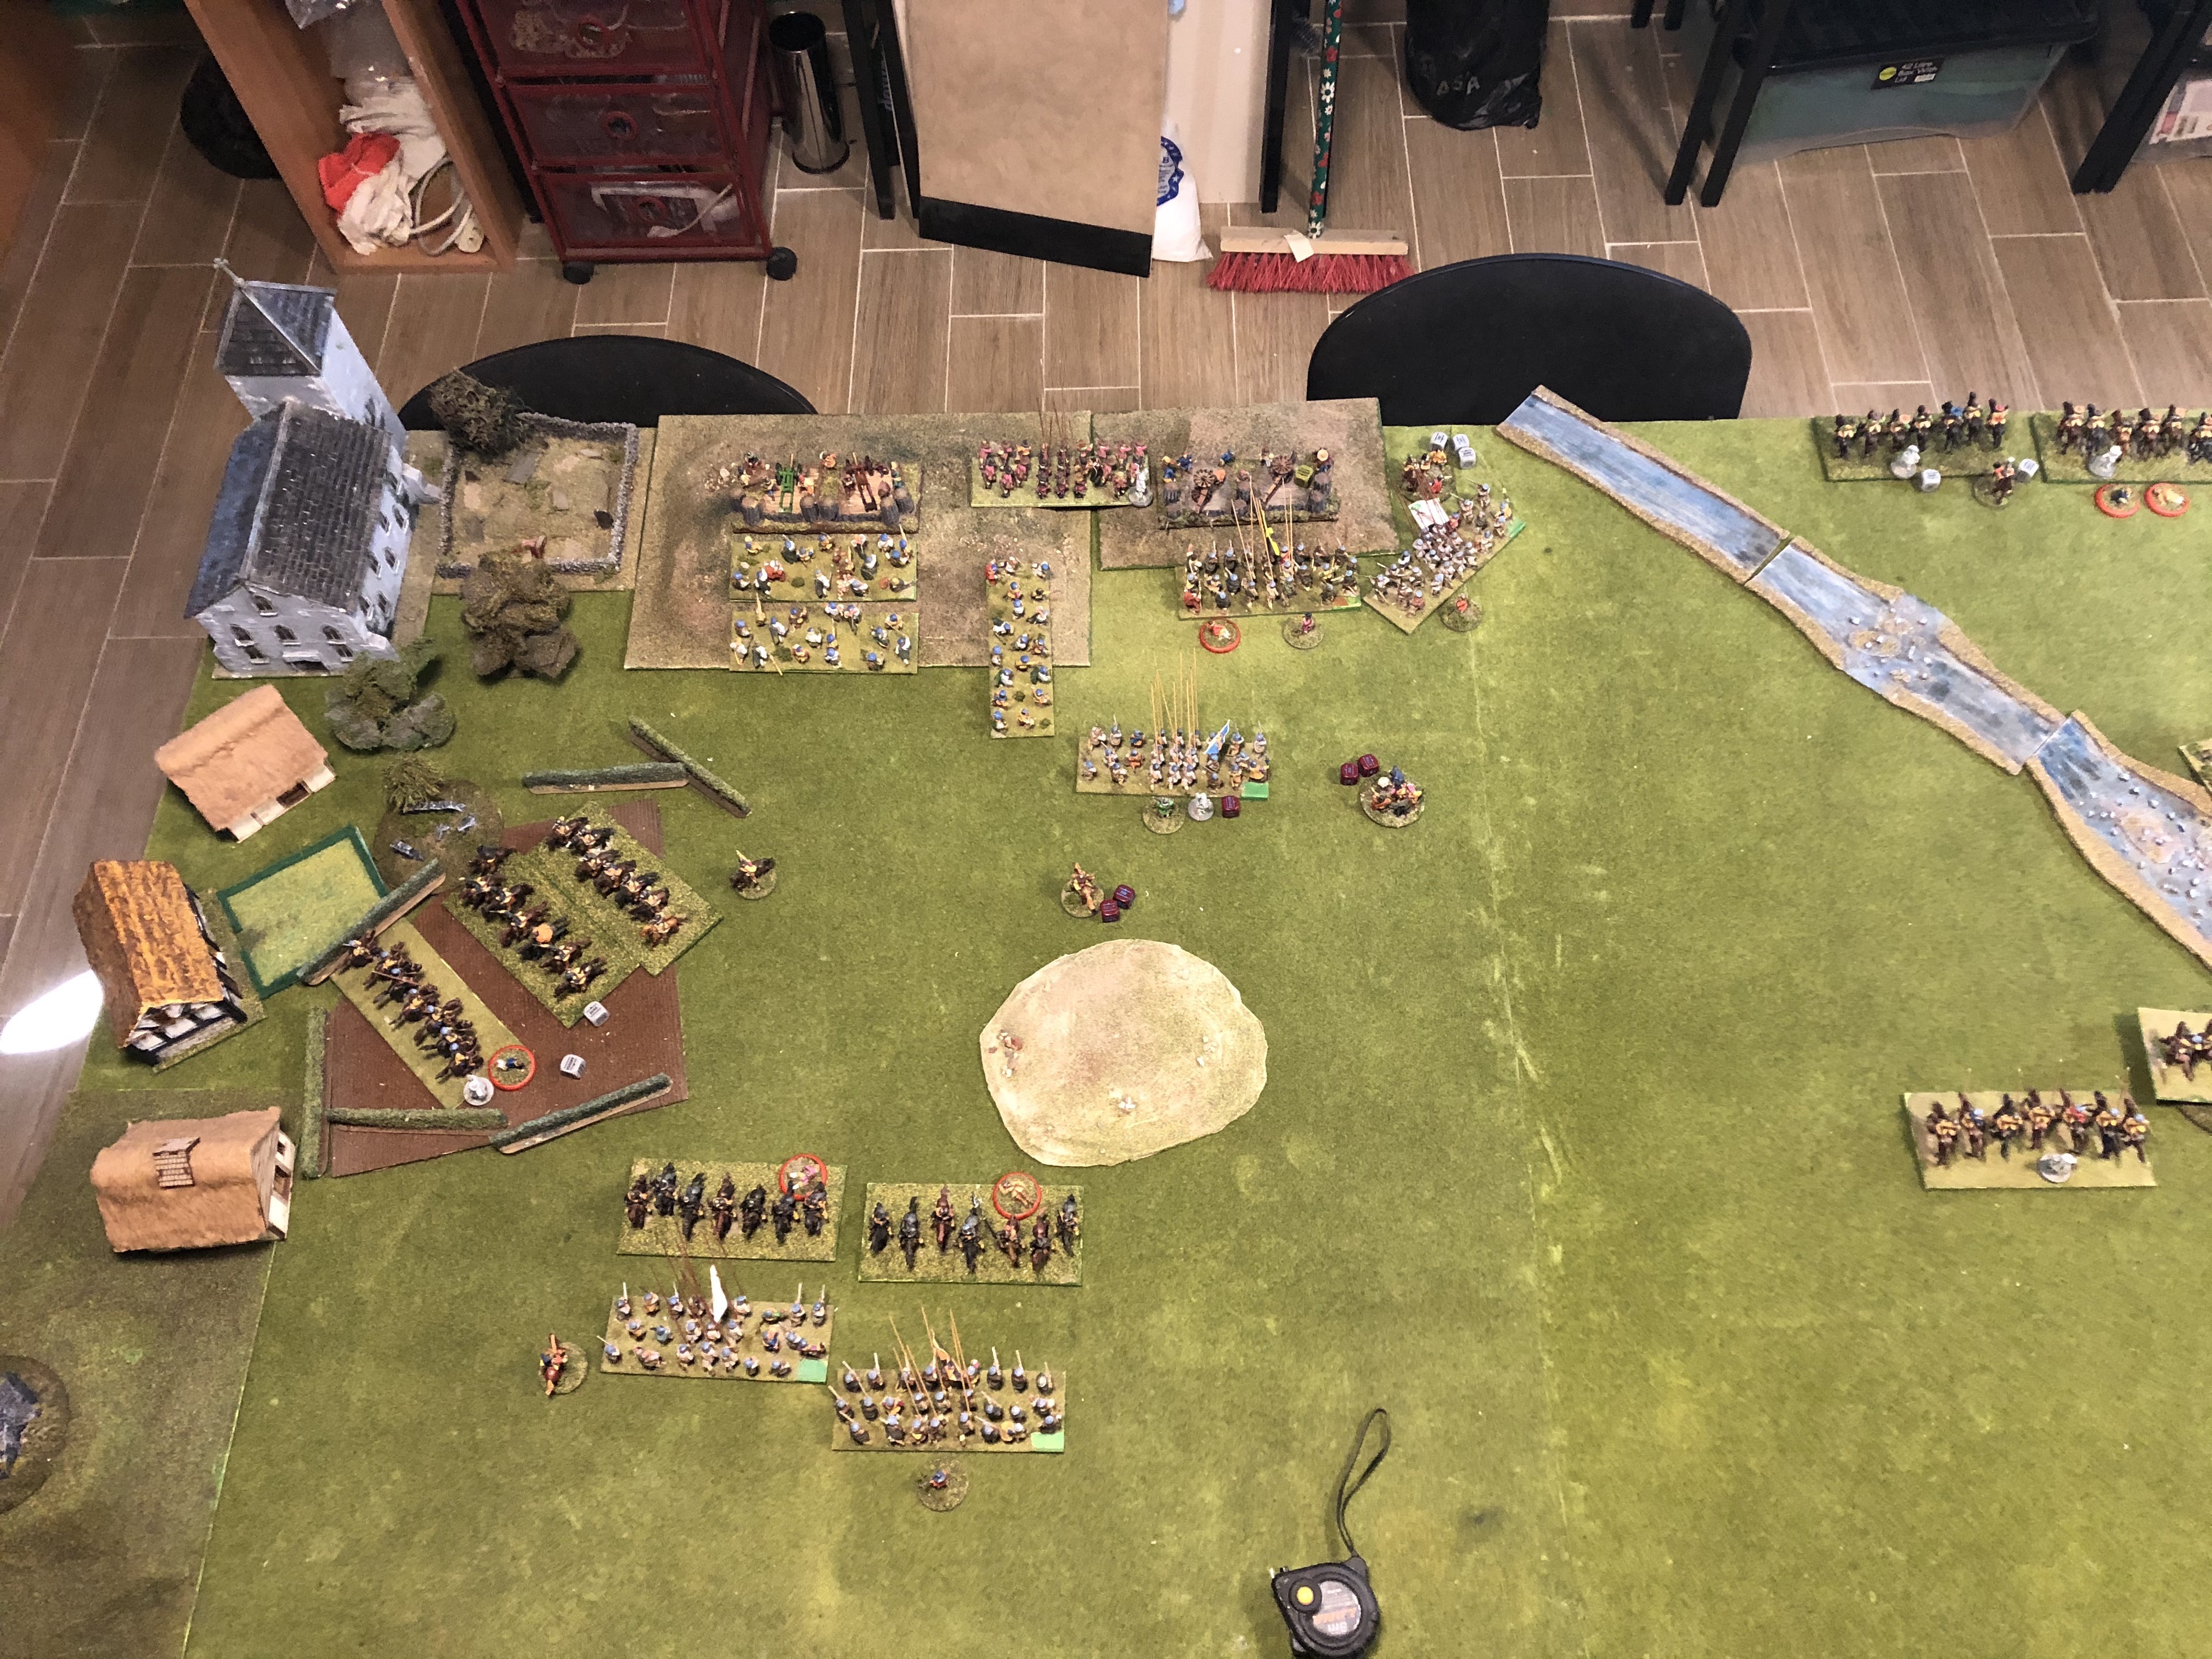
 Break through in the centre
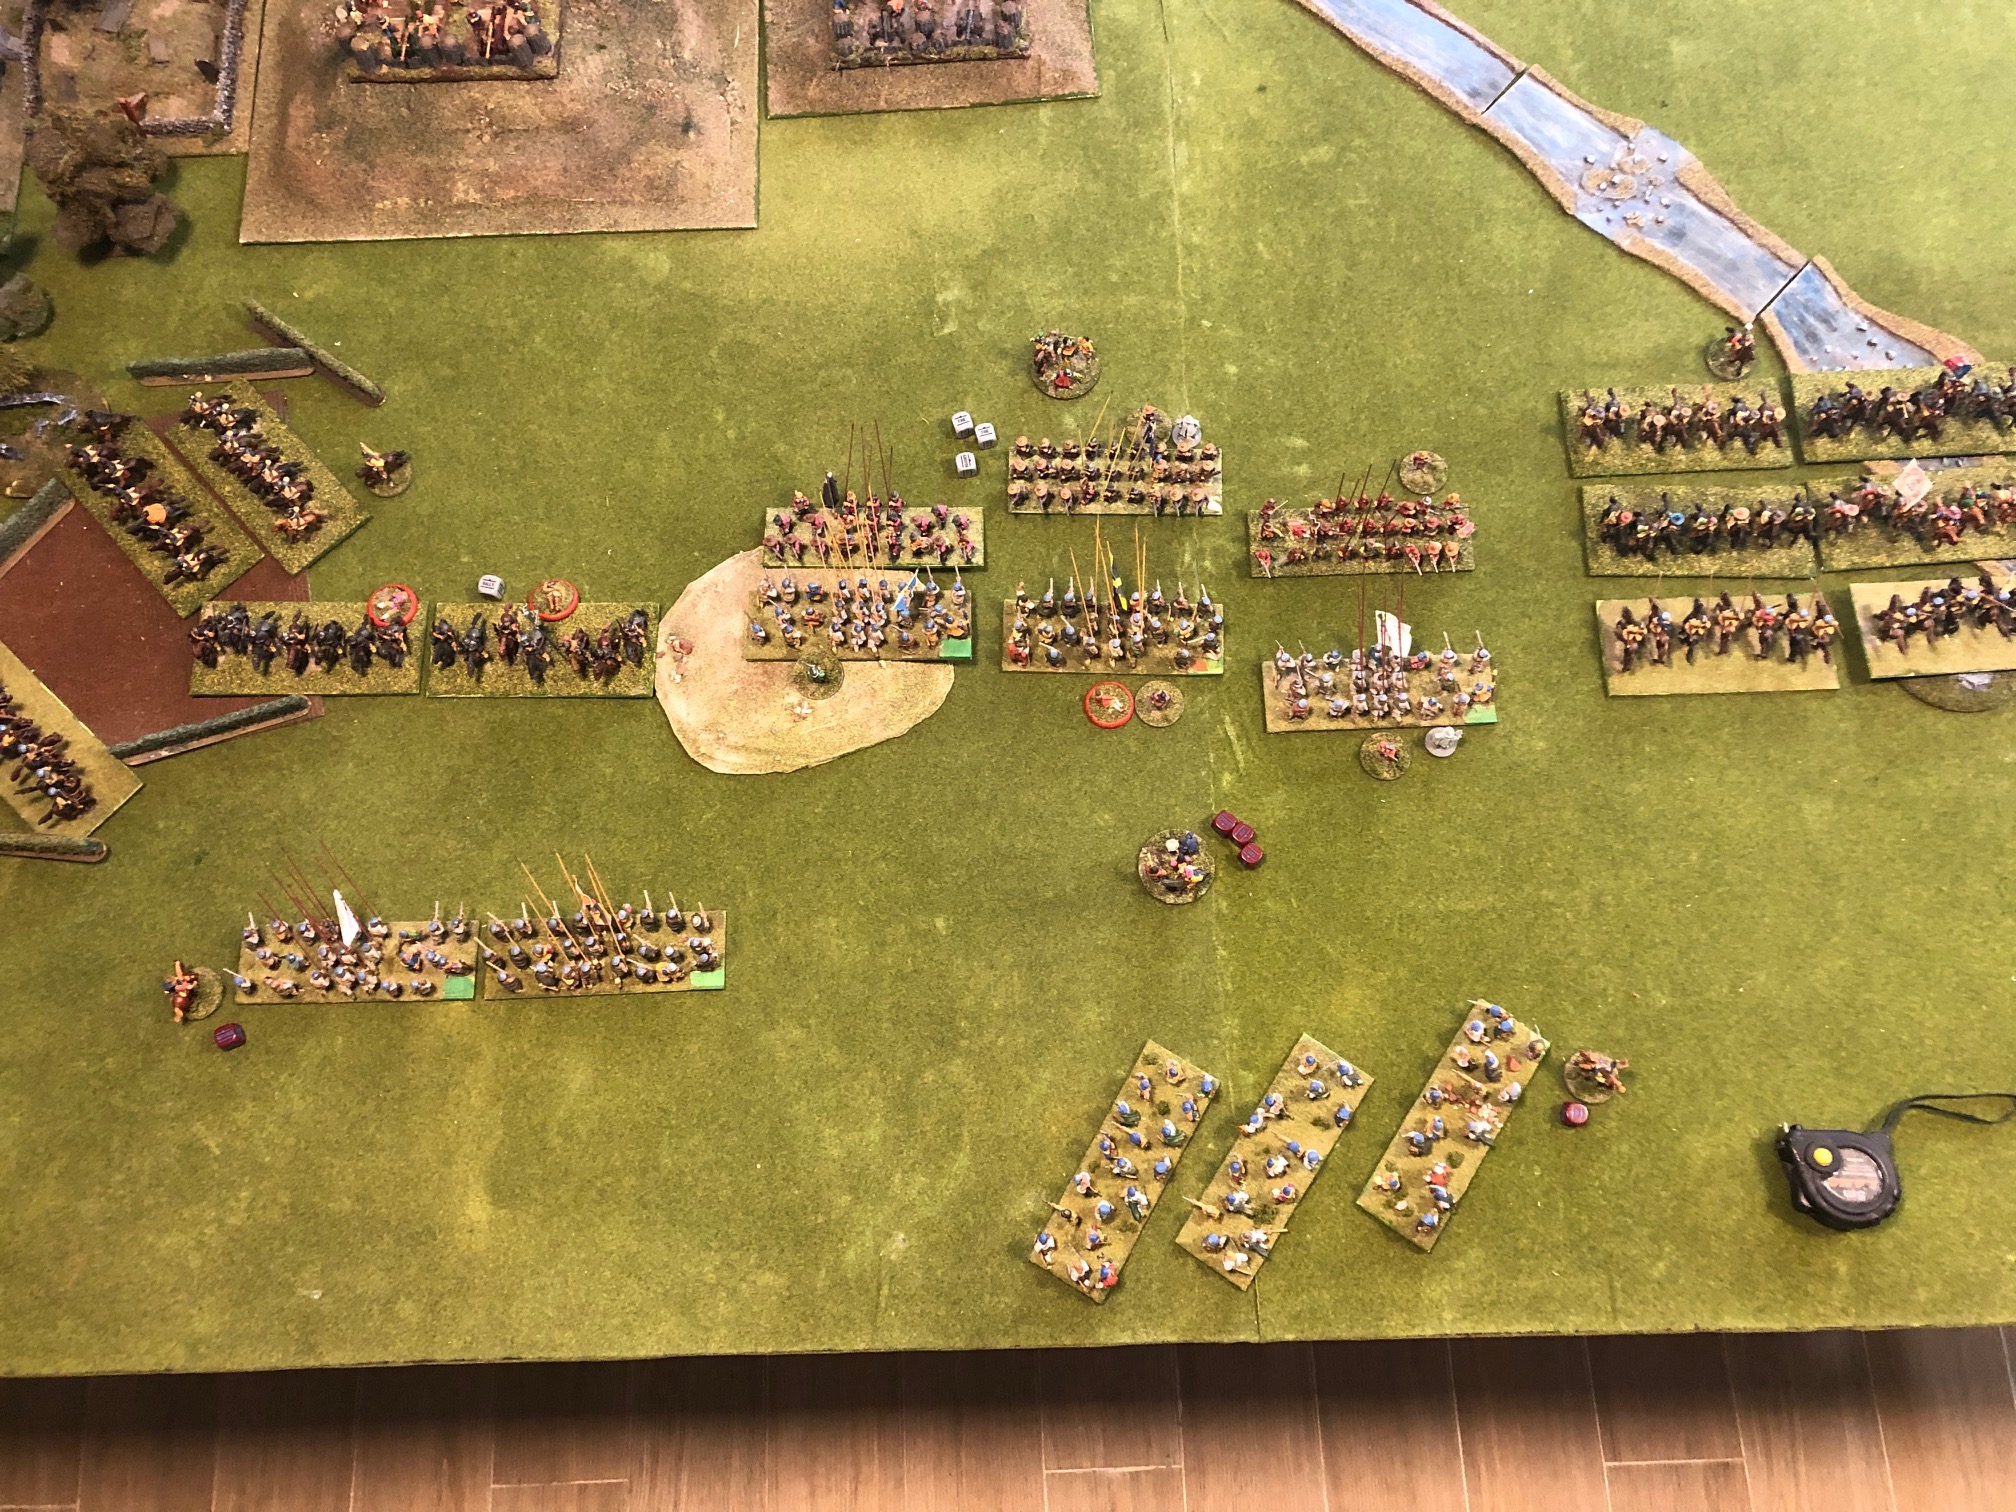
After two turns of indecisive dice rolls, this one was a massive change. The centre melee was decided (so far) in the Covenanter’s favour with two English foot units routing off the field and the Highlanders moving into position to mop up the stragglers. They can also swing round to take on the lighter cavalry should their moral hold up.
This did however, open up targets for the artillery, although their shots were off target and caused no problems to anyone.
On the Scottish right the small field guns were able to negotiate themselves onto the flank of the English light cavalry and a succession of good throws decimated two of the squadrons. The next turn could still go either way, but the advantage now appears to be with the Scots.
On the other wing things remain unclear, although the English should have some advantage with their Heavy cavalry about to run down the Scottish P&S units, and their Trotters in good position to beat the Scottish force.
Turn 6
 The decisive breakthrough
The turn ended after only six orders with the second Black die being taken. But those six orders were significant.
In the centre the Covenanters were lucky to get two dice in succession and were able to charge down the routing English regiments and drive them from the field. This ensured that the victory conditions were within touching distance for the Scots as the 7th (i.e. 50%) of the English army was off the field. Heading into the final turn the English needed to hang on to win and the Scots needed only one more victory.
With the quick end to the turn, everything now rests on the dice!
Turn 7 (Final)
 The English have gone back home to think again
The counter attack on the English Right came to nothing as the Heavy cavalry were unable to bring in their charge against the standing Pikes of the two Covenant regiments. The other Cavalry melee was fought to a stand still.
MEANWHILE in the center the Scots pushed through and sent another regiment of foot fleeing and the Highlanders charged to the guns in glorious wild style and captured them.
On the Scottish Left the two remaining cavalry units were driven back and decimated with the light guns and routed off the field.
In all of the initial 14 English units (plus 2 artillery) only four remained on the field of battle by the finish.
But the actual result was not important, this run through has given me much to think about, and in principle I think some adaptation of the command dice (being less than the total number of units) has some merit as you have to really think about which are the critical decisions. This is compounded by the use of “End Turn dice” which means nothing is certain.
The moral system needs tweaking and the use of saving throws also might reduce the immediate routing of units. So, lots to contemplate, but a fun few hours.
Now for the pizza and a beer!


