


Oriskany’s Final Days of the Great War – Australians + British tanks vs. Germans at Hamel


Recommendations: 238
About the Project
As some of you may know, the 100th Anniversary of the last days of the Great War are now upon us.
Digging around through some research, I found that the 36th Ulster Rifles were deeply involved in some of the very last battles (having been reformed after grievous losses in the 1916 Battles of Flanders and 1917 Passchendaele, the 1918 helping absorb the shock of the German "Georgette" Kaiserschlacht Offensive).
These include the Battle of Courtrai, during the follow-though of Second Army's push through the Fifth Battle of Ypres, and the first British and Belgian Army advances back into Belgium right before the Armistice.
So, to build on the work done earlier this year in the development of the "1918 Edition" of Barry Doyle's "Valor & Victory" squad-based infantry combat system, I decided to build up some units for the Royal Irish Rifles, Royal Irish Fusiliers, and Royal Inniskilling Fusiliers, battalions of which made up the final OOB of the 36th Ulster Division during these closing days of World War I.
The project outlines some of the work done to create these units in Valor & Victory and get them on the game board, and you might recognize some of the officers leading these platoons into combat!
Related Genre: Historical
This Project is Active
Australians vs. Germans at Hamel, 1918 (Part 06)
We come at last, folks to the end of this epic game of Valor & Victory – where we’ve tested not only our 1918 Australians, but also back-dating the V&V tank and AFV rules back into our 1918 edition, and trying out our new “Monash Doctrine” special rules specially for the Battle of Hamel and subsequent BEF offensives leading into the Hundred Days (August-November 1918).
So far we’ve seen Australian infantry advances through barbed wire and gaps in German minefields, hit-or-miss close artillery support from off-board batteries, hit-or-miss direct fire support from four Mark V “male” and four Mark V “female” tanks, and finally the first Australian assaults directly into the German primary trench. Some of those assaults were bloody failures, but others were successes, along with some tank overruns, finally cracking the German trench line. Not all the tanks made it through, some hit by German infantry counter-assaults, others hung up on the trench until they were abandoned by their crews under persistent German mortar fire.
But by the end of Turn 4, the primary trench line was secured, and by Turn 6 a wild run-and-gun fire fight through the German communication trenches eventually secured the second German trench line and even took the first objective building in the town outskirts beyond. But that left only two turns left for the Australians to take at least eight of the sixteen building hexes in the town behind the German trench system.
By now with only two operational tanks left, the British actually did some great damage in the south, eliminating several German fire teams and LMG (MG 08 15) teams, enabling swift Australian assault and occupation of key building hexes. Things in the north were a little more stalled . . .
But now we’re in the home stretch, with just one and a half turns to go, to see if the Australians can put one more big crack in the German positions in this town, and claw out a hard-won and bloody-knuckled victory here in our commemorative Battle of Hamel game.
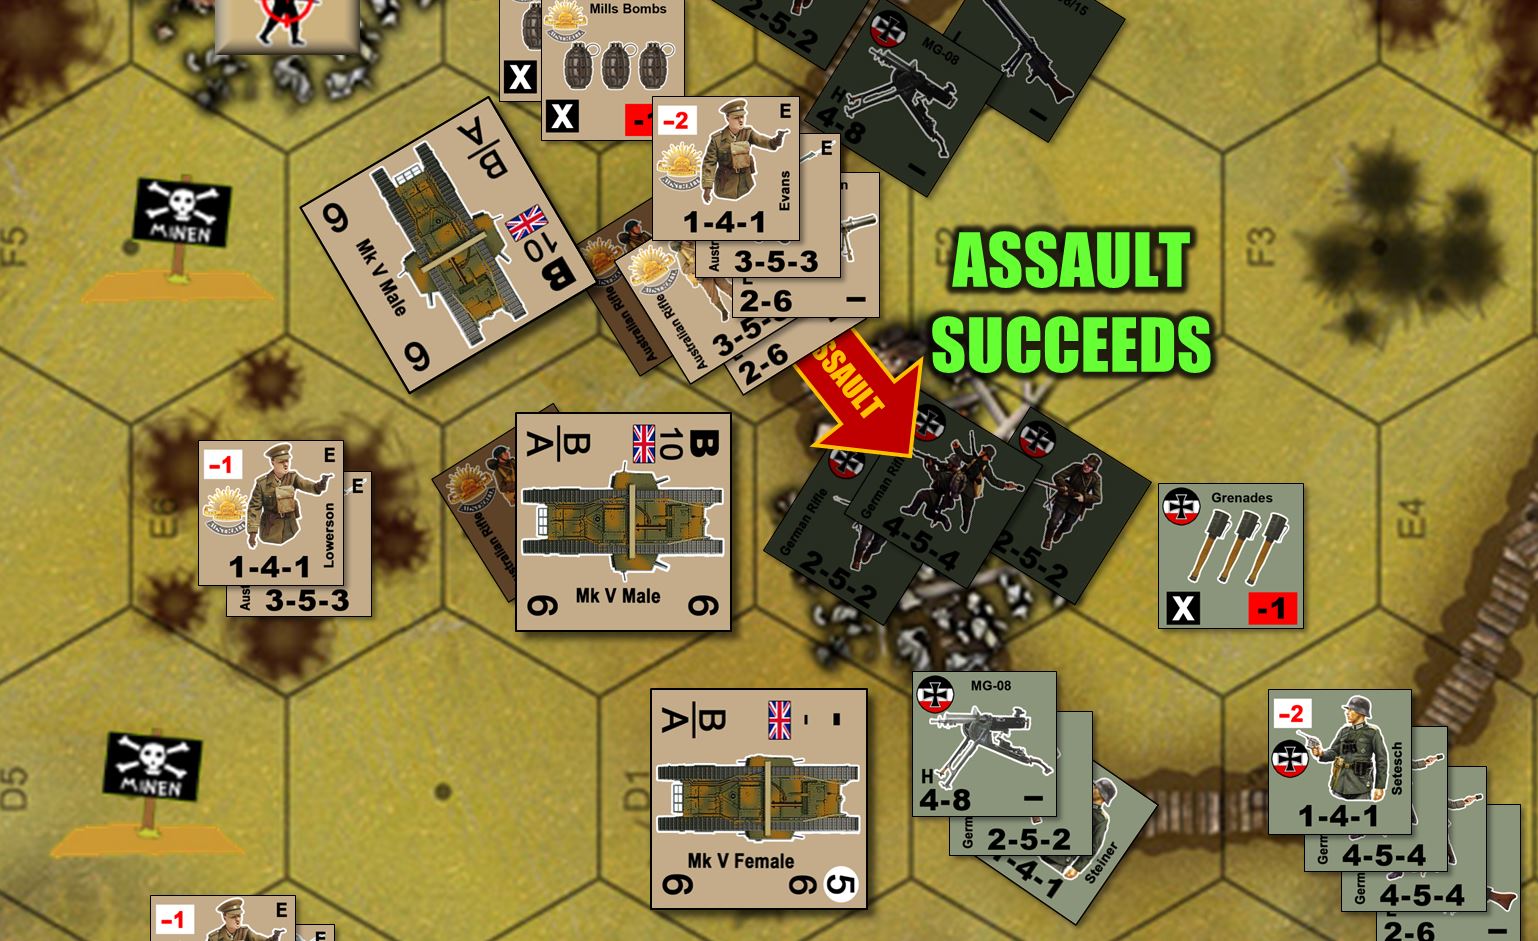
Turn 7:
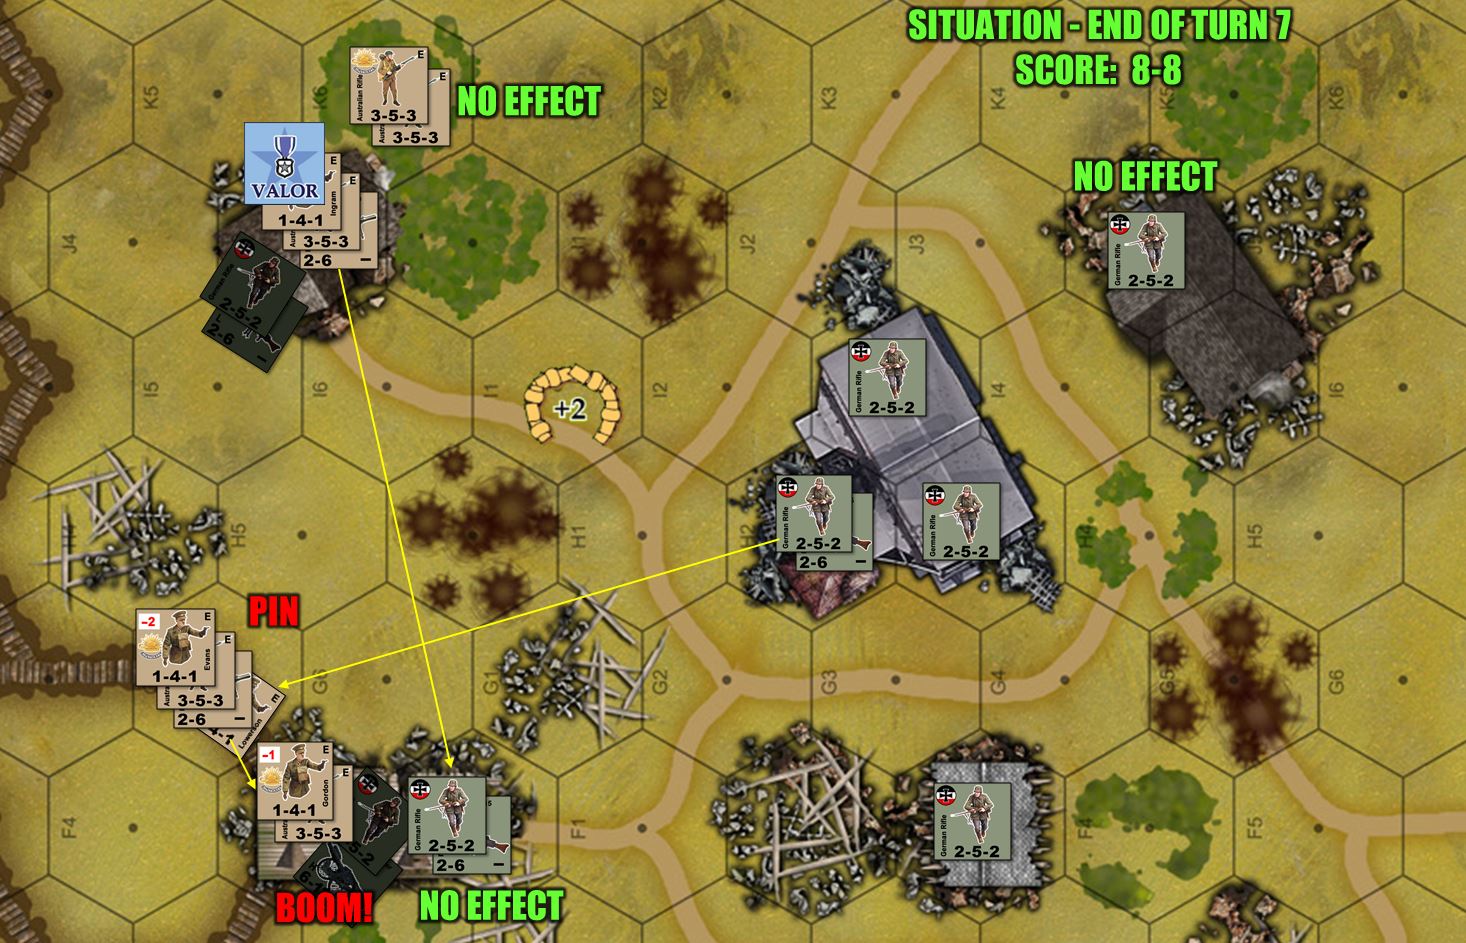
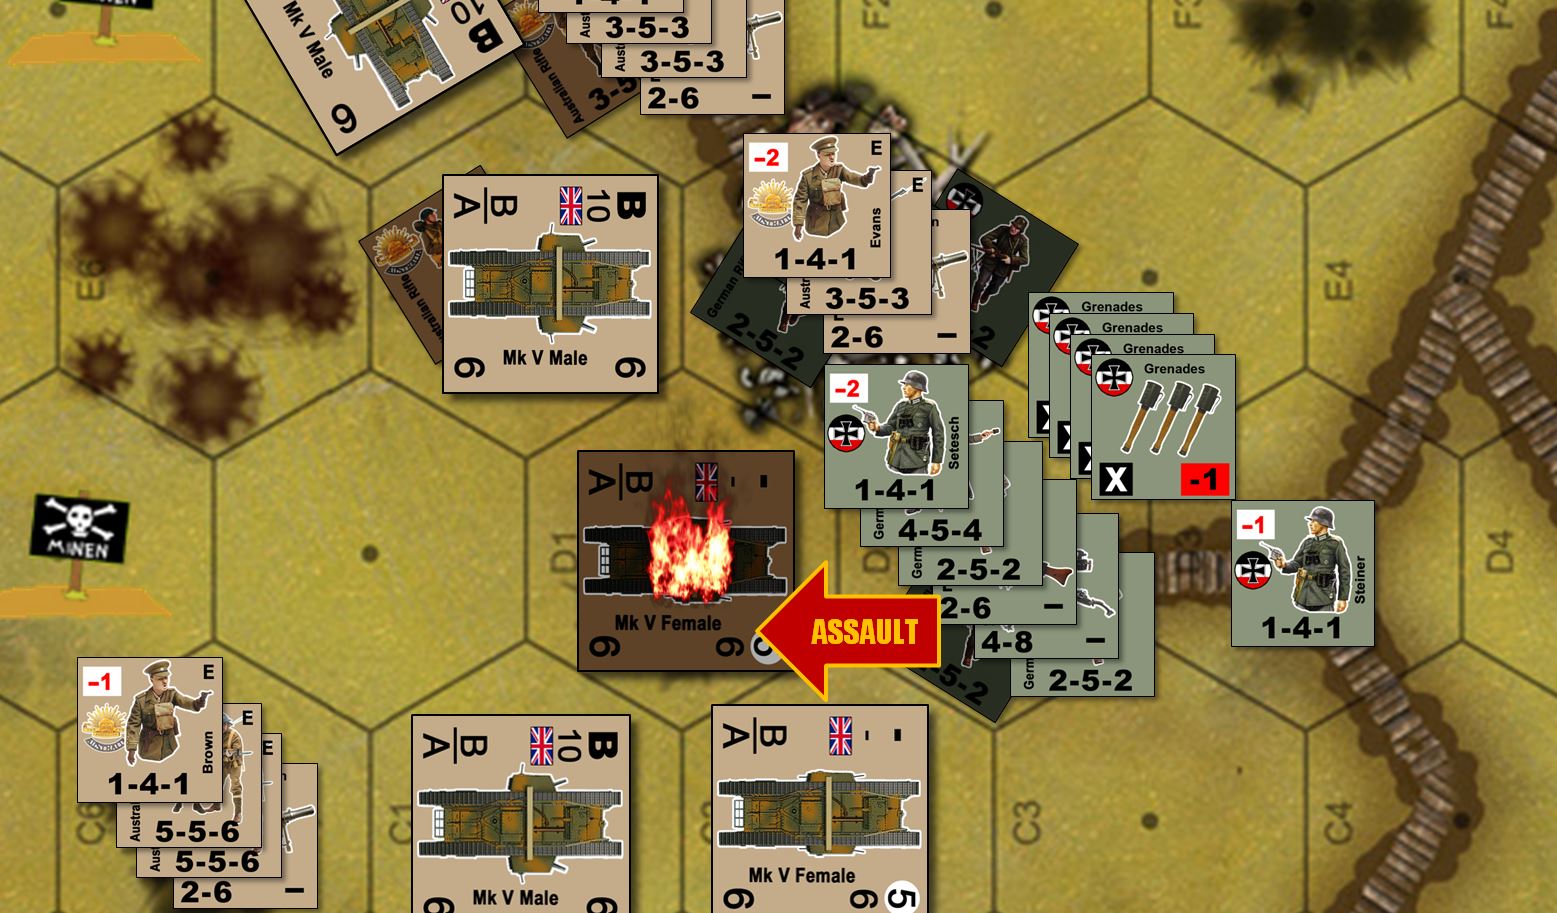
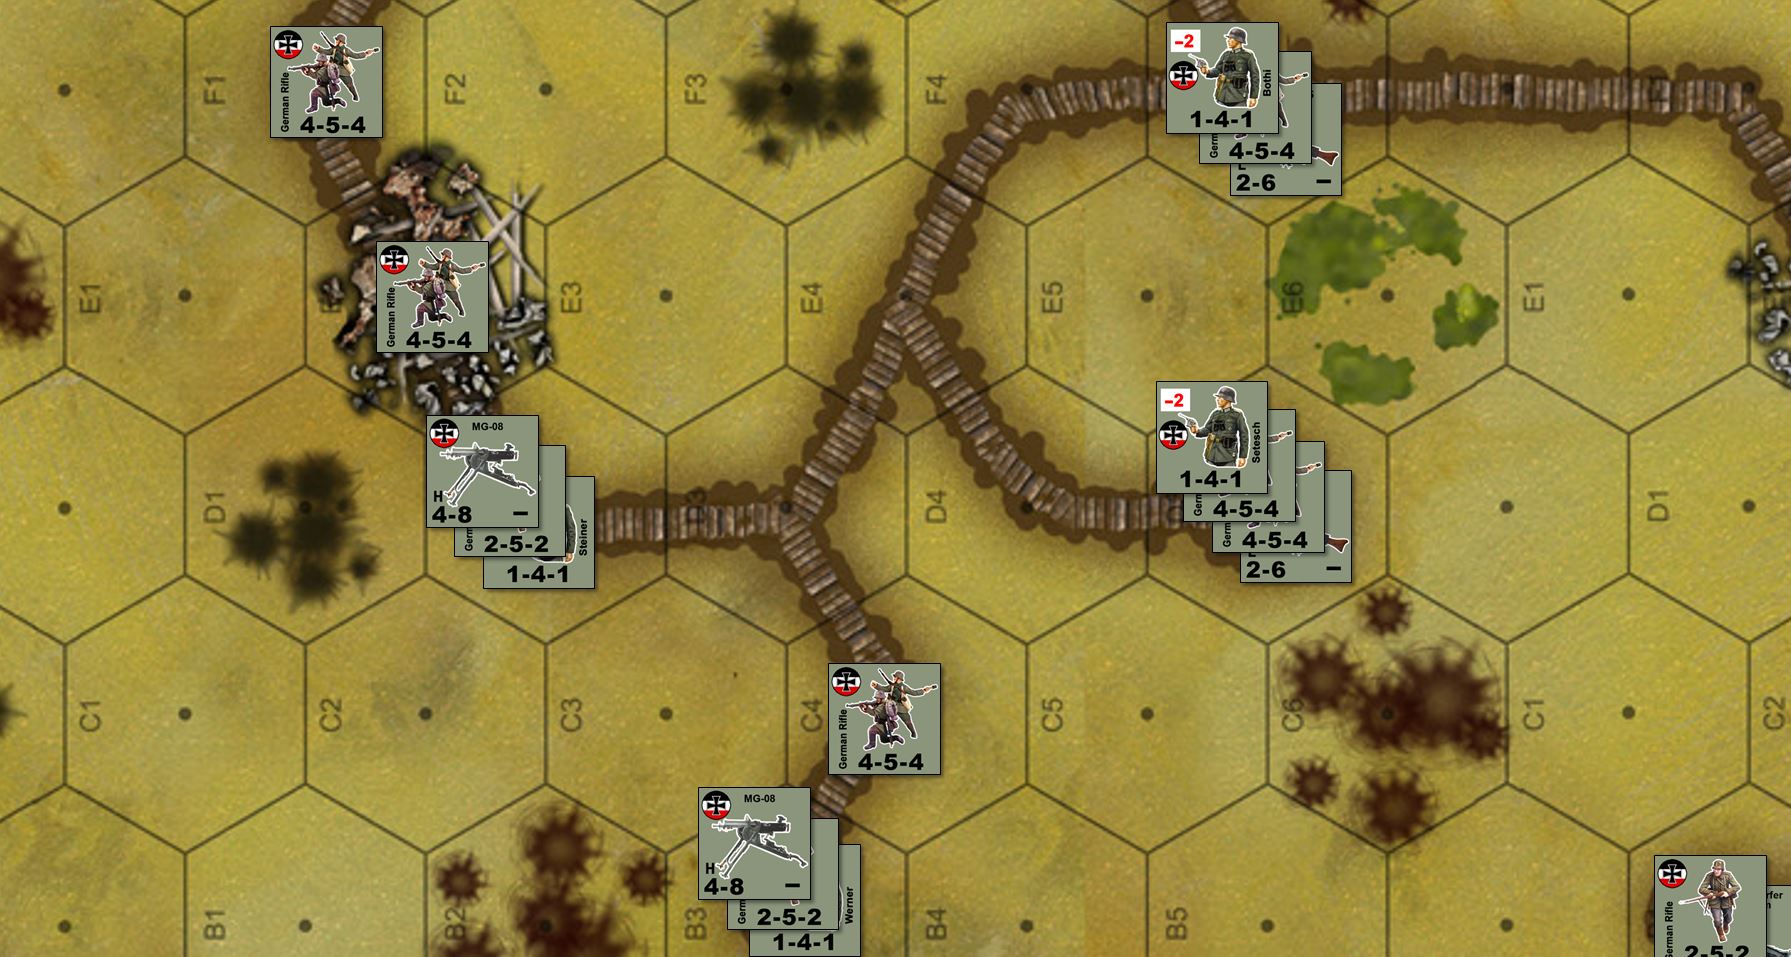
SO despite further successes for the British tanks and Australian infantry in the south, here in the center and north, things are still pretty stalled. The buildings are a little further away, leading to more dead ground for any Australian assaults to have to cover. Suppression fire is a problem since there are not British tanks up here with Hotchkiss MGs or 6-pounder guns. And of course the Germans are shooting back, their MG 08 15s pinning down Australians in certain spots.
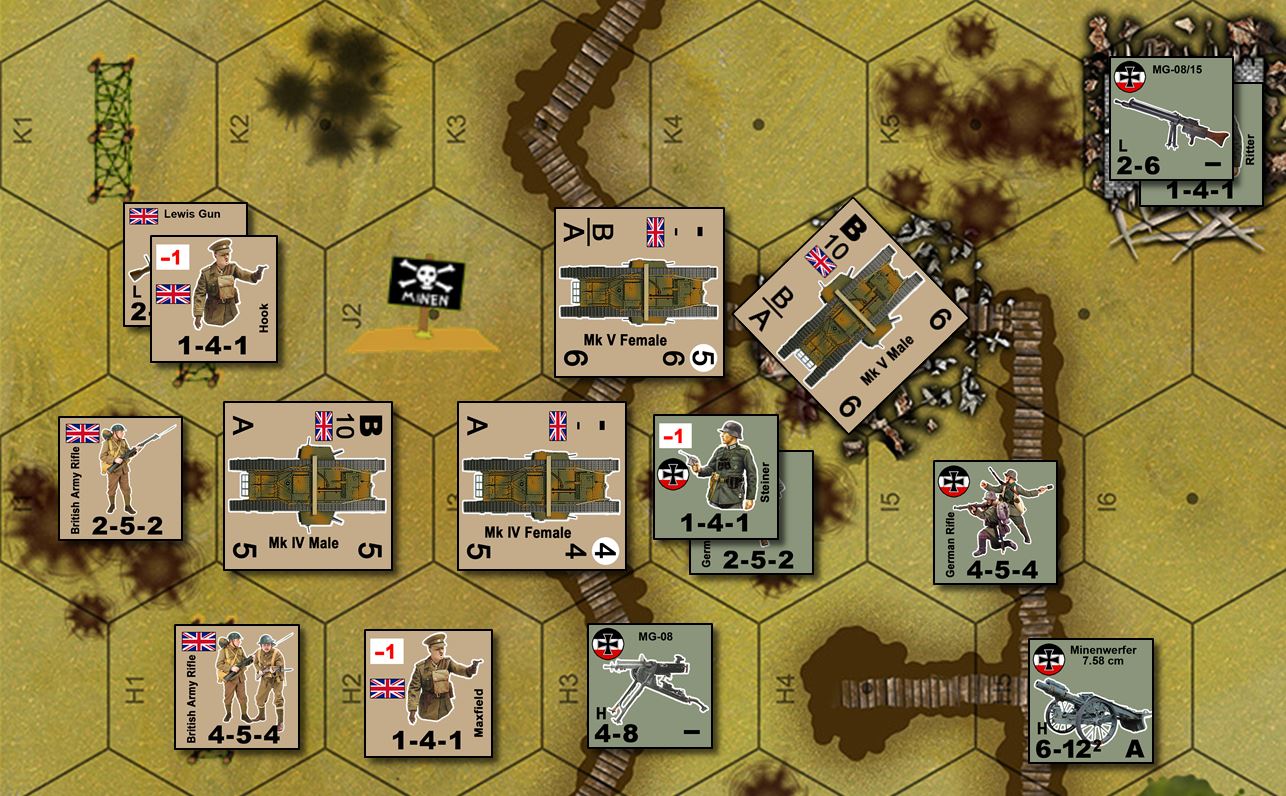
On the Australian turn, however, they do have one success. Captain Evans, applying his -2 leadership bonus (lower left), is able to direct sufficient rifle and Lewis Gun fire into the last German “minenwerfer” mortar team to eliminate the unit and clear a hex for immediate occupation. After he picks his way carefully forward during the “Advance and Assault” phase, however, some of his men are actually hit by German LMG fire and half a squad is pinned down.
As the Australians occupy that building hex, though, they now own a total of eight such hexes.
The game is officially tied at 8-8!
Can the Australians take one more building hex in the last turn of the game? Can the Germans hold on just one more turn?
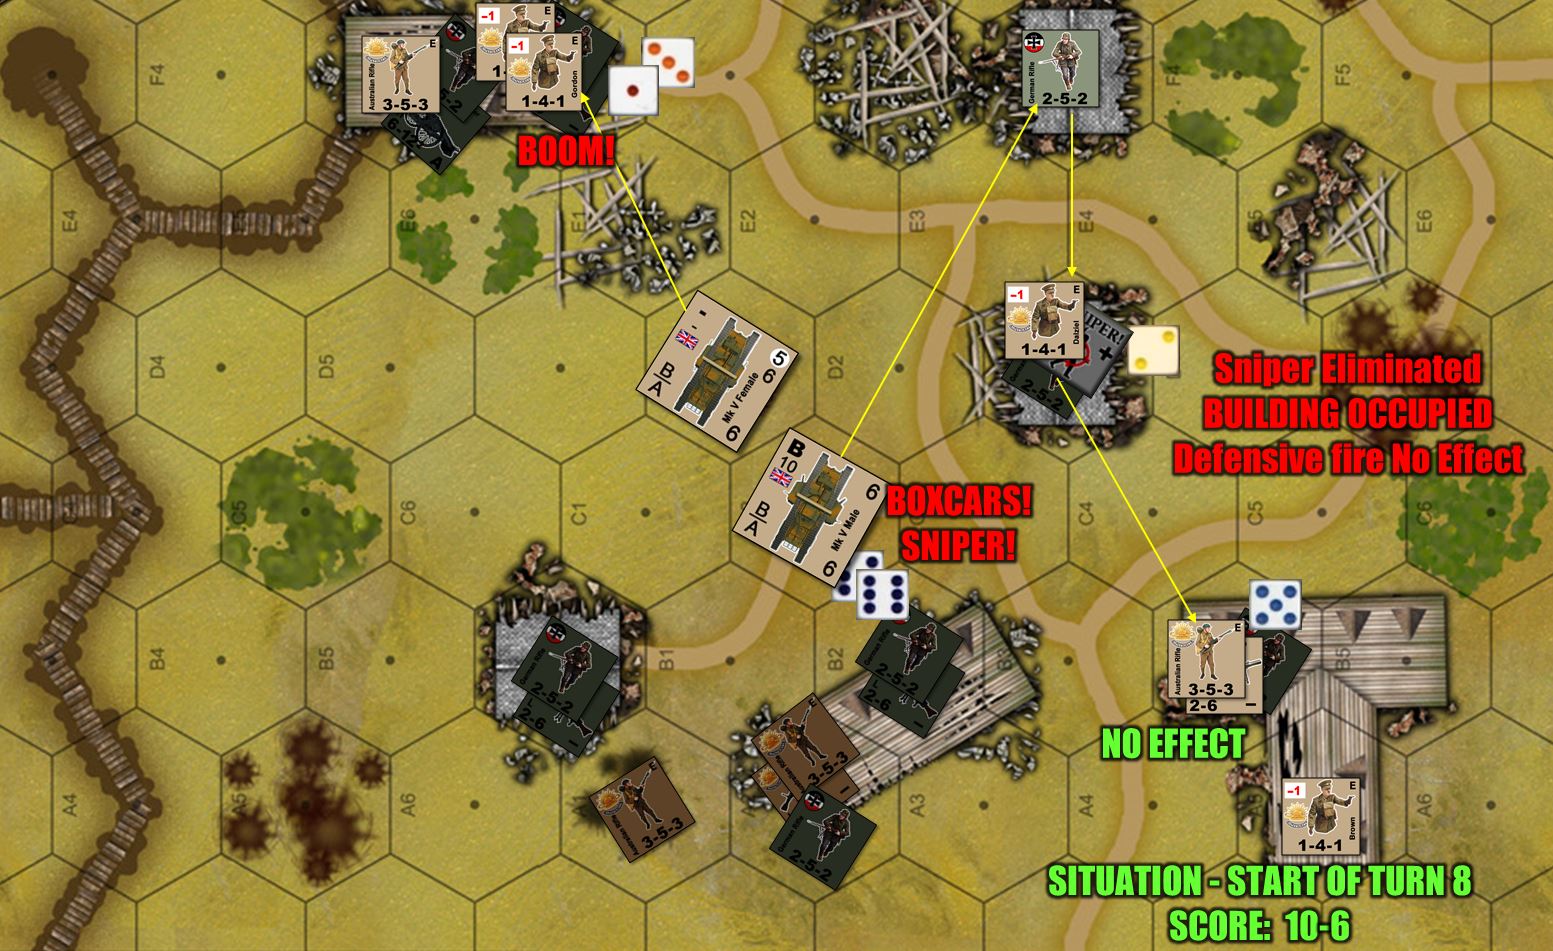
Turn 08 begins!
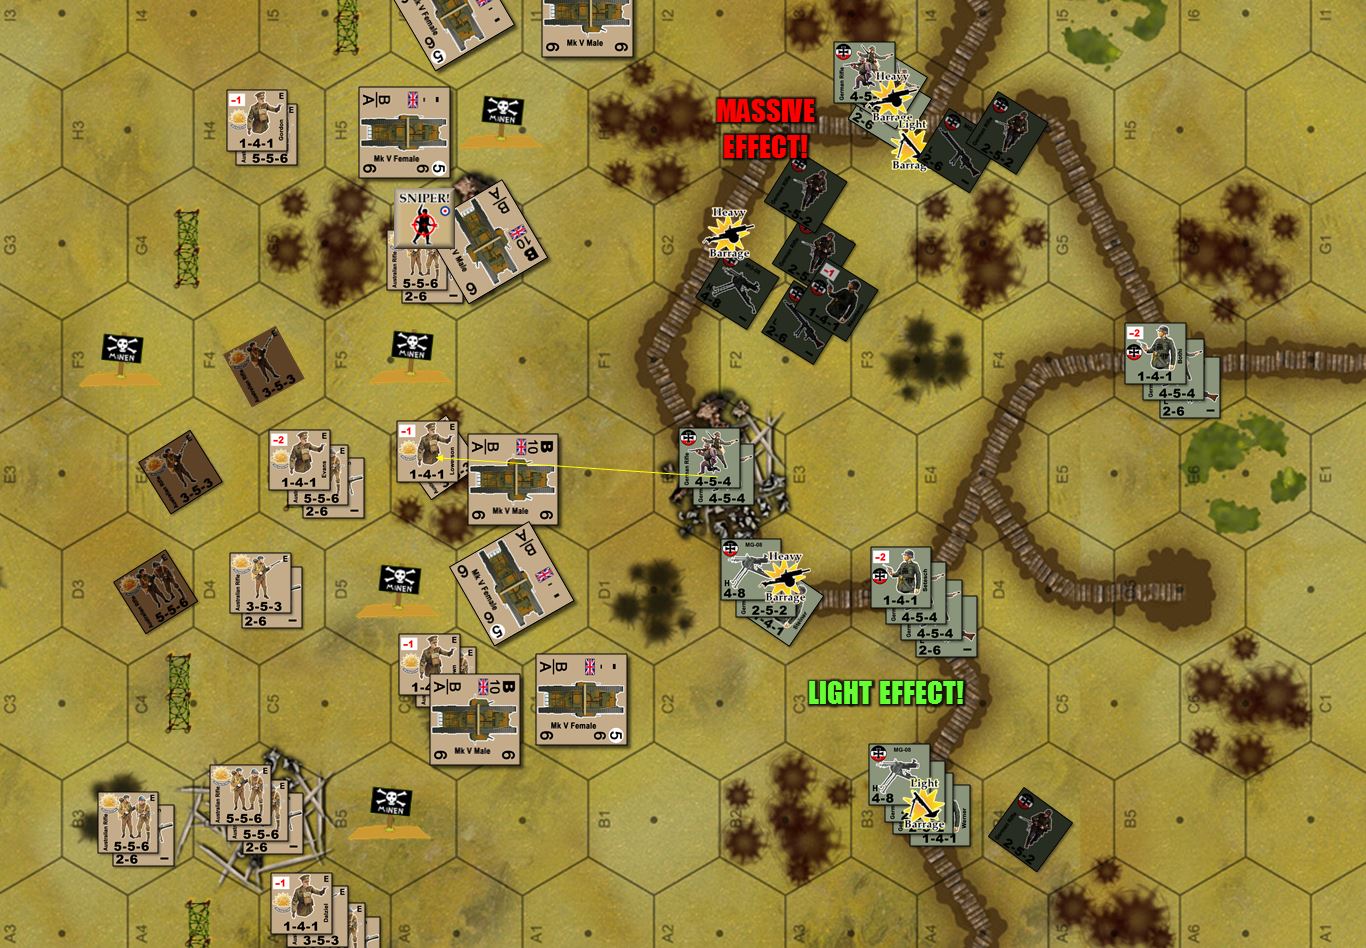
In the south, the two surviving British tanks try to again put down fire suppression on remaining German infantry units that could chop up Australian infantry making the final rushes. But at last their luck deserts them, and a boxcars roll (2d6 – the worst roll in the game) indicates that a German sniper has made his appearance!
The German sniper not only occupies a building hex the Australians though they’d cleared by fire on the previous turn and would now occupy for free, but also pops off rounds at the nearest Australian unit. Fortunately for the Australians, the German sniper roll is only a 2, and compared against the cover bonus of +2 (ruined buildings), no damage points are inflicted on the Australian squad. Counterfire is then able to eliminate the sniper.
The Australians dodged a bullet there, literally.
The Australians then occupy the building and the British Mark V “female” tank puts enough MG fire into another building to eliminate the small German fire team. Two more building hexes are thus occupied during the Australian movement phase, nudging the score up to 10-6. The Australians have, on the final round of the game, officially won.
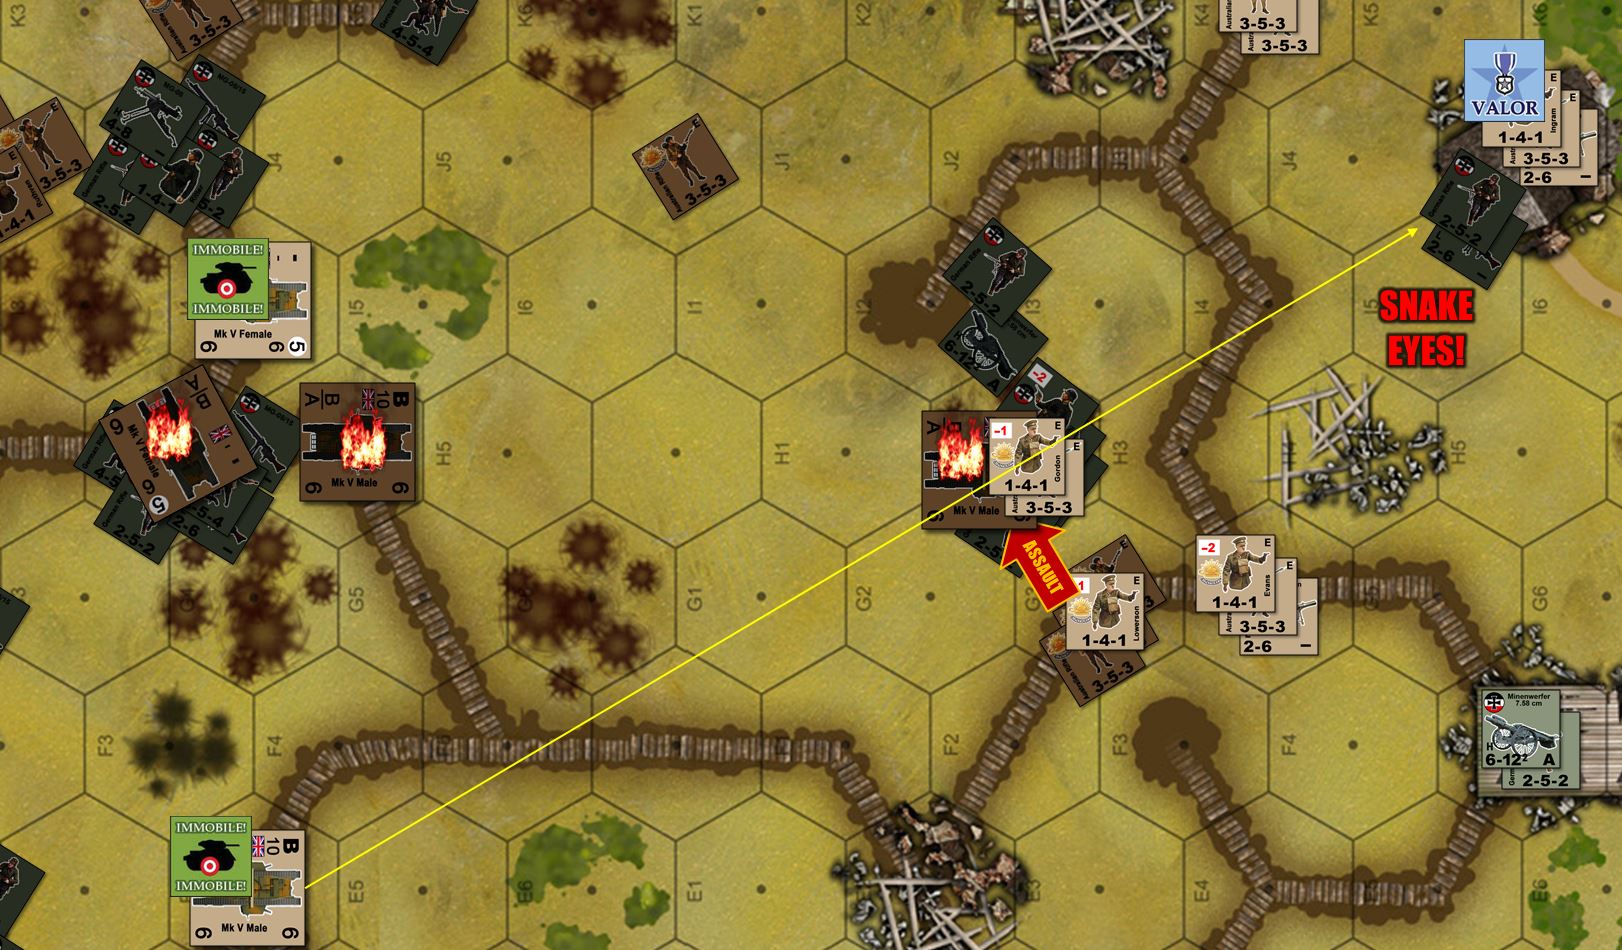
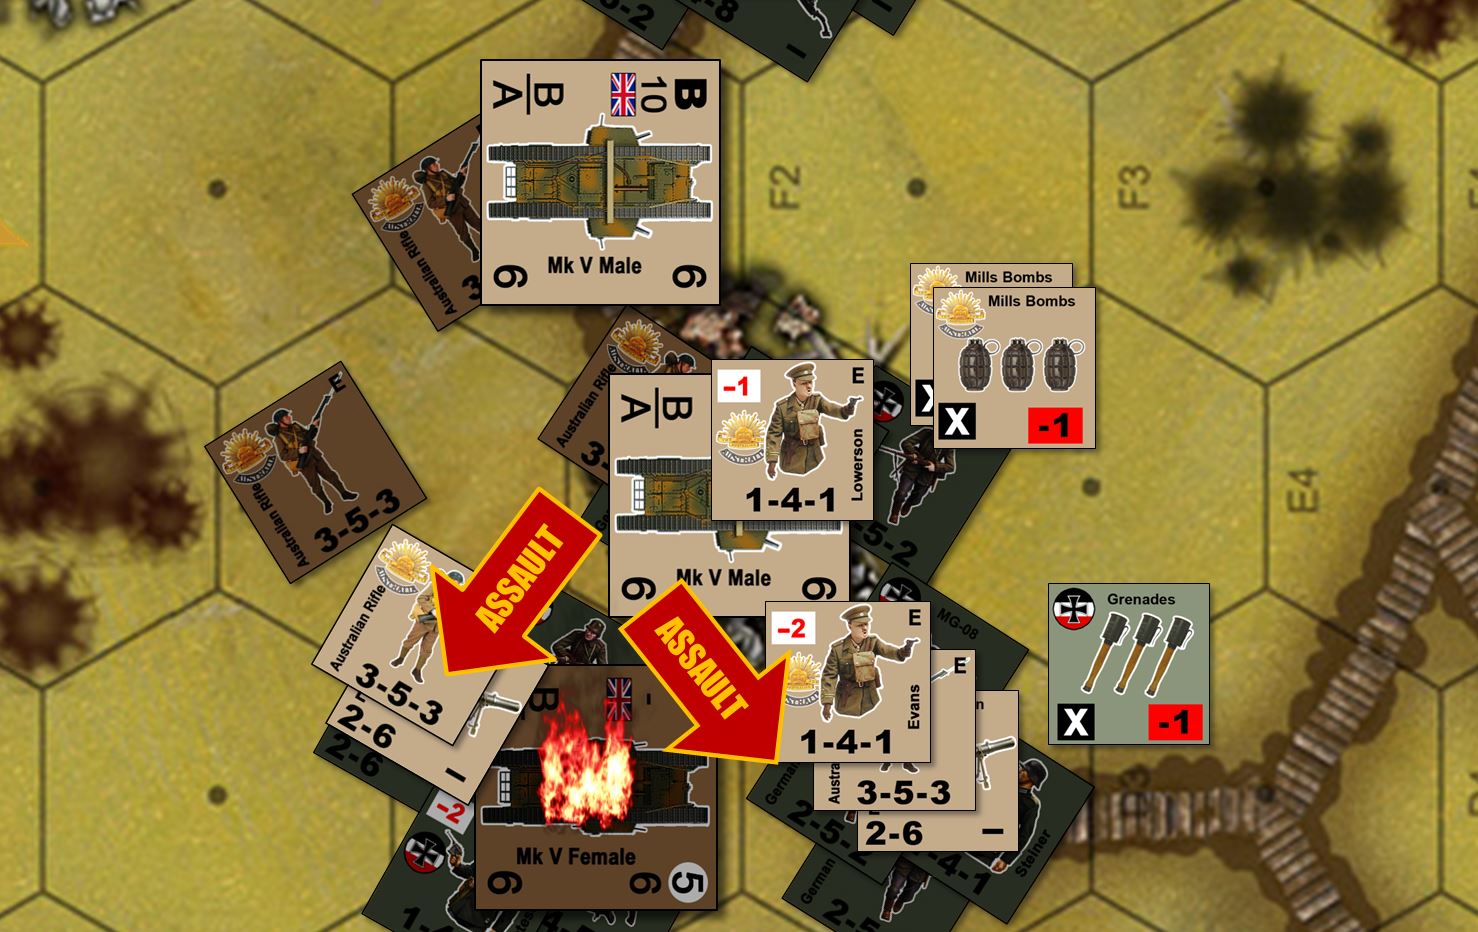
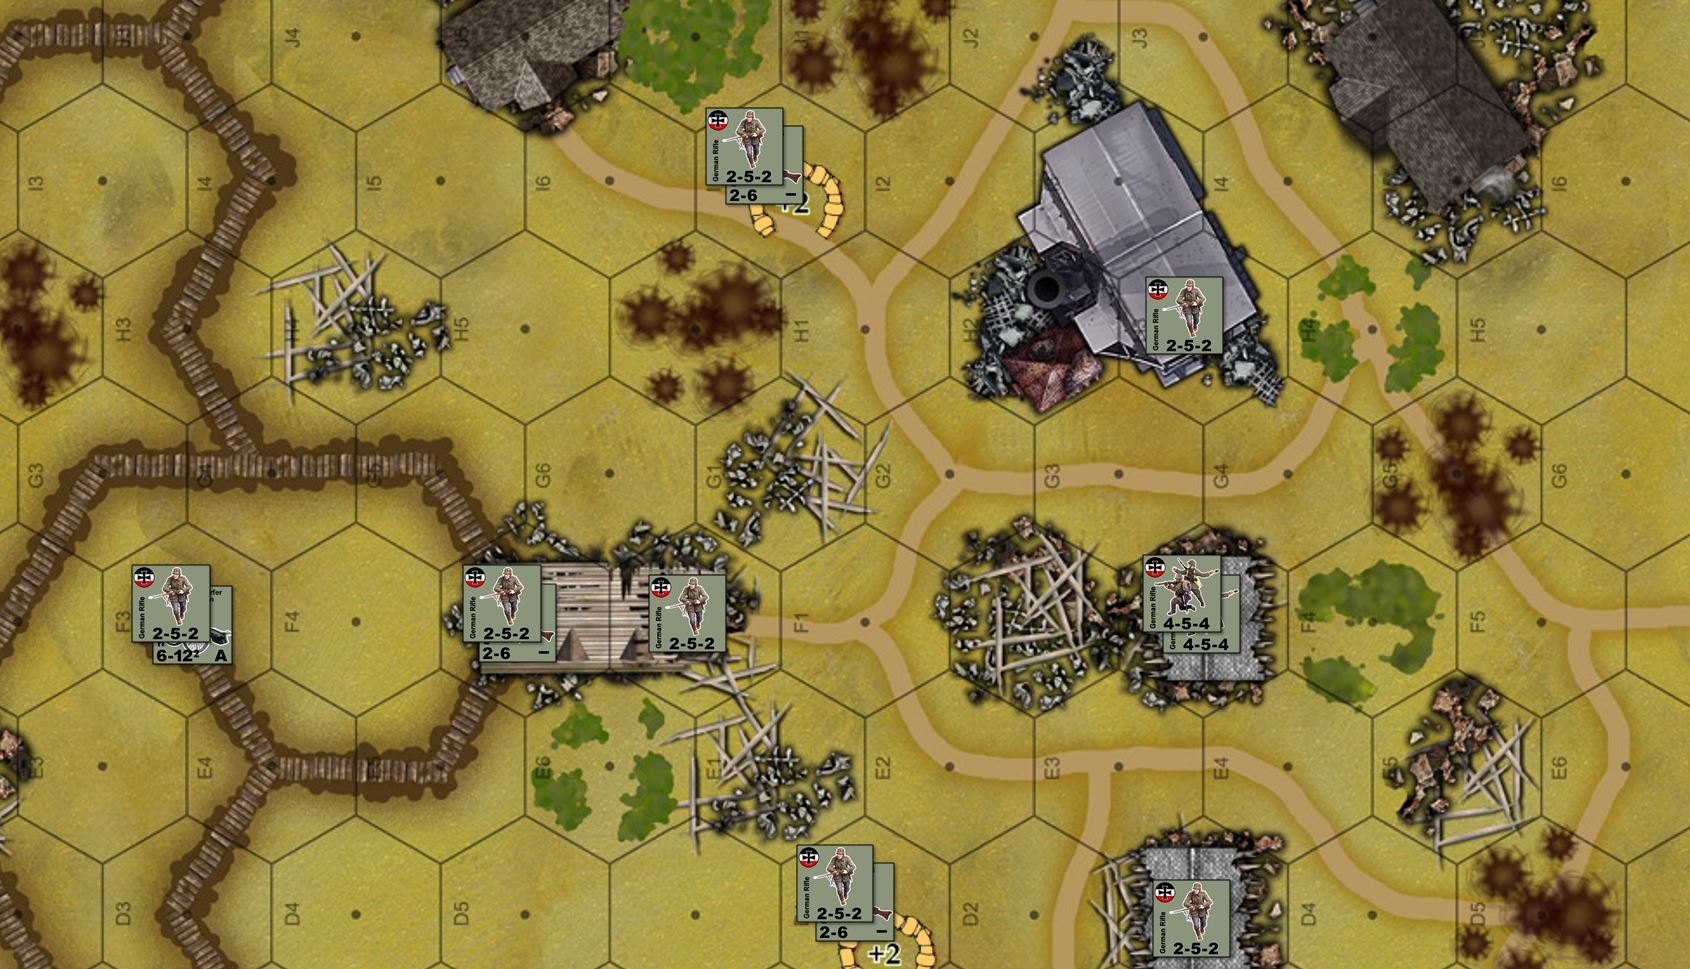
In the north, a last assault is mounted against the large German-held building in the northeast. First, Captain Evans, having detached some of his platoon to Lt. Ingram, keeps the rest of his men with him in the German communications trench, putting a “fire and maneuver” base of fire down on the German building,m trying to pin the Germans down for Ingram’s assault.
Evans doesn’t roll well enough, though, even with his -2 leadership bonus. Fortunately, the small four-man German LNG team doesn’t roll very well either, and Ingram has angled his dash in such a away that only one other German team ever gets a shot at him, which also doesn’t do enough damage (remember “valorous” units are allowed to flat-out ignore the first casualty point inflicted by any APFP check).
He and his men are just THAT hard-core, sprinting across the shell-shattered village square, kicking down the door, and bayoneting the first man in the German MG team and taking the rest of them prisoner.
With one German unit in the hex, and a +2 terrain bonus for ruined building, Ingram would normally be required to now pay three casualty points for the assault. But again, valorous units can ignore the first one. Rather than take casualties, Ingram opts to “pay” the two remaining required casualty points by pinning two of his half-squads. Being elite units, valorous, plus with a -1 officer in the next, they get to roll a rally on 9 or less on 2d6, pretty easy roll.
End result, they both rally, leaving Ingram with his full force successfully (and bloodlessly) assaulted into that German hex.
These casualty management and morale / rally dynamics are actually crucial. It was exactly this moment in the game that cost the Irish the game in our recent Assault on Courtrai game in mid-October. The last assault of our 36th Ulster Division force was technically successful, but took too many casualties and then failed to rally pinned units, allowing the Germans to counter-assault on the last turn and actually win the game.
Not here. With eight men in good order, four of them “valorous” with a Lewis Gun, plus a -1 officer, this hex is far too strong for the Germans to try a cagey last-minute counterassault to steal back a hex. They try some close direct fire just for sport, but don’t score enough successes.
The game is finally over at the end of Turn 08, an Australian 11-5 victory.

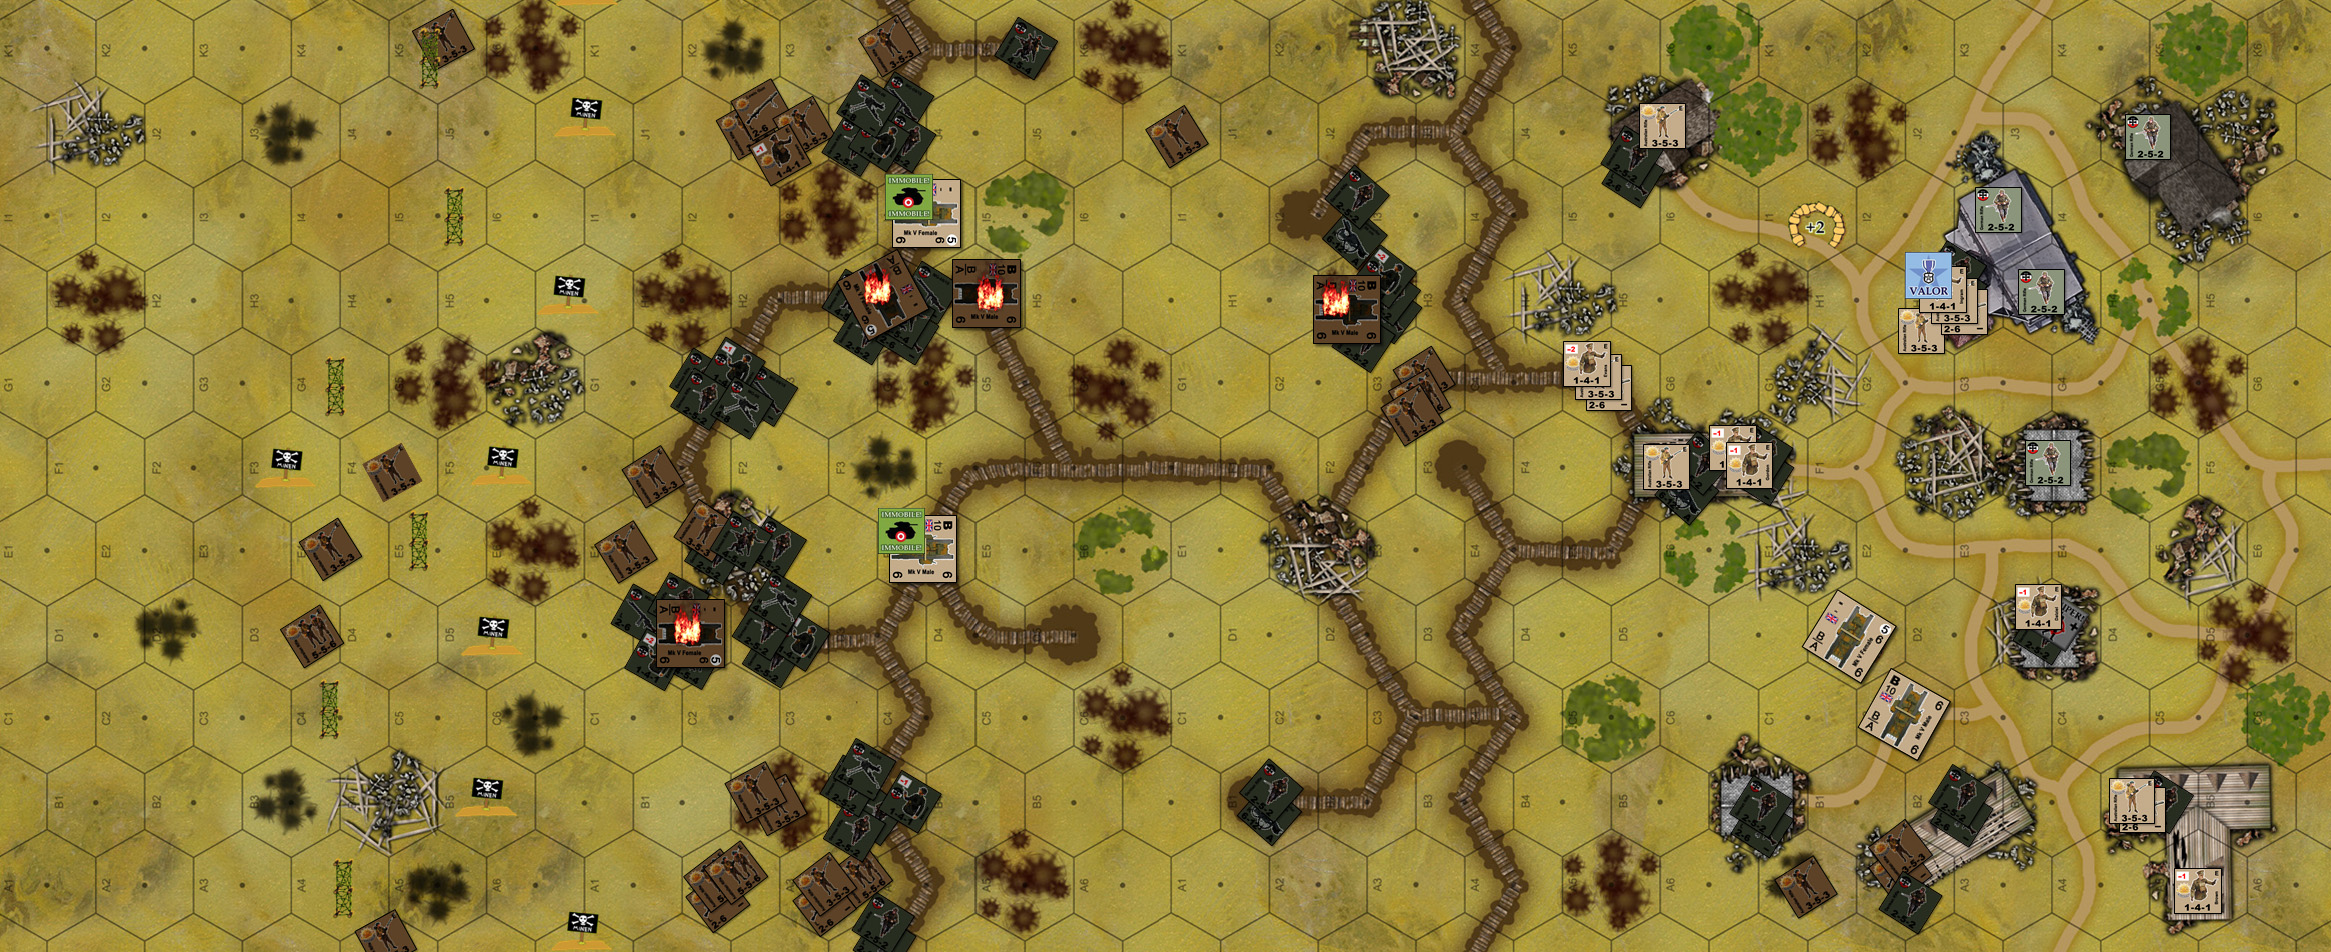
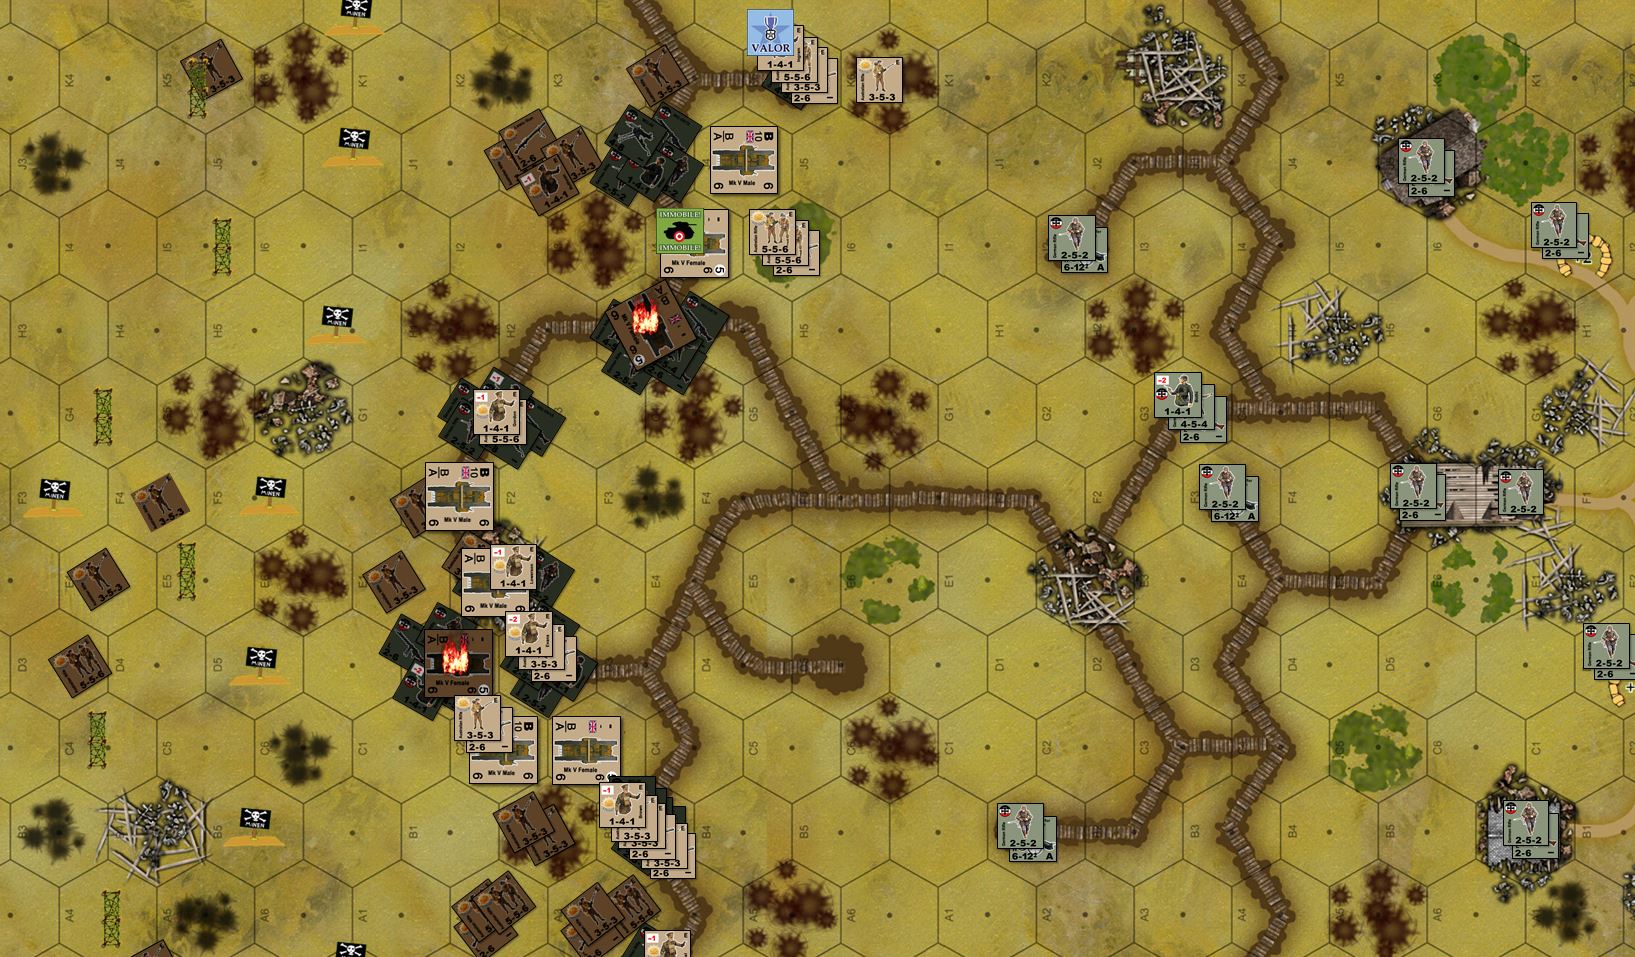
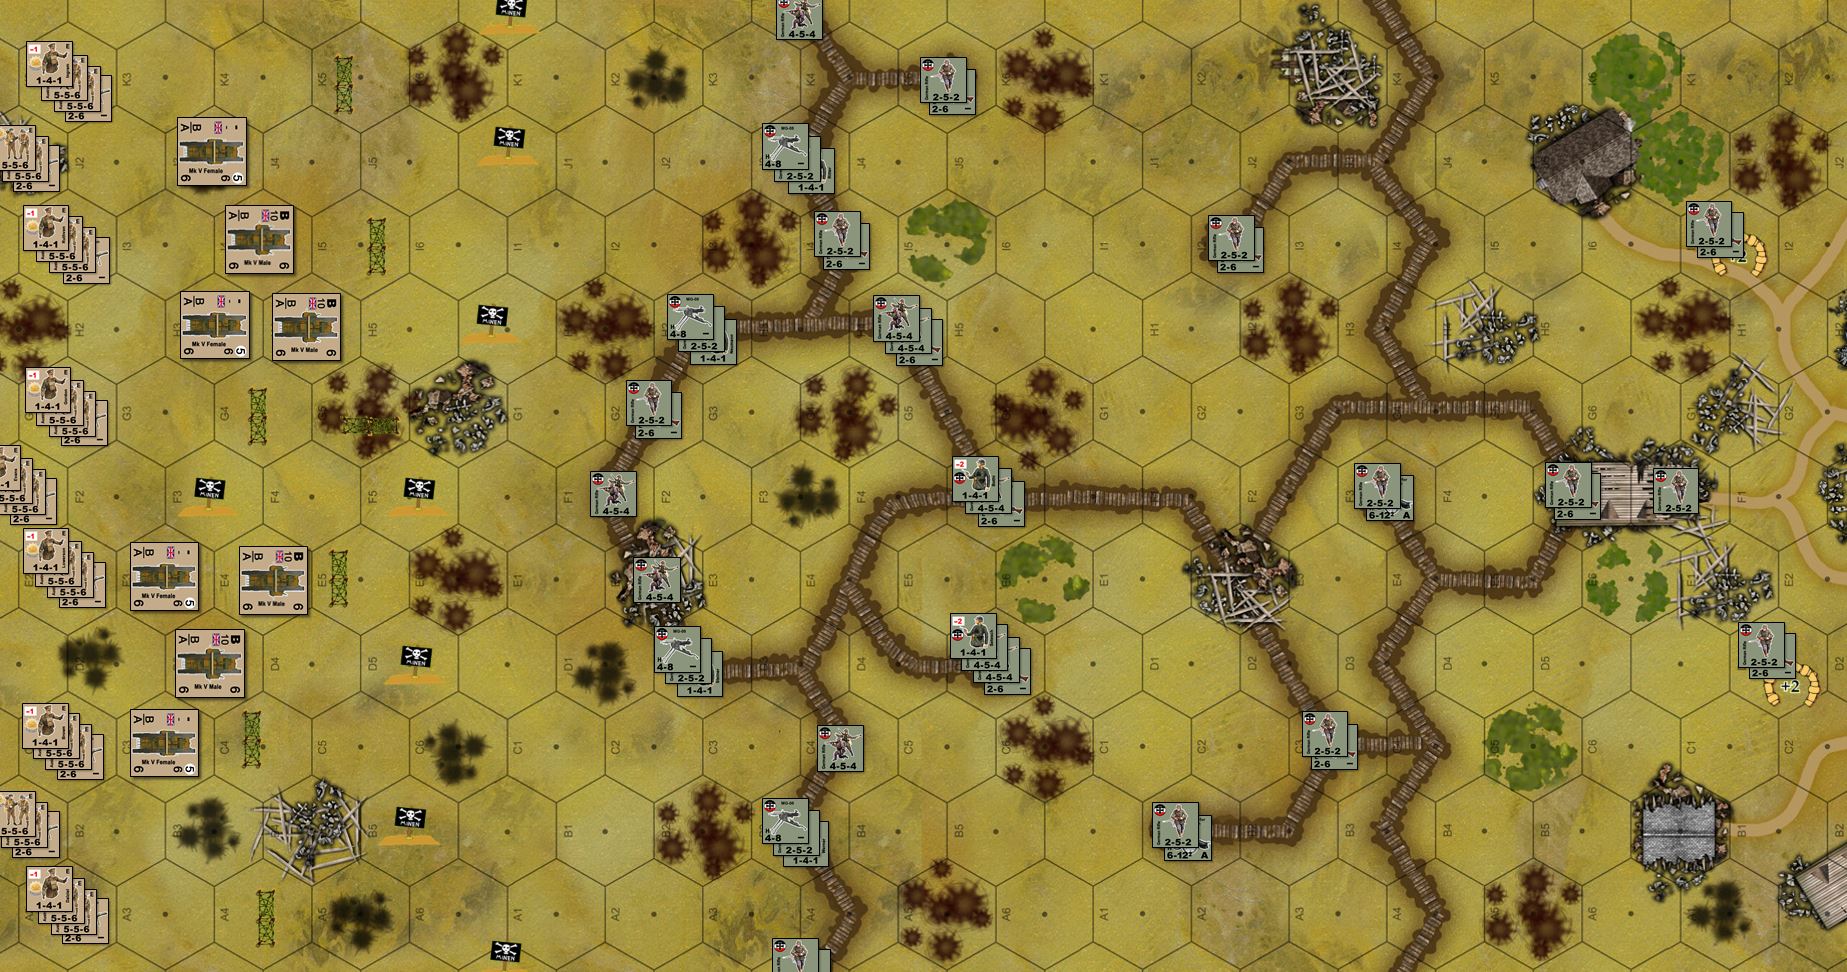
The final battlefield. Units lost have not been removed, but left as darkened counters on the counters where they were lost.
German losses: 38 killed, 112 wounded and prisoners.
Australian losses: 30 killed, 60 wounded
British losses: four tanks, 5 crew killed, 11 wounded.
Allied total: 35 killed, 71 wounded, four tanks (+2 immobilized / crippled)
Out of 16 objective building hexes, 11 now held by Australians, 5 by Germans = an Australian win.
Thus ends our Battle of Hamel game. I hope you liked it. If you want to try Valor & Victory, the original WW2 game is completely free to download and play here:
http://www.valor-and-victory.com/
Thanks to everyone who supported or participated in the discussions of these Great War articles and associated content.
Australians vs. Germans at Hamel, 1918 (Part 05)
The Australians’ assault against German fortifications in front of the town of Hamel (the assault supported by British Mark V “male” and “female” tanks of the Royal Tank Corps) continues …
In previous entries, we saw where the Australian infantry made their initial advance, backed up by British tanks. The “shock barrage” of Australian artillery hit just in front of the infantry, with mixed results (in two cases almost hitting British tanks). British armor then also had mixed results with suppression fire, and finally the infantry went in with a series of bloody assaults that failed in one location but cracked the German trench in at least two others. Two turns later, the German primary trench had fallen completely, although by now almost 80 Australians are combat ineffective (killed, wounded, scattered, panicked), two of the British tanks are burning, and a third is hopelessly immobilized.
Now begins the wild firefight in the German backfield, the “second no man’s land” between their primary and secondary trench lines. German mortars continue to try to rack up “free kills” on immobilized British armor, while the mortar pits themselves are under increasing volleys of direct Australian rifle and Lewis Gun fire and even close assault.
With both sides having lost so many squads already, with the Australians having spent their “Monash Artillery Barrage” and the Germans having lost their MG 08 pits, and with no minefields or barbed wire back here to restrict movement, the fighting is now much more open, fluid, and chaotic.
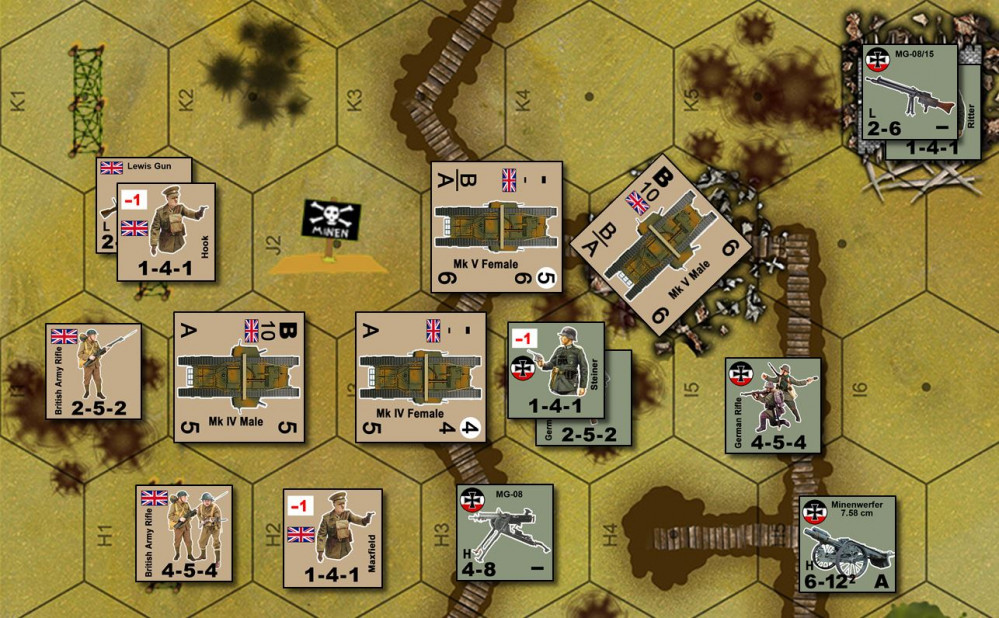
In the center, bloodied Australian survivors sprint in a crouch through German communication trenches, while British tanks and German MG 08 15s and 7.58 cm “minenwerfers” hurl shells over their heads. In one case, an immobilized Mark V “male” tank is able to bring its portside 6-pounder to bear on a German MG 08 15 crew in the building to the northeast, keeping the pinned down so Ingrahm’s “valorous” platoon can continue taking apart the German north wing.

Things start to break loose for the Australians when that crippled Mark V Male manages to sail a 6-pounder HE shell right through the window of that northeast building, rolling “snake eyes” on 2d6 (best roll in the game) and positively gut the German MG team holed up in there. This means that Ingram’s platoon can enter the building for free without having to mount an actual assault. But rather than charge recklessly into the building (and thus invite opportunity or defensive fire from the Germans to the southeast), they run right up outside the building, then use the “Advance and Assault” phase to move their one free hex at the very end of the turn.
These kinds of tactics may sound “gamey,” but in fact this is where the game’s sequence is carefully designed in such a way to encourage real-life tactics. Ingram’s team doesn’t just charge in. They charge up to the building, hit their bellies, and then crawl into the building, carefully clearing and covering each corner before their mates rush up to the next fire point.
In systems like this … be gamey. It’s fine.
You’re learning tactics.
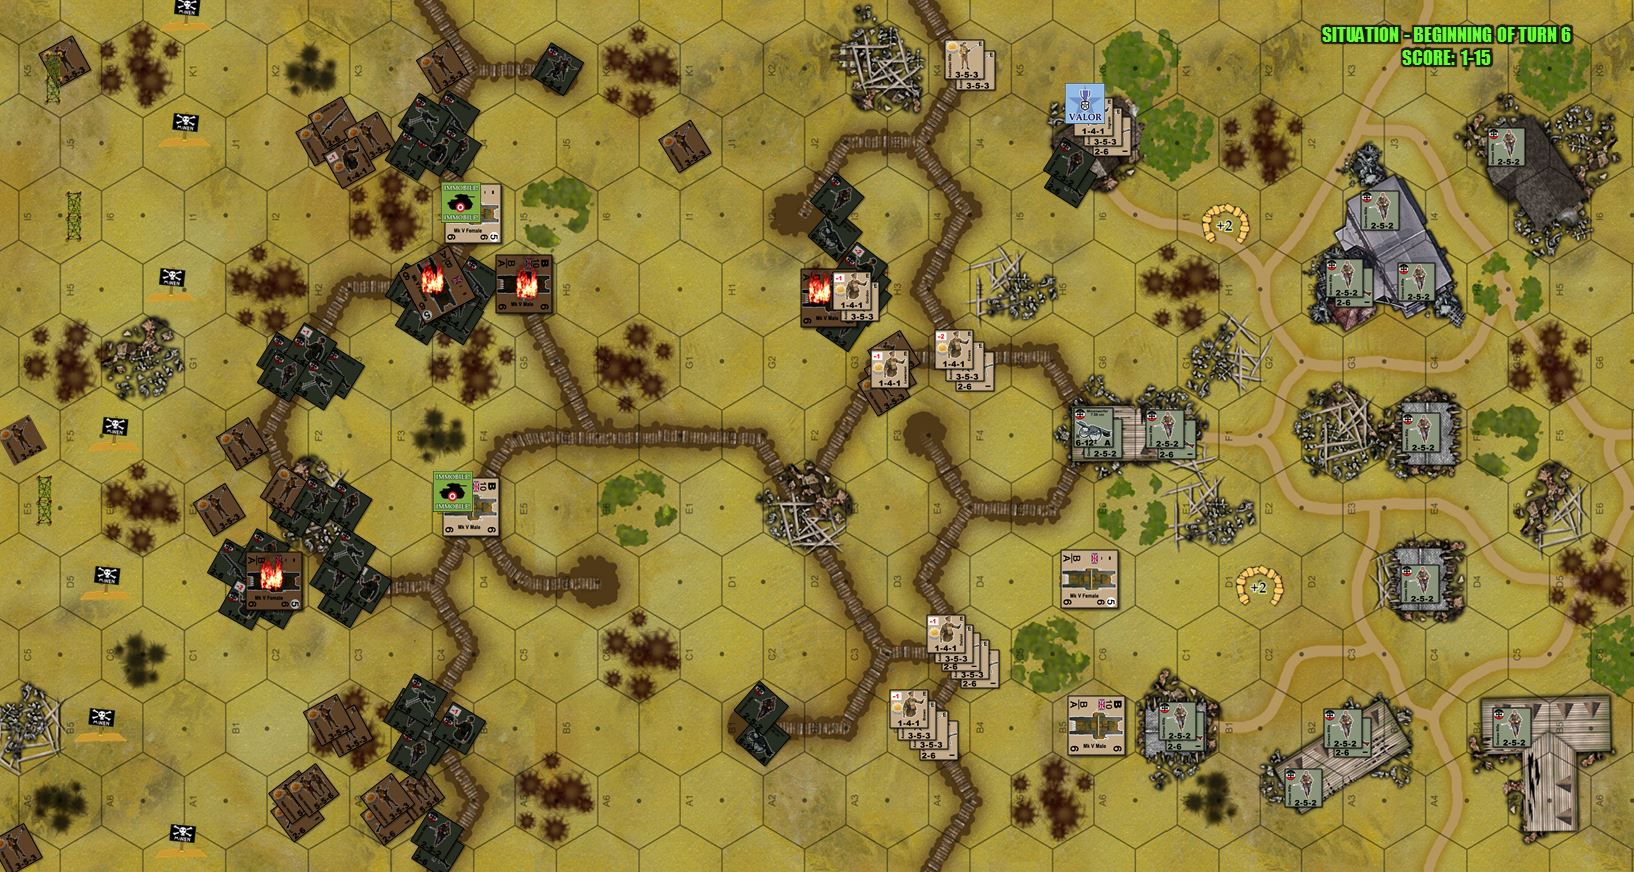
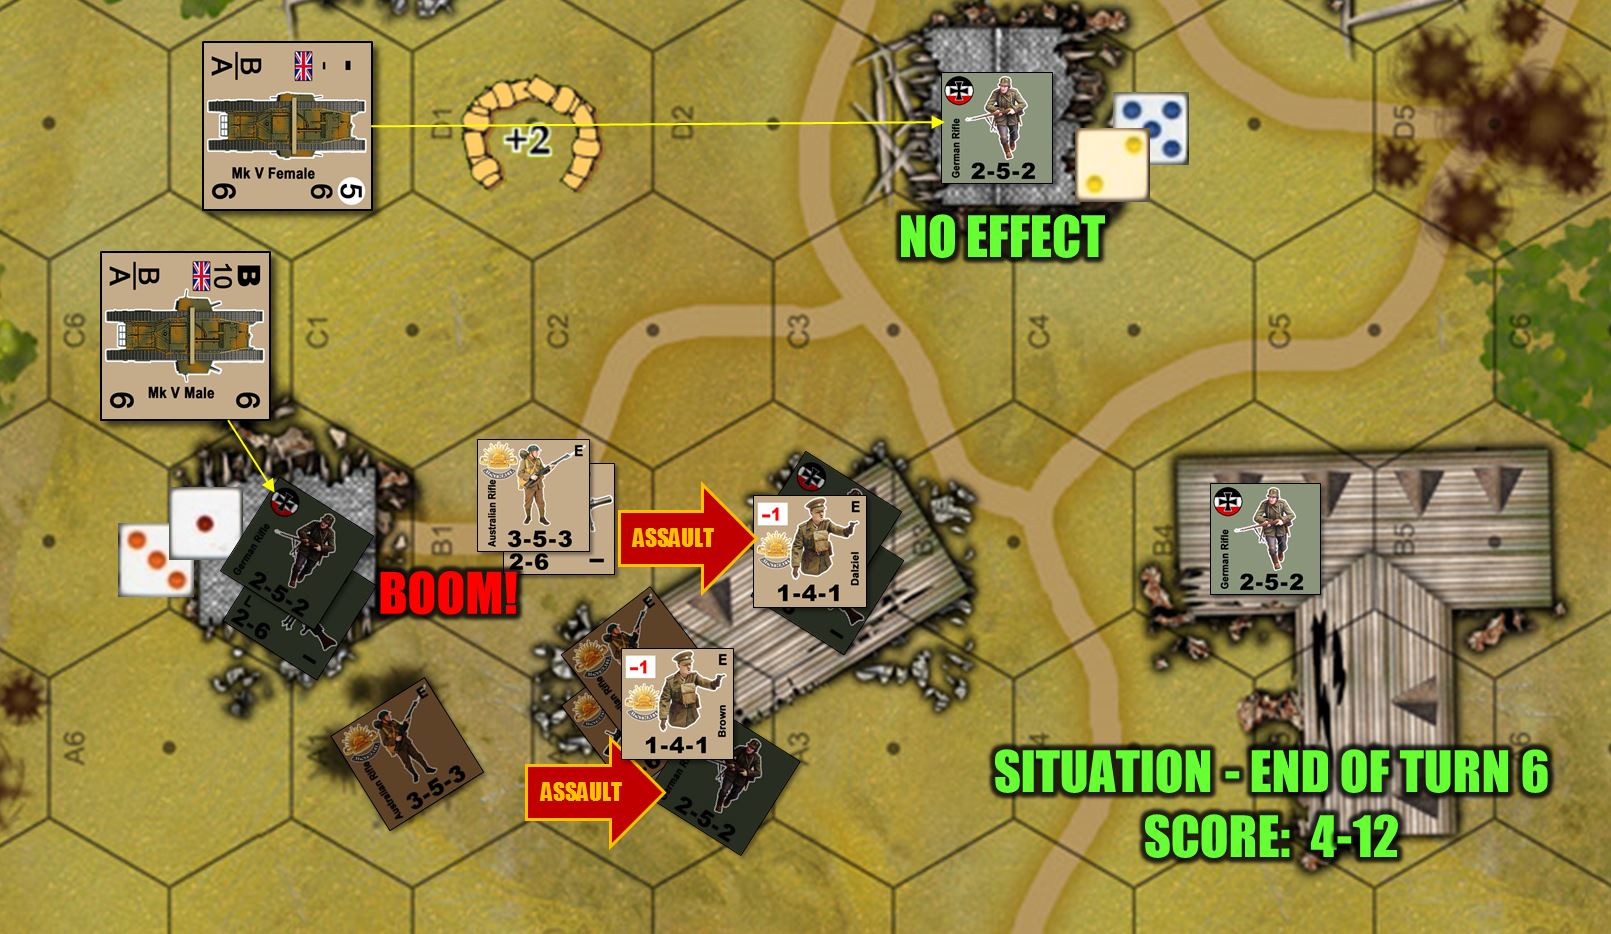
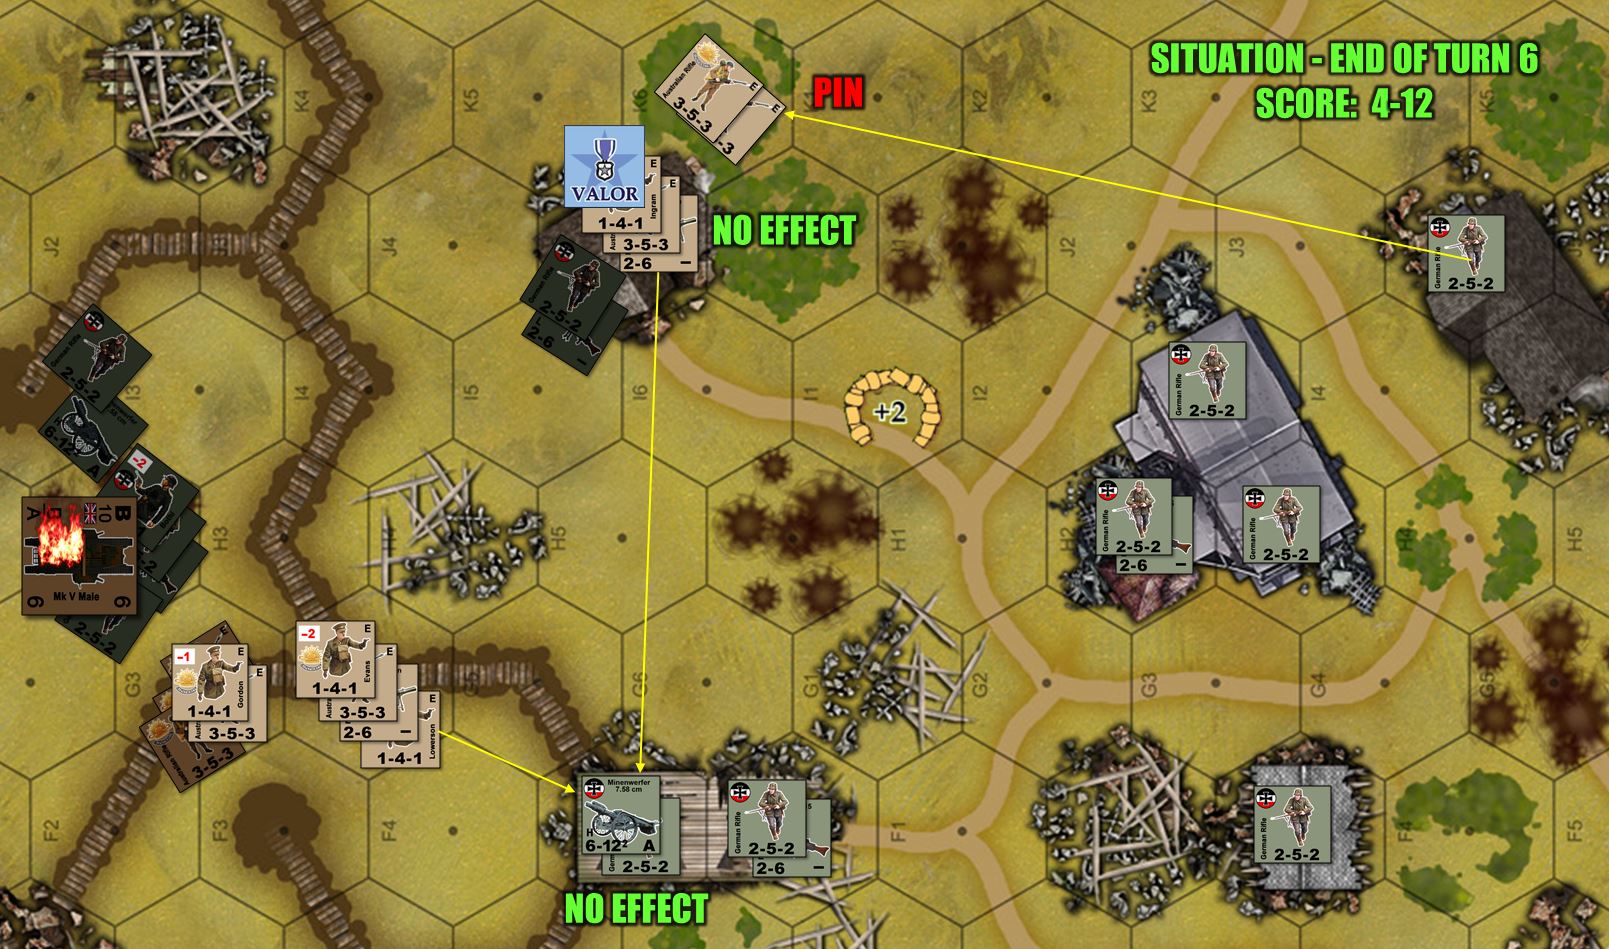
The situation at the beginning of Turn 6.
British tanks have really been hung up badly on German counterassaults and throwing tracks trying to cross trench lines. Four are burning, two are crippled … leaving just two (one “male” and one “female”) still operational on the south wing.
The German secondary trench line has fallen, and surviving German squads have now pulled back to the buildings along the western outskirts of the town. In this way, they hope to stall and bleed the Australians as much as possible, running out the clock (the game ends on Turn Eight, remember).
The Australians, for their part, are going to have to slow down their assaults. Losses have been too high, and assaults into buildings are always costly. They have to retain enough manpower to “leapfrog” squads into the outskirts of the town, and occupy enough building hexes to win the game.
Remember, the game ends at the end of Turn 8. There are sixteen building hexes in play. Both sides get one point for each building hex they control at the end of the game. So far the Australians control one. So the score is 1-15.
The Australians begin the third phase of their Hamel assault in the south, and so far things are going pretty well. That Mark V male scores enough of a hit to smash that German LMG team completely out of that building, allowing Brown’s squad to rush through the building (thus “winning” it for the Australians) and then assaulting into the next building to the east. Here things get nasty, he loses half a squad to German opportunity fire, then the other half of his squad in casualty points for the assault. Basically, Lt. Brown now stands alone, but he occupies the first hex of the second building.
On Brown’s left (north), meanwhile, Lt. Dalziel likewise makes a charge against the second hex in the building. The Mark V “female” tank to the northwest hasn’t rolled as well for covering fire, though, and again Australian losses are heavy. Half a squad is pinned down with its Lewis Gun in the open yard between the buildings, but note these counters are “straight” – no longer cocked at an angle. This is because they have rallied, making the 7 or less roll on their 2d6 (because they are Elite, usually this roll is 6 or less without an officer present).
Still, the Australians have taken three more building hexes. The score is now 4-12.
In the center and north, things haven’t really kicked off yet. With no tanks available up here, the Australians have to rely on their own rifles and Lewis Guns for suppressive fire. And so far, they’re not having much luck.
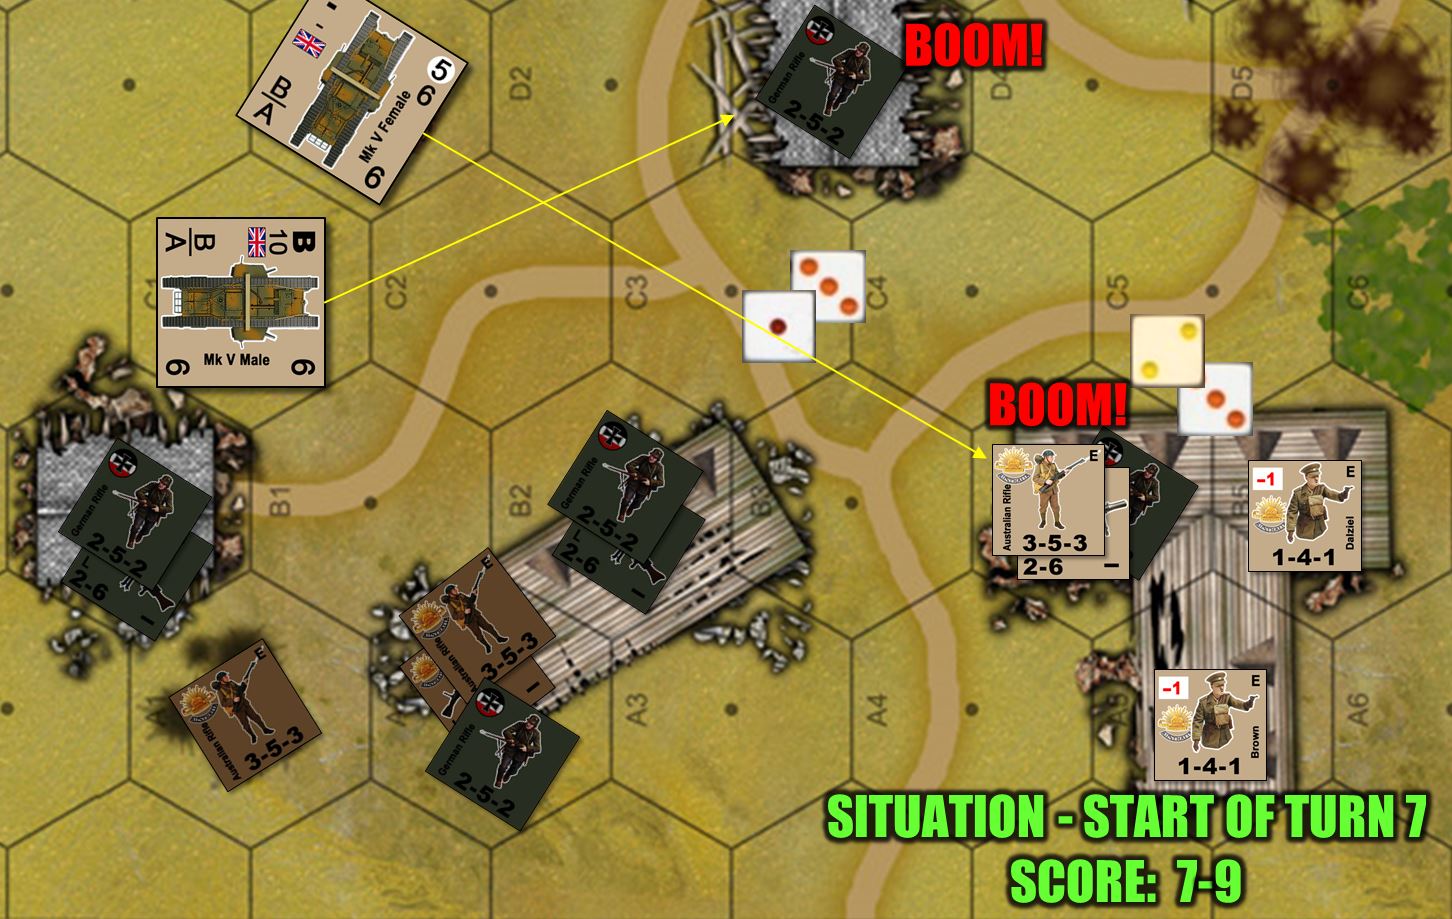
After pausing for some German fire in Turn 6 that pinned down a few approaching Australian units, as well as some shuffling of what remains of German defenses, we’re now in Turn 7.
The Australians again hit it out of the park in the south, thanks in no small part to more really great rolls from the British tanks. Seriously, these two crews must be eager for some payback for the tanks knocked across the battlefield behind them … or maybe the Australians are just jeering them mercilessly because so many of these new British Mark Vs have broken down.
In either case, the Hotchkiss machine guns of the Mark V “female” and the 6-pounder guns of the “male” are not only suppressing German units in the next couple of building hexes, they’re eliminating these German positions outright. This allows Lts. Brown and Dalziel to simply run out, Webley revolvers in hand, and lead the occupation of these buildings and bring the Australian score perilously close to actually winning this game.
Three more building hexes occupied down here, leaves the score now at 7-9. and the next German held-building hex is actually empty, thanks to the cannon fire of that Mark V “male.”
But it turns out that hex isn’t really empty. Fortune is a fickle mistress, and the Germans have snipers about …
Stay tuned !
Australians vs. Germans at Hamel, 1918 (Part 04)
The Australian infantry assault (supported by British Mark V tanks) against German entrenchments at the town of Hamel (4 July 1918) continues in our “1918 Edition” of Barry Doyle’s Valor & Victory system.
So far we’ve seen Australians mount their advance toward the German trenches, their artillery splash across the frontal German line and ranging through their backfield, and then the first Australian infantry assaults actually fail. Then came a British Mark V “female” (armed entirely with Hotchkiss MGs) mounting a successful overrun attack against a section of the first German trench, putting the first real crack in the German defense.
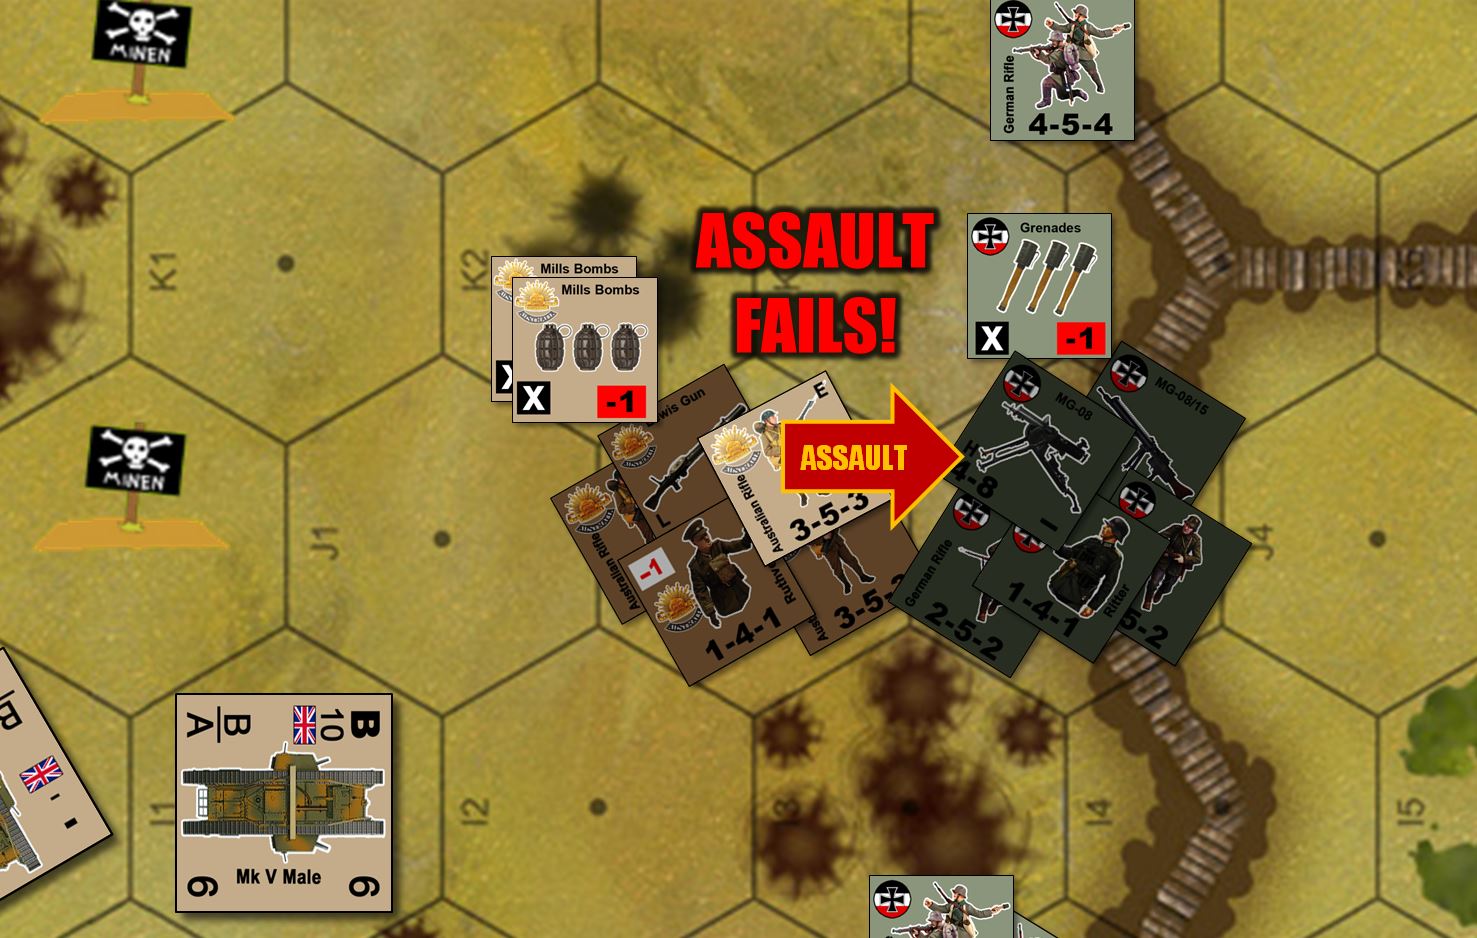
Now, still in Turn 2, we continue the Allied movement phase with additional Australian platoons mounting close infantry assaults against sections of the German trenches further to the south. Here we see a successful Australian assault, thanks in part to the suppression fire already put down by those British tanks and earlier Australian off-board artillery.
This is where games like Valor & Victory (and ASL, Panzer Leader, etc.) really shine, by encouraging the use of real-life combined arms tactics without the player having to be some kind of military officer or student of history. Just follow the turn sequence, and work out a plan that really gives you all the advantanges. Some players think this feels “gamey” … but a good game simply builds the rules where where life tactics are what really works within the structure of the game without holding your hand and carefully explaining why you should do a, b, and c.
Case in point – how to assault a fortified position in Valor & Victory. Your turn starts with the Command Phase, which is when off-board artillery (if you have any in the scenario) is used. You can call it in on any hex to which you can draw a line of sight, so it’s a good idea to have spotters already in place the turn before. The artillery can hit its target and either kill, or at least pin targets. You can also call in smoke to reduce the “opportunity fire” that will be coming back at you when you make your advance.
Next comes the direct fire phase. By and large, units that shoot cannot move that turn. You have to choose, and set up a combination of fire and maneuver elements (units that fire, and units that move, coordinating to make your assault).
So the direct fire here was from the tanks. As we saw earlier, they just kind of whiffed their rolls on this part of the line. The Australian player can now chose to set up additional fore from some of his infantry platoons, but any platoon that fires will not be able to assault.
In short, the Australians decide to bite the bullet and assault with everything here. Assaulting with too few units only means those assaults will be weaker and more prone to fail, and even if successful, will take longer and thus leave other units out here in the German MG fire that much longer.
Fortunately for the Australians, the Germans have been partially suppressed by the artillery fire. These pinned units cannot throw opportunity fire back at the Australians as they make their assault. Still, the unpinned German units do serious damage, and the Australians have to pay for the assault itself (even successful assaults against fortified positions are never cheap.
Here’s the good news – pinned enemy units are automatically eliminated in assaults, and do not count toward the calculation of Australian casualty costs. So as always, pinning as much of the enemy as you can before mounting an assault is always a good idea.
In any event “Captain James Evans” leads the assault in, applying his -2 leadership bonus to the difficulty of the assault roll. The roll succeeds, and the German trench line is cracked again.
It’s now the German phase of Turn 2. In one place, they decide to mount an infantry counter-assault against the first British tank. Note that as they make their approach, they can stay in their trench, giving them a cover bonus against opportunity fire coming against them from the British tanks. Hauptmann Setesch has two half squads and one full squad with him (counting himself, that’s four units total, so he can use four grenade counters from his available pool), all of which apply with his -2 leadership bonus against his assault roll.
With a combined -6 against his assault roll (-2 leaderships plus -4 for grenades), the 2d6 roll is successful and the tank is brewed up. It has cost the Germans a half squad of troops, however (four men). Perhaps more worryingly, “Kampfgruppe Setesch” is now out of his own trench and in the open.
Turn 3 – things start to turn around for the Australians in the disastrous northern part of the battlefield. Lt. Ingram’s platoon has rolled “snake eyes” on an APFP (antipersonnel firepower) attack, the very best roll possible in Valor & Victory (most rolls are 2d6, and low rolls are usually better). So not only have their German targets been thoroughly shot up, but any unit that participated in that attack gets to make a “Valor” check. If they succeed they become “valorous,” which gives them all kinds of bonuses for the remainder of the game.
Other news isn’t so good. Although one British “male” Mark V tank has successfully traversed the German primary trench, two “females” have thrown tracks trying to cross the trench. This is very bad news for the tanks. Not only to they have to roll to see if their crews bail from the tank (thus counting them as destroyed units), but every time they are attacked at all, they have to re-make this “bail out” check.
The Germans seize on this opportunity in their turn, peppering the immobilized tanks with direct mortar fire. The odds of a hit and penetration is puny, but it doesn’t matter. These tanks are permanently immobilized and the crews can easily panic. Sure enough, one crew fails its second roll when hit by the German mortar fire, and the tank is considered destroyed.

At the extreme south of the line, more Australian assaults crack mole holes in the German trenches. German opportunity fire here has been absolutely murderous, the Australians were really let down by their artillery here. But fortunately, immediately in front of this stretch of trench are some craters the Australians can use for at least some kind of cover for their final assault.

In the center, with holes now cracked in the German trenches and British tanks starting to overrun the trenches themselves, the Australians begin to pry apart the German defenses from the inside. Here we see Lt. Lowerson’s platoon and Captain Evans pivot south inside the German trench, counter-assaulting “Kampfgruppe Setesch” and supporting German units from the north.
This is probably the most violent single point on the battlefield right now, with two British tanks, one of them burning, and 64 men, four officers, and six machine guns, all within three hexes (about 90 meters – a medium-sized parking lot).
The overall situation at the beginning of Turn 4 – the Australians have cashed in about half the effective combat strength, including three tanks – but have also more or less secured the German primary trench line. The Australians will now spend most of Turn 5 consolidating their position, and on Turn 6 launch a new assault on the secondary German trench line some 150-200 meters behind (each hex is about 30 meters across at its widest point), and then the outskirts of the town behind that.
Australians vs. Germans at Hamel, 1918 (Part 03)
Okay, I was finally able to finish this game of Valor & Victory “1918 Edition” – depicting part of the Australian assault on Hamel (4 July 1918).
As discussed in Part One of our recent article series, this battle was especially important because it field-tested new combinations of diversion, close coordination between tanks and assault infantry, shorter and sharper “surprise” artillery barrages meant to suppress and stun rather than destroy, and more flexible utilization of support assets allowing better tactical exploitation of initial breakthroughs into operational depth.
In short, the Australians under General Sir John Monash decided to ditch long artillery barrages that really only served to warn the Germans of where the Allies intended to attack, rely instead of misdirection shock, and surprise, and keep the tanks and infantry much closer together in order to ptovide mutual support.
We’ve already gone over the scenario set up in previous posts on this project, as well as some of the special rules we’ll be using to attempt to recreate this “Monash Doctrine” – as well as retrofitting Valor & Victory AFV rules into new Mark V “male” and “female” tanks for use in 1918 Great War games.
So far we’ve seen the Australians make their initial assault across no man’s land toward the primary line of German trenches – making the best use of tanks as mobile cover, as well as craters. They took a little extra time in avoiding minefields, and used the advance and assault phase of their turn to pick their way through German barbed wire.
Of course this gave the Germans additional time to hit them with MG fire, but so far this has been surprisingly light. What hasn’t been light, however, is German mortar fire, which has been murderous. But now the British tanks are close enough to start laying down suppressive fire, and the massive wave of off-board artillery is about to hit the German line just before the Australians reach the trench line.
So this image shows the Australians’ 10 light and 5 heavy artillery barrages, scheduled to hit in the Command Phase of their Turn 2. They’re using 1918 “drift” rules, however, and so they’re not terribly accurate by World War II standards. The final locations of the artillery barrages are shown, you can see where only a few of them have actually landed on their targets.
In fact, two mortar barrages have almost hit British tanks!

Even those barrages that hit their targets haven’t always done the best damage, especially in the southern part of the line. However, one barrage in the center has really hit home. Note the darkened German units set off on an angle, these represent units eliminated by the artillery.
Units that are set at an angle but still “illuminated” are not eliminated, but pinned, and thus unable to use opportunity or defensive fire against Australian infantry sections as they continue their advance toward the German trench line.
With off-board artillery resolved (and somewhat disappointing except that one really powerful smash in the German center), we move on to Australian / British direct fire phase. In general, the rule in Valor & Victory is that you can move or fire, not both in a single turn. So these British Royal Tank Corps Mark Vs along the southern part of the line all fire at German targets.
But they roll very badly, the Germans making the best of their +2 cover bonus afforded them by their trenches. Only a few additional German units are pinned or eliminated.
After firing, all units then get to move one hex in the “Assault and Advance” phase, the tanks crawling forward just a little.
A quick word about these tanks … the “male” tanks are armed with two 6-pound guns in side-mounted sponsons, along with a handful of machine guns. The “female” tanks have no cannon, but are armed instead with many more machine guns.
Historically, the general idea was to send these tanks into assaults mixed in pairs (hence the “male” and “female” metaphor). The MG-armed female tanks would suppress enemy infantry and gun crews while the cannon-armed males would shell enemy bunkers, gun positions, strongpoints, and buildings.
This actually works out great in Valor & Victory – since, when tanks are close assaulted by enemy infantry, they can fight back only with MGs, cannons cannot be used against enemy infantry crawling right up on your tank’s hull. This makes “males” very vulnerable to enemy close assault, unless they have females alongside to cover for them. Females are also better at engaging targets in multiple directions, as these MGs are mounted all over the tank’s hull (none of these tanks have a turret).
Conversely, armed only with MGs, the females cannot engage enemy targets past a certain range (cannons in Valor & Victory have unlimited range at least on the relatively small battle areas depicted on the map boards), and only males can engage fortified or armored targets.
Male or female, though, at least so far these tanks aren’t doing very well at all.

Further north, however, one MArk V male does much better, landing 6-pounder shells and Hotchkiss .303 machine gun ammo right into the German trench to devastating effect.

With the artillery and tanks doing all they can, we’re finally onto Australian movement phase. Eager to get out of no-man’s land, they have decided not to fire, instead retaining their movement phase for fast advance the rest of the way to the German trenches for a series of close assaults.
The first Australian assault however, actually fails. Even against this gravely weakened German platoon position (an MG 08 and crew, a half squad that includes an MG 08 15 LMG, and an officer -Leutnant Ritter), the Australians take serious casualties to point-blank German opportunity fire, which weakens their assault to the point that very bad dice rolls actually causes the assault to fail.
Failed assaults in Valor & Victory is something you never want to see. The casualty points you have to pay = the number of non-pinned enemy units in the target hex + terrain bonus (2 for trench) + the margin by which you failed the roll. The Germans, however, must also sustain casualty points = the number of enemy units that just assaulted them, and this was the hex already badly blooded by that Mark V tank fire.
So by way of grim default, the Germans have basically run out of men in this hex anyway. But because the Australian assault technically failed, those few survivors do not get to occupy the German hex, thus leaving the survivors pinned down in the open just in front of the German trench.
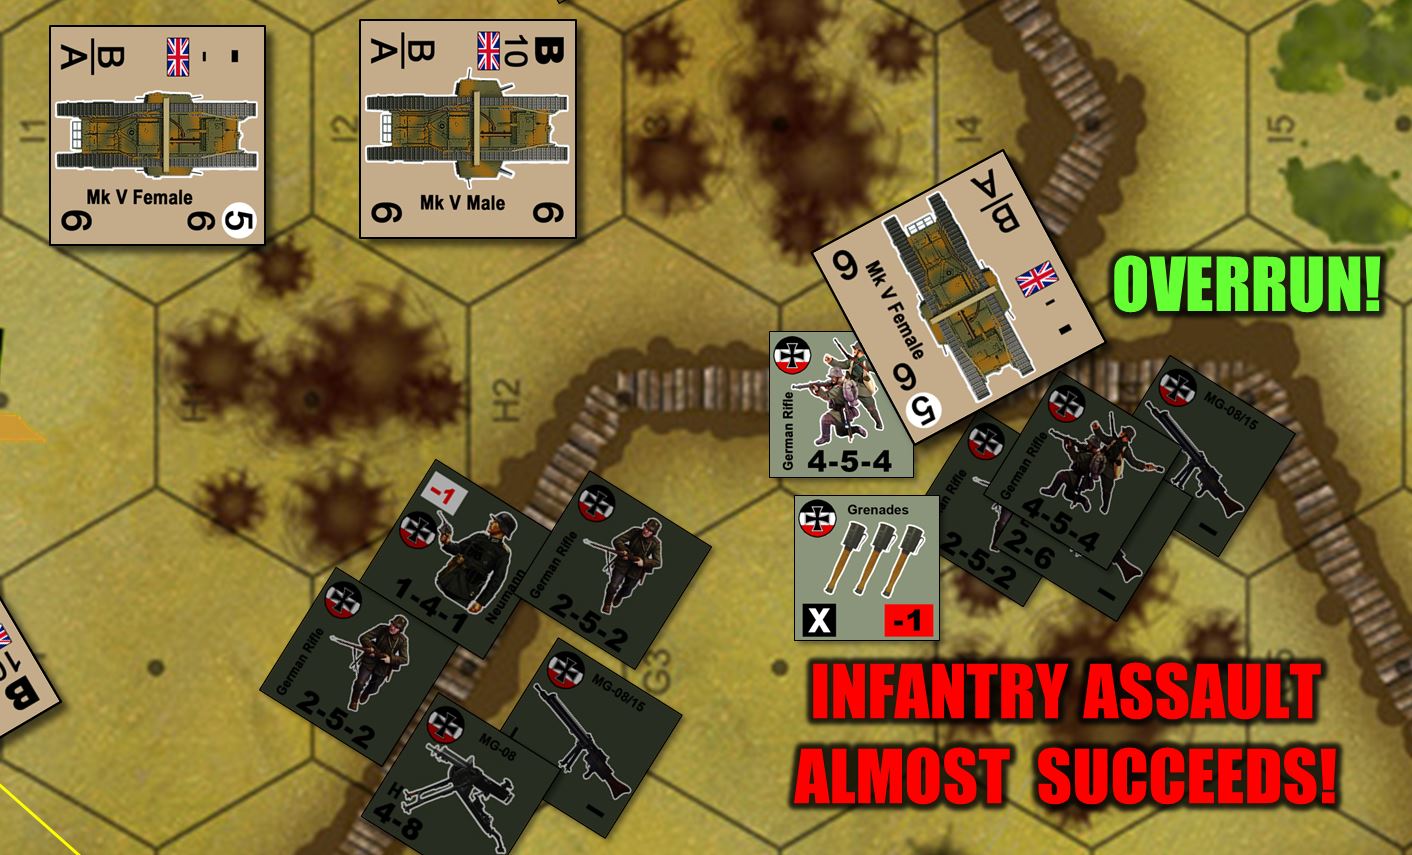
Things go a little better for the Australians in the center, where one Mark V “female” tank that did not have a target earlier (and so did not fire, thus leaving her eligible to move) instead overruns the German trench. Tank overruns are terribly nasty, although again they can’t use their cannons point-blank against enemy infantry in the same hex.
Good thing “females” don’t have cannons, those weapons mounts instead taken by more machine guns, which are doubled in overrun attacks.
In short, this makes “female” tanks absolute monsters in overrun attacks, as these Germans learn to their dismay. They do get the opportunity for a close assault on the tank as it comes in, and it almost succeeds (which would have blown up our first tank of the game). But the British catch a break and the Germans just miss their roll. The overrun goes in and wipes out this German position, finally putting the first real crack in the German trench line.
Australians vs. Germans at Hamel, 1918 (Part 02)
Finishing this game today come hell or high water. If there was ever a day for it, the day is today.
I keep meaning to really cut loose on the Battle of Hamel game in Valor & Victory, pitting a company of General Sir John Monash’s Australian infantry + eight Mark Vs of the Royal Tank Corps up against an understrength “reserve kompanie” of Germans (4 July 1918).
Things keep coming up, but I have finished the first full turn. This is gonna be a big one, folks. We’ll see if the Australians and tankers can do as well here as they did historically!
 North wing of the Australian assault. Firegroups based on German MG fire (assisted by direction of German officers) actually don't do very much damage up here. Australians are making the most of the craters where they can (+1 to APFP fire checks) and I'm counting tanks as a V&V "LOS Hindrance" if enemy fire has to pass THROUGH a hex occupied by a tank.
 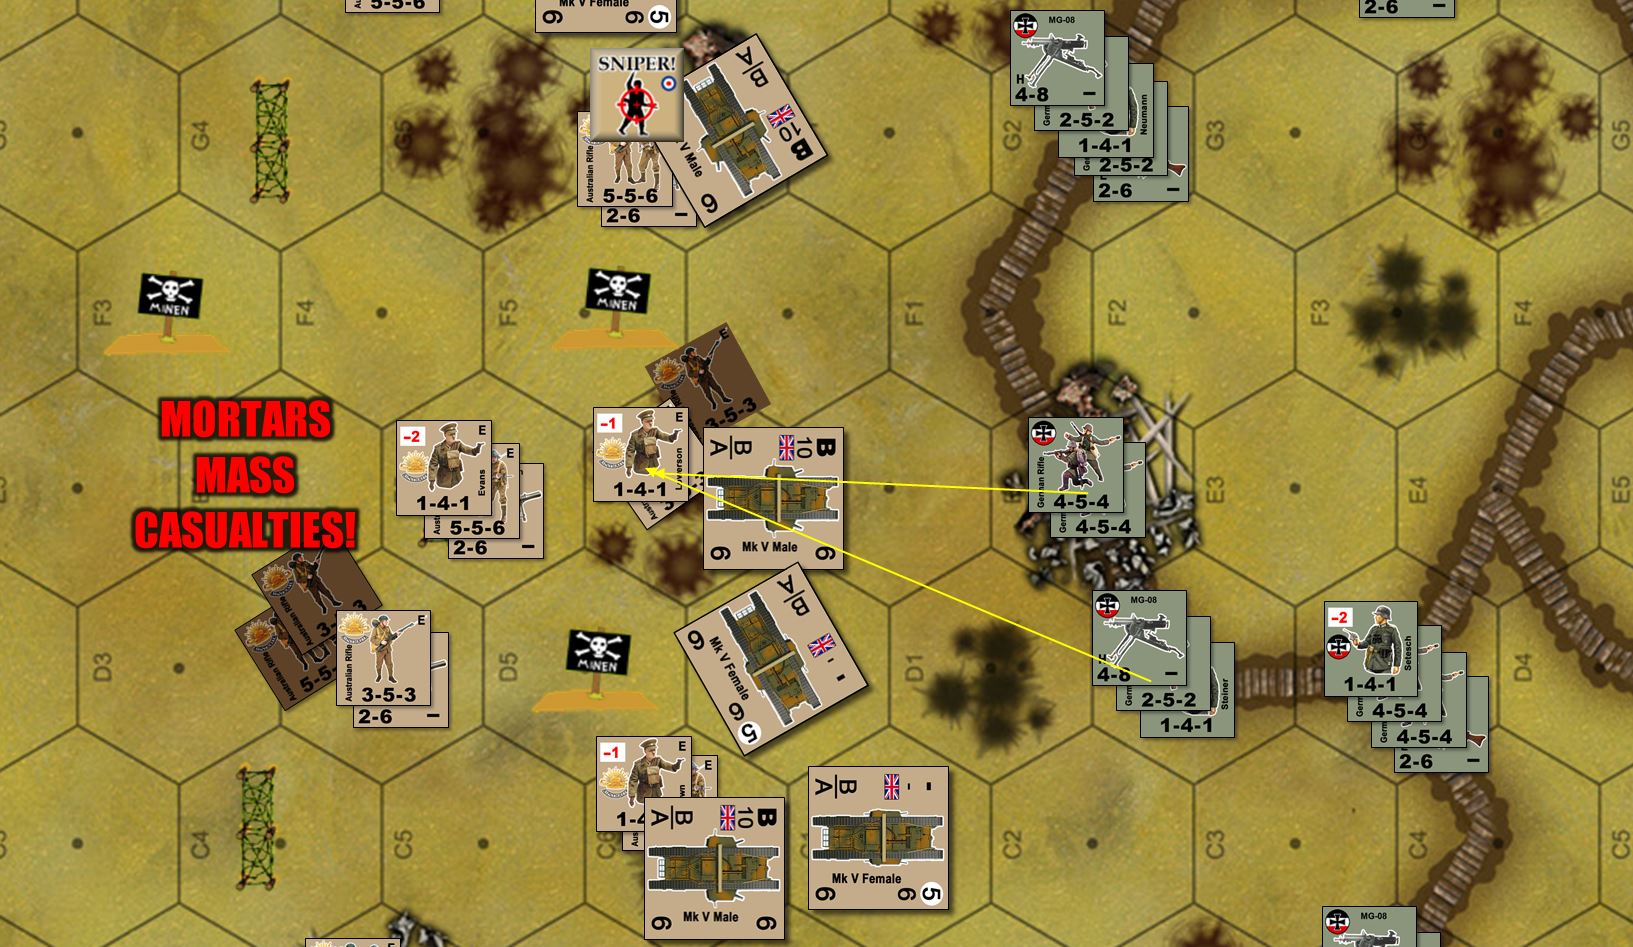 In the center, the Germans score more successes, Their MG 08 and MG 08 15s do better, but what really scores are German 7.58cm "minenwerfer" mortars. Three strikes are called in, and two score amazingly well. A squad and a half are taken out right here (12 men rendered combat ineffective, say 6 casualties = 4 wounded, 2 killed outright). Note that Australian movement has taken place through no man's hand with +2 movement bonus for stacking with officers (where applicable), plus they are avoiding all minefields. They've advanced into barbed wire where possible, but used "Assualt Movement" phase to then advance THROUGH the wire. It just slows them down and gives the Germans potentially another fire phase.
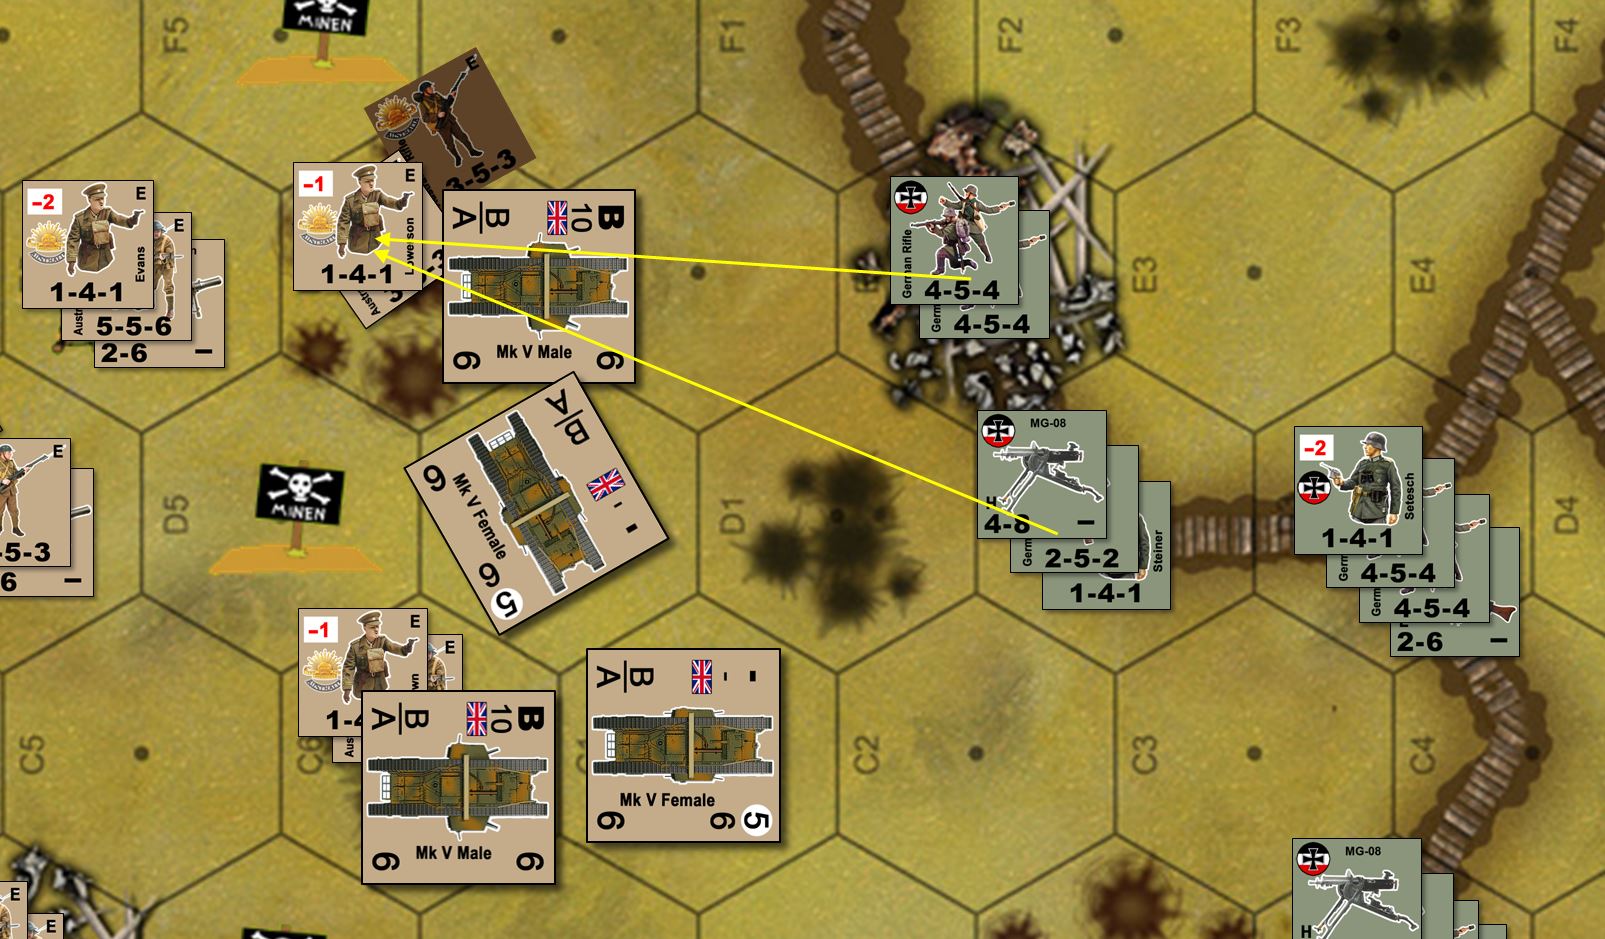 Turn One is now complete. No German casualties so far. The Australians have lost three full squads (24 men = 12 actual casualties = 4 killed, 8 wounded). But Australian artillery is about to hit (Monash Fire Special Rule) and of course the tanks (both Mark V Male and Females) are close to the German Trench line, and ready to cut loose.
Battle is set - Australians vs. Germans at Hamel, 1918 (Part 01)
German forces:
x20 squads (roughly three companies, an understrength battalion).
+ x8 minefields, x6 barbed wire, x3 7.58cm minenwerfer mortars,
x4 MG 08 MGs, x12 MG 08 15
166 officers and men. 12 grenades
Australian forces:
x18 squads (two companies)
+ x9 Lewis Guns, zero Vickers Guns or mortars, x5 heavy barrages, x10 light barrages
(special 1918 Edition “Preparatory Artillery Barrage” rules – except the hit on the beginning of Turn 2)
151 officers and men. 12 grenades
British forces:
x4 Mark V “Male” tanks, x4 Mark V “Female” tanks
64 officers and men
VICTORY CONDITIONS – Game last ten turns. At the end of Turn 10, one pint for each building hex controlled / last occupied by each side.

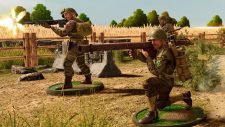
Closeup of part of the Australian assault force, backed up by Mark V “male” and “female” tanks of British Royal Tank Corps.
Part of the German forward defenses. Note the two general bands of trench systems (primary and reserve).
German backfield, where 16 building hexes are ready to either be defended or occupied. One point per building hex controlled by either side at the ned of Turn 10. The Australians have tons of firepower, tanks, artillery, superior troops, etc. But the Germans have plenty of space to trade for time … and they have defense. For the Germans this is defense, absorb, and delay. For the Australians this is assault, break through, and move FAST.
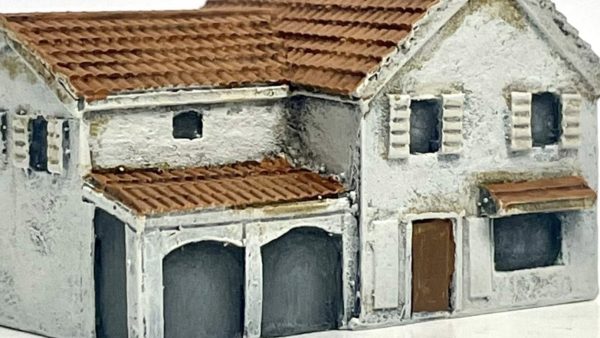
Building four-board map for upcoming tank breakthrough game
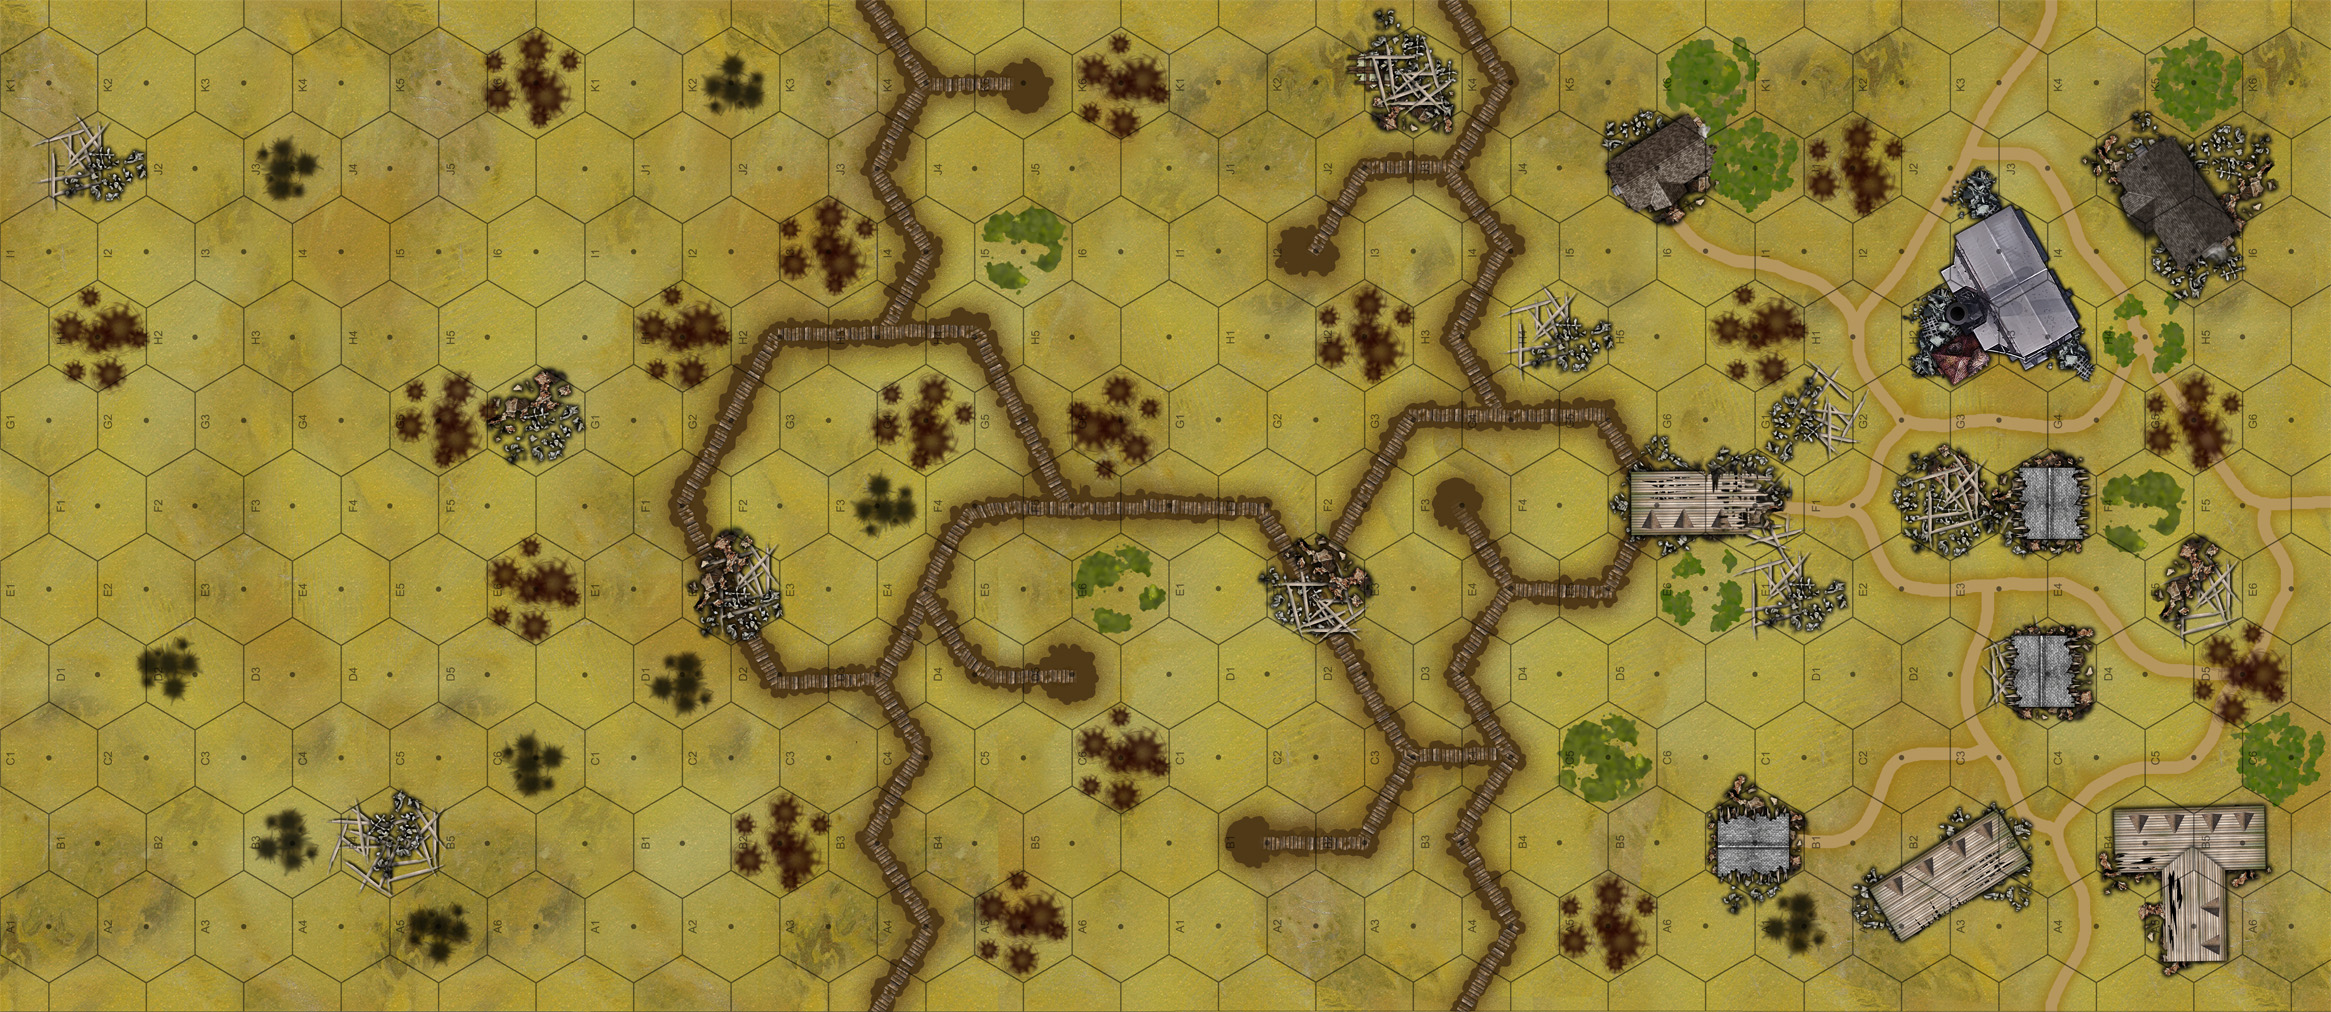
I’ve finished building a quick four-panel (four standard Valor & Victory map sections) “trench assault zone” for an upcoming game we’re running to support the 1918 Armistice Centennial Article Series.
In very quick summary these four panels are (from left to right)
- No Man’s Land assault zone
- Primary German trench line
- Secondary German trench line
- Town that the Germans are defending
The attackers, obviously, are going to be assaulting from east to west. This will be a rather large game for Valor & Victory, and will feature my new Australian infantry and British tanks. In this way, I hope to approximate some of the actions seen at the Battle of Hamel (4 July 1918) and Amiens (8 August, 1918), where Australians of Monash’s Australian Corps (Rawlinson’s Fourth Army, BEF), spearheaded by British tanks, used new close coordination tactics of artillery, assault infantry, and tanks to crack brittle German defenses held by troops depleted and exhausted by the recent “Kaiserschlacht” spring offensives of March-June.
This will be the first time I’ve used AFVs in Valor & Victory in quite a while, and definitely the first time I’ve used them in a World War II setting.
British Armor in 1918 Great War
In continuing expansion of our Valor & Victory: 1918 Edition, we’re adopting the armor rules for this WW2 system back into 1918 values for use in our ongoing 1918 Centennial Commemorative Valor & Victory games.
Here we see a very quick sample of some of the tank units drawn up in the Valor & Victory system. This isn’t from an actual game or battle, just showing off the new counters created on lunch hour today. 😀