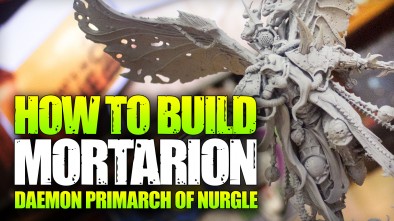
How To Build: Warhammer 40,000 Mortarion, Daemon Primarch Of Nurgle
September 15, 2017 by johnlyons
John gets busy in the studio with the latest build for Mortarion, Daemon Primarch of Nurgle from Games Workshop.
Pre-Order Mortarion Here!
Thankfully the build is actually quite easy and it won't take you ten thousand years to frantically put together, each component slots together in a very simple fashion providing you follow the fantastic instructions that comes with it.
It's a massive model and we're so excited to see it played on the tabletop, we just have to get it painted now... OH JOOOHN!
What do you think of Mortarion?
Supported by (Turn Off)
Supported by (Turn Off)
Supported by (Turn Off)














When did this become John week? And when can we get another? 🙂
I was waiting before someone would notice that it’s mostly John content this week.
Did it seem easy/possible to leave the wings off to put on later with a strong bond? Or better to have em on? Asking, as it may be easier for my kid to paint it with them off. I’m by no means a pro, and want him to be as sturdy as possible.
you could totally keep the wings off until after painting. Just avoid the join points up on the top of his back and your golden 🙂
That’s great to hear. It kinda seemed like it. It’s his biggest project yet and he’s excited. I wanted to make it as easy as possible for his 8 year old hands, spent his whole allowance on it.
I’ll keep an eye out for the those points. Thanks for the reply and advice.
Stick some bluetack in the wing sockets so that you don;t get primer in there and the glue joint when you put them on will be as strong as it would be if you put them on before painting.
That’s a great. Gonna have to start doing that. Way better then gently scrapping it off or using super glue.
John is a busy boy I see
It is chilling how much of this model makes me think of my beloved First and makes me wonder have fallen these Dark Angels might have.
Great show and a great model. Looks like it will be a bugger to paint when assembled!
Wouldn’t last long on the table top though, just get Brigadier Lethbridge Stewart – “Chap with wings there five rounds rapid”
Bit of a side question – what glue were you using? The revel polystyrene cement? What do people think of the Humbrol type?
I’ve never used Revel, and I find the humbrol quite thick – does poly cement need to be warmed slightly before using to help it flow better?
Thanks John, it looks great and, as always you’re a soothing voice to listen to over these things!
The Revell Contacta Professional is a bit thinner than the Humbrol. It tends to work better in room temperature and gets a bit thicker in the cold and thinner in the heat.
The Revell one gets my vote too. Have used a number of different plastic cement glues over the years including the Humbrol cement and the Humbrol liquid, also GW brand. None are as good as the Revell. Also found the nozzle blocks less than the Humbrol.
I use the Revell glue since the 90ies and it is by far the best glue for any plastic model
Thank you everyone, I’ll get some off amazon and give it a try.
The only glue I ever use is plastic weld. It’s as thin as water, and you just apply with a brush. It melts the plastic together to form a really strong bond, and dries super quick. You can also carefully brush it over seams to completely blend away joining seams. I love it.
You can get it at loads of Model shops, and even on eBay http://www.osbornsmodels.com/plastructppc-2p-ppc-2p-plastic-weld-3526-p.asp
I mostly use the thinner stuff on scale models 🙂
Really nice build. With all the folds and bits and bobs going this way and that, would a sub assembly set up worked for painting? The wings as stated above seem an easy fix for this. Or is the model able to get painted up without the need for the separation?
Really enjoying this and the other episodes this week. I took a flyer and bought the Tau getting started set. I know these one off figures lend themselves better to this format but I would love to see more, maybe a getting started collecting box or a Bolt Action platoon. It is just nice to have a friend over for awhile while i get work done, and also later when i can hobby a bit.
Love the idea of clipping all the parts and then bagging them up. Going to have to try this next time I build a big kit.
Oh, be careful there. Sometimes these steps are very specific with no real distinction between the components.
If that is the case break it down into more bags (sub assemblies) 🙂
That’s ok. I assembled a Thundertusk earlier with no instruction booklet and by clipping out all of the parts and putting them in one big pile. Makes assembly more like a jigsaw where you gotta figure out where all the bits go just from the picture.
Sometimes the hard way is the fun way 😉
Besides … it’s not as if GW models need instructions, right ?
It seems John liked this assembly a lot, maybe more than tanks.
It must be hell to transport a model like this without doing any damage to it..
I watched this video while cutting the foam to transport my Kairos model. That was difficult enough, and Morty has even more wobbly sticking out bits (so to speak).
And can I say THANK YOU for the tip about using a lighter to clear the tube for the glue. I’ve used Revell polycement for years and never knew that trick.
Yeah, I’ve been using a pointy scalpel blade to pick out the solidified glue. Lighter is a great tip.
“It seems John liked this assembly a lot, maybe more than tanks.”
woah….woah….. easy now.
Intersting model, but how are you supposed to transport it safely? No way is that surviving being put in foam, cycled to work for the day and then cycled to the shop for a game after work, if it even fits in the foam to begin with.
Really interesting video. Now that I can see more of the model and the bits, I like it much, much more. As the video started, I was thinking ‘this shouldn’t be too difficult to convert by leaving off a lot of the ‘bling’. By the time it ended, I was thinking ‘actually, I think I like most of the extra stuff’. (I might still leave off the smoke from the backpack and the scythe.)
One thing I did find strange though was just how different my approach is to @johnlyons when it comes to assembling the kit. For starters, I was amazed at how little glue he uses on joins. I consider myself to be very careful, but I use much more glue, covering virtually the whole surface that I’m sticking to another piece (and I use the same Revell glue). I find by welding the entire join I get a much, much stronger join. Any seepage – and I do sometimes get some – is easily cleaned up with a piece of kitchen towel. By having the joins weld completely you avoid the slight gap that you can see between a lot of the pieces. Perhaps that gap would be filled by paint, but I’d rather not leave it in the first place.
I was also surprised by how often John didn’t refer to the instructions! The number of times he was trying to figure out what went where, and i was thinking ‘why not just look it up?’
I would never have guessed we’d approach model making so differently given just how professional his paint jobs always are.
Speaking of which, I can’t wait to see Mortarion painted. Don’t keep us waiting too long John!
“I was amazed at how little glue he uses on joins. I consider myself to be very careful, but I use much more glue, covering virtually the whole surface that I’m sticking to another piece (and I use the same Revell glue)”
I’m not sure about John, but I for example use superglue, specifically to make a weaker join. I often do demo games for kids, or just put out models for display, and they often fall to the ground. A weak join means that it’s more likely to let it go at the glued part, so I can just glue it back. With a stronger join, they often snap in a more stressed part of the plastic, that might be harder to repair.
Wow, a how to build video. This is old school Beasts of War. The first video I watched of BoW was John building a rhino on youtube. Hey John, you want to build a Stompa again? What about a Heirophant? 😛
damn you! damn you all!
Going along my way ignoring GW maybe buying the odd technical or texture color thats it. But than, Blood Bowl 3rd edition…pfff ignore, primaries marines…pfff ignore, new 8th edition starter set…pfff ignore, Mortarion miniature…pfff ‘NOW SON, would you ignore your father!’ a booming voice echoed in my head.
Damn it you wearing me down and of all things it has to be papa nurgle calling my name! arg, can’t resist temptation…need to rot!
This was a great tutorial, thank you! I’ve linked it in our article about the model: https://alkony.enerla.net/english/the-nexus/miniatures-nexus/miniature-related/miniature-kit/mortarion-daemon-primarch-of-nurgle-kit-warhammer-40-000-ed8-games-workshop-2017-miniature-kit-review