Skip to toolbar
Stuck at Home; Keeping myself sane

Stuck at Home; Keeping myself sane

Supported by (Turn Off)

Project Blog by warhammergrimace Cult of Games Member

Recommendations: 1015

About the Project

As of Monday 23/03/2020 I'll be stuck at home, as the schools will shut down this Friday. So I'm keeping this project to show what I'm doing to keep myself sane. It'll mostly be painting miniatures, some of which will be added to my other projects. Writing board game reviews, some painting tutorials and terrain building. Going into 2021, this project page will become more like a blog.

This Project is Active

Going Forward with this project

Tutoring 7
Skill 7
Idea 8
No Comments

With lockdown in the UK effectively over, this project will continue as my catch all project. It will include hobby items that don’t fit anywhere in my other dedicated projects. So for instance I’m about to start painting some Blood Bowl teams, and rather than starting a new project they’ll be added here.

I will also include tutorials in this project going forward, unboxings and and anything else hobby related. If we end up in another lockdown at some point in the near future this will again become my lockdown project.

During the lockdown/Furlough period which was from end of March until July 31st I did manage to blast through a big chunk of miniatures and terrain pieces. In total I painted around 180 items, far more than I would normally paint in a year. Yet it still didn’t make much of a dent into my grey army, which has me now considering going through everything and making some touch choices of what I keep and which items I’ve had for years gathering dust to get rid of.


Going Forward with this project

Creating Gore Tutorial

Tutoring 8
Skill 8
Idea 8
No Comments

Step 1

First of all, you’ll need a prepped base. This can be can either be fantasy or Sci-fi/modern, in this case I’ve made a simple fantasy base.

Step 2

Next, I’ve added some small stone, which will become standing stones. This base will be used as an objective marker in fantasy and historical games.

This image has an empty alt attribute; its file name is last-roll-17.jpg

Step 3

The next step is to paint the base and stones, yep we’re going to paint stones to look like stones. The easiest way to do this is black or dark grey under coat and dry brush with a lighter grey colour.

Step 4

Once your base has dried, the next step is to make up the gore. Squeeze some UHU or similar glue on to a small tray or up turned base

Step 5

Now you will need to add some colour, for this Tamiya clear colours work best, for blood use red, and possibly a little purple. Mix the paint and glue together to create a sticky goo. You can use inks, but I found that the Tamiya Clear Colours work best. If you want to create an ooze for Nurgle then you’d use greens or yellows or a combination of the two.

Step 6

Now you have a  gooey substance, use a cocktail or matchstick to place the gore on to the base. If you want strands, you will need to dab the glue onto the area and then carefully drag the strand across to the desired area.

Step 7

Do this as many times as you want. You can also just add large patches on to the floor or other areas of the base to give a bloody and gory effect.

You can also use this method to create spiders webs, just replace the coloured ink with either PVA glue or white paint.

Flora Basing Tutorial

Tutoring 8
Skill 8
Idea 8
No Comments

Using real mosses and plants on your bases is a great way to add interest to your miniatures.

Before you start you’ll need to prepare your plant material to make sure they last.

Tools and Materials needed for preparation:

Plants

Glycerin

Absorbent paper (ie kitchen roll)

Water

Small container

This technique can be used on any type of plant but the results can vary. Generally the more ‘woody’ the plant is, the better. Normally once you cut a plant it will begin to dry out, losing its water which in turn destroys the structure. This process solves the problem by replacing the lost water with glycerin which acts like an embalming fluid and retains the plants structure.

I recommend you do this in advance of when you need the plants. I do batches every now and then and keep them in my bits box – some have been stored for well over a year and are still as good as new. Some plants won’t take well to the process, and you’ll see within 48 hours if it’s failed.

Step 1

Collect some plants! I like to use mosses as they scale well and you can just pull them from the rock but try anything, small herbs like thyme can be good. For this tutorial I just popped in the garden and grabbed some moss – it took me about 1 minute and I was able to find a good variety.

Step 2

For this stage you need some Glycerin. It is available over the counter from most chemists, as it’s often used as a children’s medicine, and also found in some supermarkets. It isn’t harmful and you don’t need a bio-hazard suit to handle it. It’s also pretty cheap, the bottle pictured was about £1.20 and lasts for ages. You will also need a small container and some water.

You need to mix 1 part Glycerin to 10 parts water in the container. Give it a good stir so it’s properly mixed. Next take your plants and dip them into the mixture, make sure they are well covered then remove and place on some kitchen roll or newspaper. This will soak up the excess.

Some plants you may want to turn over after an hour to soak both sides. Then simply leave to dry (overnight if possible).  After 24 – 48 hours any plants that didn’t succeed the process will have wilted so you should discard them; the rest you are free to use.

Step 3

Now that your plants are prepared you can use them on the bases of your miniatures.

You can take this a step further though, and use certain mosses to create miniature flowers.

Tools and Materials needed for preparation:

PVA glue

Cocktail stick

Moss with fronds

Coloured flock

Some mosses have fronds that like miniature reeds, and these are great for making simple flowers. Glue the moss to your base using PVA or super glue.

Step 4

Using a cocktail stick, carefully apply PVA glue to a single frond – you don’t need a lot of glue, so don’t overload it.

Step 5

Dip the glue covered ‘flower’ into the coloured flock to create flower blossoms.

Using different coloured flocks will add a bit of variety and a splash of colour to any base.

Urban Basing Tutorial

Tutoring 10
Skill 10
Idea 10
No Comments

A quick tutorial for making urban bases suitable for WW1, WW2, modern and Sci-Fi games such as 40k.

Construction

Step 1

Sections of plasticard are cut into irregular shapes and glued to the base. You can use either plain or textured plasticard for this, but if you use textured make sure it is thick enough to resist the glue deforming it. This will be the contact point for your model, so it is worth checking to ensure there will be enough room for the model’s feet.

Step 2

Now to start adding interesting detail to the bases. A regular feature of my bases is brick rubble, which I make by cutting slate model bricks to scale using a sharp modelling knife – I can normally get 4 base-sized bricks out of one model brick, and if one should disintegrate while being cut down, the bits can always go in my mid-grade grit tub. The bricks I use are from the Minaco on eBay, specifically the 1/24th miniature grey bricks, with 250 currently going for £4.99.

Step 3

For some variety, you can replace some of the bricks with wire mesh. I normally do this on around one in five bases. Crumple the mesh down so that it looks damaged, then when you add more elements to the base build it up around the mesh. Any fine-grade mesh will work for this – the material I use was available from Dark Art Miniatures or the older GW.

Basing kits.

Step 4

Pieces from the Gale Force 9 Concrete Rubble Mix- can be used as large bits of ruin. The finer bits from the tub can also go into your mid-sized grit mix, to add further variety.

Step 5

Sections of polystyrene rod can be used to represent elements of the metal reinforcement that most buildings use. Plastruct’s 1/4” (6.4mm) styrene I beam fits nicely with 28mm scale figures. As with the wire mesh, I wouldn’t use this on every base, but it adds yet more options to your basing scheme.

Step 6

Once you’re happy with the various detail elements on your base, fill any gaps with PVA glue and your mid-grade grit. If you’ve been adding bits of brick, and the smaller bits of plaster, this should give a nice mix of textures.

Step 7

Once the grit has dried, add PVA glue and fine sand to fill any remaining gaps.

Painting

Step 1

Undercoat the bases black – I do this by hand, but you can spray them if you so wish.

If you spray the bases, be sure to go back with some thinned black paint and make sure there is an even coverage.

Step 2

Basecoat the various elements of the base. I’ve used three shades on the concrete and bricks, while only two shades on the metal.

Concrete – GW Codex Grey
Bricks – Wargames Foundry Conker Brown A
Metal – GW Boltgun Metal

Step 3

A lighter second coat on the concrete and bricks.

Concrete – GW Fortress Grey
Bricks – Wargames Foundry Brick Red A

Step 5

Was the entire base with GW’s Devlan Mud wash, then highlight the bricks and metals.

Bricks – Mix of Wargames Foundry
Brick A & Tan C
Metal – GW Boltgun Metal

Furlough Painting

Tutoring 7
Skill 10
Idea 10
No Comments

I was furloughed and sent home late March from work due to the growing Pandemic crisis. As a way to keep myself occupied I decided to try and get as much of my grey army painted as humanly possible.

During this period I didn’t set a goal such as finish an army, that would have been to sensible. I just basically grabbed stuff from my boxes and painted what ever took my fancy.

I did managed to get my German Flames of War army finished, and all the US tanks from the Hit the Beach starter set. Yet, all my other projects just got bits and pieces painted. Though when I amassed everything for a one big photo, I did noticed that I’d painted quite a lot of Bolt Action stuff, but not from the same army. Though I did manage paint a full unit of Chinese infantry, a unit of British Chindits.

I was overall quite productive during the last few weeks and managed to get quite a haul of miniatures painted, though I’ll be honest it’s not really made that much of a dent in my grey army which has made me realize how much I actually have. I also realized I’ve probably got too many projects on the go at any one time. So I’ve decided to try and not start a new project until I’ve finished one of the ones I’ve already started (I did say try).

One project I did manage to finally finish was the Walking Dead starter box. All I had left to finish were the zombies which I finally did, and I also finished off the scenery pack for Walking Dead as well, but I still have some additional expansions to now start before the Walking Dead is complete.

Projects I started earlier this year, also got a sizable chunk completed, for instance I started painting up some of the buildings for my various terrain projects. Mortal Gods and SPQR minis were started, I painted a selection of Roman and Greek infantry.

The one project that kinda has been neglected during this crisis have been the Team Yankee armies. I only painted three items, one of the tanks (T-55) for my Chinese army and an M109 self propelled gun along with a command post for my BAOR British army. So my plan before the end of the month, which is when my furlough officially ends is to finish building and painting the four other T-55’s I have.

So I 10 days left before my furlough ends, and I’m planning to get a fair few more models finished by then, which includes some more Greeks, the T-55’s and possibly the post apocalyptic Scooby Gang by Hasslefree.

A Quick Look at Reality's Edge

Tutoring 7
Skill 6
Idea 8
No Comments

Author: Joseph McGuire

Publisher: Osprey Publishing

Reality’s Edge is a skirmish wargame set in a dystopian cyber punk setting. Players take the role of a shadow runners, basically mercenary hackers who lead a small band of operatives, each with specialist skills and abilities, all looking to drag themselves out of the slums. These are in tun backed by Shadow backers, who have their own agendas and designs. The shadow runners will accept jobs/tasks from unknown clients for profit, glory and street cred.

Battles take part in the city commonly known as the sprawl, but players must at all times be aware of locals and the constant threat from cyberspace. Hacking is an essential element of the game, that comes from robots, AI machines, other hackers, drones and data nodes.

Running a campaign within the world of Reality’s Edge as it will allow you to earn experience and better equipment which includes advanced weaponry, synthetics, biological enhancements and much more.

This is a hardback book published by Osprey, it’s nicely laid out with some great artwork littered throughout, something we’ve come to expect from Osprey. The game can be played as either one off scenario or as a long running campaign. I feel it works best in a campaign style of playing, as you can slowly build your band of operatives up with more advanced weapons, better equipment and more operatives to drawn on.

The book is well laid out making it a very easy read. What did surprise me was the lack of images of miniatures and terrain, something you normally expect to see in a modern rule set. Which is a good thing in my opinion as it allows you to re-create the world/setting the way you envisage it. At 320 pages its rammed full of information which includes the black-market list of all the possible weapons, apps, equipment and items for sale, each of which includes a short description. There are a number of scenarios included in the book to try, but it is quite quick and easy to modify these or create your own.

Campaigns are the best way to enjoy this game. It will allow you to slowly build your crew but remember operatives can ditch your crew if things have a tendency to wrong regularly. Everything costs hartd cold cash including fixing injuries. Captured operatives can be bailed or left to rot in jail, though it’s better to bail them out otherwise it’ll affect the crew’s morale, and low morale is the quickest way for operatives to leave.

The mechanics are really well thought out and are based the authors other ruleset ‘This is not a Test’. Though this version of the rules adds more depth to roster generation and equipment options. Fundamentally this is a quick, simple set of rules that’s easy to learn, fun to play armed with a touch of role play.

I like the fact that this game isn’t tied to a miniature line and I’m free to use whatever minis I want. Fortunately, there is a plethora of options out there in the marketplace for both miniatures and terrain. For my first crew I’ve picked up a couple of minis from Studio McVey, one from Infinity and another from a game now lost to the world called Rezolution. Players are free to choose from a wide of manufacturers miniature ranges that could include Corvis Beli Infinity, GW’s Necromunda, Star Wars Legion, Hasslefree, Foundry and Artizan just to name a few. This is the same for terrain as well, in the last few years the range of Sci-Fi buildings and scatter terrain has grown giving us a wide range to choose from.

I’ve been looking for a generic Sci-Fi/Cyber punk game for a while now. I did think I’d done that when I picked up another rules set from Osprey called Rogue Stars, but though enjoyable wasn’t perfect. Reality’s Edge definitely hits the mark where Rogue Stars failed.

I would highly recommend this set of rules especially if you’re looking for something completely different to the current crop of mainstream Sci-Fi games on the market. Anyone looking for a more narrative style game should also pick up a copy. Finally, if Cyberpunk is your thing then this will definitely hit the mark for you, as it has plenty to offer with cybernetics, hacking rules, high tech weapons and much more. It absolutely has an Altered Carbon and Blade Runner feel to the game.

Painting Up-date

Tutoring 8
Skill 8
Idea 8
No Comments

Well I’ve been stuck at home since the end of March, which has meant I’ve managed to get plethora of miniatures painted. On the 28mm side of things I’ve painted 97 miniatures along with built and painted 6 pieces of terrain and finally built the Stoic Arms by 4Ground. I’ve also finished all my 28mm Bolt Action tanks, a couple of vehicles for Team Yankee and the German infantry from the Flames of War starter box, Hit the Beach.

I’ve managed to be quite productive hobby wise managing to plow through quite a lot of miniatures, yet I still have a massive grey army in boxes and draws. This has made me consider slimming down some of the grey army.

Bolt Action

For starters I finally finished off all the tanks that I had built, and part painted which was quite satisfying to have those on the shelf all finished ready to go on the battlefield. I’ve also managed to get some infantry painted which includes some German infantry as well as some British Desert War SAS. I’ve still have several miniatures to paint for the British Desert War force, and my Late War Germans.

Also, in a box waiting to be built is a box of Perry Miniatures US infantry, the aim of this box is to be used for Korea and Late WW2. I made a stock take of my Bolt Action forces a few weeks back to work out what I had and also to discover what I needed for each force. My US force needs a couple of vehicles and I’m planning to pick up a Sherman and a Greyhound. The Brits need a couple of LRDG vehicles, and I may get another Bren Gun carrier.

One of the units I did paint up recently was a platoon of Chindits from Warlord, these are all metal single piece miniatures, being British infantry they’re not too difficult to paint up quick and easily, due to the limited colour palette. My plan is to use them as Brits fighting in Korea, these will be attached to my US force.

Sigmar

Under Sigmar includes miniatures for Warcry, Shadespire and Mordhiem as these are the three games I currently play.  I’ve managed to paint up two Shadespire warbands, the first was the Skaven warband; Spiteclaw’s Swarm. I painted these in a dirty look as I wanted them to look like they live underground. The second warband I painted up was Garrek’s Reavers, these are really nice minis and I found them quite easy and quick to paint up. I’m quite happy with the end result and plan to use them in all three games I play.

I also managed to finish the Sigmar miniatures I was painting with metallics and contrast paint. This was mainly an experimentation exploring how well contrast, ashes and glazes would work over a shiny metallic paint. Some paints worked really well such as Contrast Blood Angels Red, it gave it a metallic red colour much like you see on cars. Other colours didn’t work at all One of those was Ultramarine Blue contrast. I was hoping to get a similar result as I got using the red, but the end result was disappointing. Especially when you compare them to some miniatures, I painted last year mixing blue and metallic paint the old-fashioned way building up thin layers of \silver mixed with blue.


Walking Dead

I’ve finally managed to paint all the zombies from the starter set and all my objective markers, this means I finally have a fully painted core set of a game…Yes I have finally finished painting a core set lol. This means I now have only a few miniatures to paint for my Walking Dead collection.

Once these are done, I’ll need to start on the miniatures from the other Walking Dead game I have, No Sanctuary. I have the core set and the What Lies Ahead expansion. These are truer scale whereas miniatures compared to Mantic’s Walking Dead are slightly heroic scale. The other difference is the miniatures from No Sanctuary are based on the TV series characters rather than the comics.

Reality’s Edge

I recently picked up a copy of the new Sci-Fi skirmish game by Osprey Miniatures Reality’s Edge and being really excited by this game I promptly rummaged through my boxes of minis looking for suitable miniatures to use. I came across three I quite liked two of which are by Studio McVey, from the Sedition Wars range.

So, coupled together with a couple a miniatures I painted some time ago I now have a small starting faction ready to play with. I now need to source another faction/war band so I can introduce the game to friends and try to persuade Coco to have a go at playing the game. Fortunately, I don’t need to find terrain to play, as I have a couple of scenery packs for Infinity in card. These will be ideal for playing Reality’s Edge.

SPQR/Mortal Gods

So far, I’ve painted on a few models for these games, which includes a Roman Centurion and the Macedonian Royal Guard command group. The plan is to start painting the rest of the miniatures I’ve built so far, along with the Macedonian Heroes set from Warlord.

40K

Now after I quit playing 40K when it was in 6th edition, I did say I wouldn’t return to the game and I had no intention of doing so until they announced 9th Edition a couple of weeks back. Now I’ve no intention of building a massive army like I did in the past. My plan is to build 500-750-point force, as I really don’t want to play big games that take hours. The fact the new edition will have a mode of play called Crusade, which will allow you play anything from a combat patrol scale game right up to a massive Armageddon sized battle. I have a 500-point Eldar force that was part built, and I’ve dug that out and started building units ready for painting. I also have a small Dark Eldar force, that’s currently about 350-400 points that also part built and I’ll take this up to 750.

I’m also interested in building a Death Guard force of 500-point force as well, with this in mind I painted a Myphitic Bight-Hauler that I had in preparation for this. I’ve included a short article/tutorial on how I painted this in this issue.

I also had some Primaris Marines I need to finish painting for my Kill Team warband and so these are currently on the painting desk as I write. I had decided to paint them up as Ultra Marines as I’ve never painted this colour scheme previously.

Fantasy Minatures

I’ve managed to paint a few random fantasy miniatures just to break up the task of painting warbands and groups of miniatures. One of these was a Giant miniature I picked up at last years UKGE for £3 (which is about $4) a bargain. I the giant is a boardgame piece from Dungeons and Dragons Assault of the Dragons. Painted up he’s not a bad miniature and will work well in games such as Frostgrave.

Terrain Project

My plan when I was first sent home on furlough from  my job was to start my terrain project, but this ground to a halt once I realised I didn’t have enough basing material and other bits and pieces to start on the modular boards. So, with that in mind I made to decision to build and paint some of the buildings I have instead, so at least I’ve made a start on the project. I had three buildings from Renedra which includes the large rural barn, these were quickly built and painted. I’ve also built a couple of the MDF buildings I have but as yet I’ve not undercoated them mainly due to the weather taking a turn for the worse, which has prevented me from spray painting them.

I plan to paint up the Terracotta figures I have which I plan to use as old ruins on the board. So, I’ll paint these up ready to go onto the board. I also have a couple of other bits and pieces that I plan to use as part of the ruins, and these will also be painted up in preparation.

Once I start the process of building the modular board tiles I’ll write up some articles and tutorials describing the build process.

Irregular Magazine Summer Issue 2020

Tutoring 7
Skill 7
Idea 7
No Comments

Let us welcome you again to our latest issue of Irregular Magazine, Issue 12 Volume 2 for Summer 2020!

Issue 12 Volume 2 / Summer 2020

As we usually do, we begin with a review of the recent News in gaming, followed by a look again our editor’s ongoing battle against his grey hoard – only in this issue he has made some great progress!

We also take a look at the upcoming release of Warhammer 40,000 9th Edition from Games Workshop, as well as some of the free games available from Mantic’s online store and we have a review of Osprey’s latest skirmish wargame: Reality’s Edge.

We have book reviews in this issue that look at Ceaser’s Roman army on campaign, a biographical acount of the LRP in Vietnam, the history behind The Game of Thrones, the SAS’s mid 20th Century actions in Africa, and a book on the history of the Royal Navy in the Napoleonic era; as well as an overview of three of the titles in Images of War series from Pen and Sword Publishing.


We also look at a few great products: the stunning collaboration between Games Workshop and Bandai, in the form of their Primaris Intercessor Action Figure; and our editor has written up both an unboxing of the Dreadball Extreme board game, as well as a step-by step overview of the building of the Stoic Arms, a fantasy tavern kit from 4ground.

Finally, there is a step-by-step painting guide to one of Games Workshop’s easy build kits, the Blight Hauler, as well as a guide to painting wood, and a review of the Macedonian Heros for SPQR from Warlord Games.

Time to get reading – go on, download your copy now!

Issue 12 Volume 2 / Summer 2020

Painting the Death Guard Myphitic Blight-Hauler

Tutoring 8
Skill 8
Idea 8
No Comments

The Myphitic Blight-hauler is a light Daemon Engine that provides the Death Guard with heavy firepower wherever it is needed. Resembling a Bloat-drone that has been stripped of its turbines, this strange machine has heavy weapons mounted on its carapace, and its rusting armored plates can absorb impressive punishment – as can its blubbery exposed flesh-parts, which soak up appalling trauma.

This is one of the new easy build kits from Games Workshop, it was as it should be an easy kit to build. There was very little in the way of mould lines on the kit, so clean up was really quick and easy.

The first thing was to under coat using Games Workshop Wraithbone. I’ve stopped under coating in black these days and generally only undercoat in white, grey or Wraithbone.

Next was to paint the armour

Step !; Base coat the amour with Death Guard Green by Games Workshop

Step 2: A coat of wash using Military Shader from Army Painter

Step 3: A thin coat of Death Guard Green in the areas where you don’t want the shade showing.

Step 4: A 50/50 mix of Death Guard Green and Zamesi Desert from Games Workshop for mid tone

Step 5: A mix of 25/75 of Death Guard and Zamesi to start high lighting the raised areas.

Step 6: Additional shading in the cracks and along some of the edging with a purple wash, you can either use a pre made wash or pick a purple paint and make a thin wash with a medium.

Step 7: Using the Zamesi Desert with a small drop of Death Guard,probably a mix of 85/15 for edge high lighting and anywhere else you think its appropriate.


The metal edging was done using Leadbelcher and this was washed with Nuln Oil both paints are from GAmes Workshop.


The bronze metal was painted with Retributor Armour, and then was washed with Seraphim Sepia and Seleton Horde Contrast. At this point I started adding rust on the steel coloured metal, basically dab a dark brown on. I used Rhinox Hide from GW, once dried I stippled the brown with an orange, I used an orange from Windsor and Newton. I then washed over this with a wash of brown to dull it down slightly,

The fangs/teeth where painted white and then washed with Skeleton Horde Contrast, then Agrax Earthshade both are from Games Workshop.


The light and gums were painted with a Blood Angels Red Contrast from GW. The gums were too bright so this was toned downed using Strong Tone wash from Army Painter. The gun was washed in Nuln Oil and the missiles on the other side were painted with a contrast red.

The fleshy parts were painted as follows

Step 1: A wash of Reikland Flesh shade from Games Workshop

Step 2: A coat of Carroburg Crimson from GW

Step 3: A coat of Druchii Violet from GW

Step 4: Raised areas were painted with a Red contrast

Step 5: A coat of 50/50 Mephiston Red and the Orange from Windsor and Newton

The weapon was painted with Lead Belcher and washed with Nuln Oil, then I washed the front of the gun with a thin coat of Sepia. The tentacles or whatever they are on the top of the vehicle were painted with a brown wash, then a red wash, followed with a purple wash. The tops were painted with a thin coat of green ink, with a final wash of Skeleton Horde Contrast.

The rest of the metal areas such as the tracks were painted with Lead Belcher, then washed with Nuln Oil followed by a wash of Agrax Eartshade. I then followed this up by picking out areas to paint in rust.

A quick update

Tutoring 5
Skill 6
Idea 6
No Comments

Well what have I been doing for the last few days since my last post. Well for starters I cracked open my German Flames of War army from the carry case, and decided to make a start on the infantry.

This is the first time I’ve painted figure miniatures of this scale, apart from about 5 years ago when I painted some 15 mm fantasy for a friend, and then it was a small selection of different characters/villains he was going to use  for a planned RPG campaign.

So at this point I’ve not painted a 15 mm army of humanoids, in fact I’ve not batch painted an army unit in a while, those I have done have been completed over a longer period of time. Last years Spring Clean Challenge is still unfinished, as I’m that bad when it comes to unit/army painting. I became bored of batch painting a few years back when I got rid of my 40K armies (7000 pts Dark Angels, 4000 pts Blood Angels and 3000 pt Empire army). I started playing skirmish level historical games, Bolt Action is the nearest I’ve come to playing large scale historical games, but even then I’ve not built any large armies for the game.

So sitting down and painting a reasonable amount of 15 mm infantry in a couple of days was not a task I was looking forward to. I decided to paint the uniform in a light grey (Administratum Grey from GW), as my plan was to wash this with my limited stock of Nuln Oil.  I initially painted up one base worth just to get an idea of the different steps I’d require to paint all of them. Once I was satisfied with this I pushed on with the rest of them. Thank god for my painting magnifying glasses as I would have been squinting throughout the process. I finally managed to get through it all and I’m happy with the result.

Once I finished these, I decided to crack on and finish a couple of my Bolt Action Tanks, Panzer III, Stug and a T-34. All of these had been previously base coated but I decided i wanted to add some weathering and dirtying them up a little, so that they look battle worn. The T-34 didn’t get too much weathering done it, as I’m planning to use it in the Korean War Campaign, and I wanted it to look like a reasonably new tank. The two German tanks I wanted to look like they’ve been on the battle field for a couple of years or more, so they needed some drastic weathering, This was done using weathering powders, and powder pads by Tamiya.

All this time off locked away at home has meant I’ve been able to catch up on a lot of projects.

Finished 15mm Germans Finished 15mm Germans
Panzer III side viewPanzer III side view
Panzer III front viewPanzer III front view
Panzer III rear viewPanzer III rear view
Stug side view Stug side view
Stug Stug
Tamiya weathering padTamiya weathering pad
A quick update

Unboxing Dreadball Extreme

Tutoring 3
Skill 4
Idea 5
No Comments

The Brutal Sci-Fi Sports Game

Recently I picked up a copy of Dreadball Extreme board game from Mantic Games for a bargain price of £9.99 (approximately $12.50), this also included a free copy of the players handbook as well. So I’ve decided to carry out an unboxing.

So what is Dreadball Extreme

DreadBall Xtreme is the underground sports game of the future and the follow-up to DreadBall: The Futuristic Sports Game. In this game, two teams battle it out on the pitch to outscore each other, with all-new twists: … Best of all, Sponsors allow you to build entirely unique teams out of any player combination you like! Basically if you’re still unsure,think Blood Bowl with a Sci-Fi twist and it comes close.

DreadBall Xtreme plays very similarly to the original game. In fact many of the actions and their resolution are the exact same.

Contents:

Rubber Gaming Mat

4 Strike posts

Obstacle Posts

2 Dreadballs


65 Page Rulebook

Special Move Card Deck

Sabotage Card Deck

Counters

14 Coloured Dice

Over 30 Miniatures

10 Convict Players

10 Asterian Players

9 Free Agents

12 Yellow Bases

12 Blue Bases

The game is supplied in a tightly pack box, the artwork on the front depicts a scene from a game between the two teams supplied with the starter box. The rear of the box provides some introductory information designed to sell the game to the potential purchaser, it also includes a list of the games contents.

IMG_20200416_135235

Once opened you’re presented with a tightly packed inside full of goodies, on top is a flyer from Mantic, which we’ll ignore. Next is the 65 page full colour glossy rulebook, this is A4 in size and is nicely designed. The rules and information are presented in a clear and precise manner, making it quite easy to read.

IMG_20200416_135254IMG_20200416_135306

The next item in the box are the counters, these are all on one page. This is a boon for me, as I can’t stand games which have been flooded with counters and small cardboard parts everywhere. These are made from a good quality stiff glossy card. They pop out from the card quite easily, as there’s nothing worse than counters that need to be forced out potentially damaging them.

IMG_20200416_135316

The next element of this game is the rubber mat, now this did surprise me as normally with these types of game the playing area is generally made from cardboard. So receiving a rubberized mat in the box make this even more of a bargain.

IMG_20200416_135336IMG_20200416_135345

Once the mat is taken out, what’s below are the miniatures, dice and cards. All neatly packed into the plastic box insert.

IMG_20200416_135357

You receive in a small bag of different coloured 6 sided dice, consisting 4 red dice, 5 blue dice and 5 Yellow dice. There is also a sealed deck of cards which contains the Special Move cards and the Sabotage cards.

IMG_20200416_135404IMG_20200416_135757

Next are two bags of easy to fit together obstacles and strike posts. These push together really easily and its not necessary to glue them but I intend to glue them myself. Both of these bags are stuffed with parts giving you quite good amount of terrain pieces to place on the gaming area.

IMG_20200416_135421IMG_20200417_120952

Now we’re down to the most important aspects of this starter box, the miniatures. First we’ll look at the convict team, this consists of 10 one piece plastic miniatures. These are nicely sculpted, though is some cleaning to do on these, mostly mould lines.

Mantic_Games-Warpath-DreadBall-Convicts-Long_Rock_Lifers-1s

The Convict team is sponsored by the Warden and is made up of hardened criminals.  These players have all position available in their teams; Strikers, who handle the DreadBall with bonuses, Guards, the players that can damage all opponents with bonuses to their rolls, and finally Jacks, who are able play a little of both positions, but they don’t have any bonuses.
IMG_20200416_135707

The second team are the Asterians, these are quite slender looking aliens, very much like Elves in fantasy settings. There is some cleaning to be done on these models, and again its generally mould lines.

Mantic_Games-Warpath-DreadBall-Kalyshi-Bremlin_Nebulas-1s

These are the  more feral version of the Asterians from the Warpath universe and are sponsored by Blaine, a character that appears in all of Mantic Games’ universes. The Kalyshi have only two positions, Strikers and Jacks. This team is a  much faster and more agile team than the Convicts, but they’re also less armored.

Finally the last bunch of the miniatures are the Free agents and the two sponsors. The two sponsors are single piece miniatures, which will as with the other minis in the box need some minor cleaning. The Free Agents are a mix of different races from the Warpath Universe, all are again single piece miniatures.

Mantic_Games-Warpath-DreadBall-Free_Agents-1s

I wasn’t planning on picking this game up, though I had played Dreadball in the past and enjoyed the game, but when I saw the price I decided to grab a copy. So far I’m very impressed with my first impressions of the game, and I’m expecting this to be as good as the original Dreadball game.

Building the Stoic Arms

Tutoring 6
Skill 6
Idea 6
No Comments

A couple of years ago I was awarded the prize of the Stoic Arms by 4Ground on the Beasts of War (now On Table Top) website.

I hadn’t gotten around the building the terrain piece because I knew it was quite a large building, and up until recently I didn’t have the space for it once built. It’s made from MDF and is pre-coloured. All the roofs/floors are removable allowing you to place miniatures and game inside the building. Which makes a far more interesting gaming piece than you average scenic building.

IMG_20200404_111835IMG_20200404_143031

I found this at time quite a difficult kit to build, and I consider myself to rather experienced at model making, having been doing this since the early 80’s, starting with Airfix 1/72 kits before graduating to war-gaming and 1/35 scale models.

IMG_20200404_145104IMG_20200405_162429

Now you can build this either with a wood glue or as I did super glue, though if you’re going to go down the superglue area you will get glue over your fingers. This will get rather dirty/discolored on your fingers from the MDF. It’s quite a pain to remove dried superglue from your finger tips.

IMG_20200406_123832IMG_20200405_163624

A top tip before starting is to make sure you have enough pegs and rubber bands as these will come in useful during the course of the build. I suggest that once you’ve built one part of the floors, then whilst it’s drying make a start on the next floor. That way it won’t take as long to build. Have more than one floor on the go at any one time to speed things up.

IMG_20200407_180410IMG_20200407_180418

The instructions could be a little clearer in places as it was difficult to see from the small photos they used to show you the step by step build. This took me several hours over about 4 days to build, a lot of that time was waiting for glued parts to dry. Many sections required to be left overnight for the glue to bond and dry. With it being such a large kit, this was what slowed the build down significantly.

Overall I enjoyed to the process of building this kit, though at times it was a little frustrating, but the end result was worth it. It will definitely make a spectacular centre piece on any gaming table, and could be used for both war-gaming and RPG.

IMG_20200408_125008

I have to say thanks to both Beasts (On Table Top) and 4Ground for giving this awesome terrain piece as a prize.

Irregular Magazine Lockdown Special Edition

Tutoring 6
Skill 7
Idea 7
No Comments

Last week was spent mostly on putting together this special edition of Irregular Magazine.

This one is a little different than usual due to the changing times in which we all are living in the Spring of 2020. We know that most of our readers are locked down – some with more hobby time available due to economic circumstances; some with with less hobby time due to work commitments still needing to be met and many of us experiencing an increased need to spend more time with our families and those we live with, to keep loved ones going through these times.

But however this lockdown finds you, we hope you’re keeping well, keeping safe and doing what you can to help the medical heroes working in your area to manage the current crisis!

To help you all do this, the Editor has drawn together this Lockdown special edition of Irregular Magazine! This is a compilation of many of our painting and modelling articles that we’ve published over the more-than-a-decade in which Irregular Magazine has been going.

We very much hope this helps you either pass the time, or helps you de-stress just a little, by revisiting some old painting guides and helping to inspire the next things you want to work on in your own hobby projects.

Time to get reading – go on, download your copy now!

Contents include;

  • Application fo paint
  • Colour Theory
  • Constructing the Dueling Giants
  • Air Brushing World
  • Clone Troopers 15mm
  • Sculpting a Robe in Greenstuff
  • Directional Highlighting
  • Clothing and Zenithal Lighting
  • Painting British WW2 Camo
  • Scratch Build Star Destroyer
  • Non-Human Skin
  • Speed Painting Skeletons
  • Painting Colonial Troops
  • One Thick Coat
  • Gore Workshop
  • Painting Ghouls
  • Dip Tutorial on 1/72
  • Urban Bases
  • Flora Basing
  • Moulding & Casting Minis
  • Terrain in History
  • Dark Ruined Tower
  • Basic Character Bases
  • Freehand Design

Painting Wood Tutorial

Tutoring 6
Skill 7
Idea 6
1 Comment

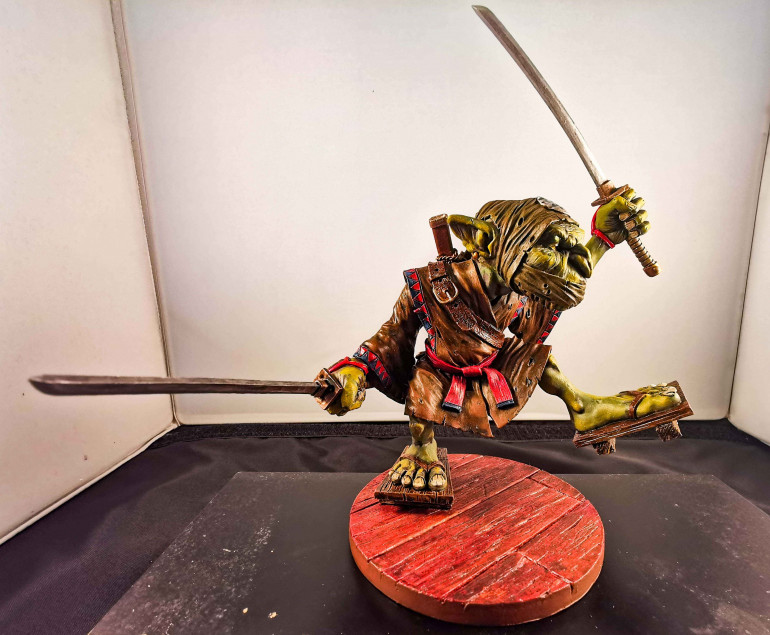
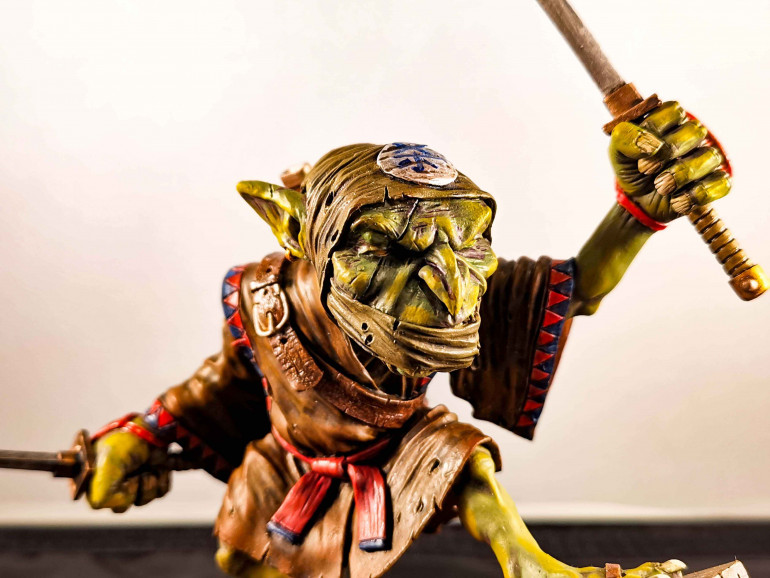
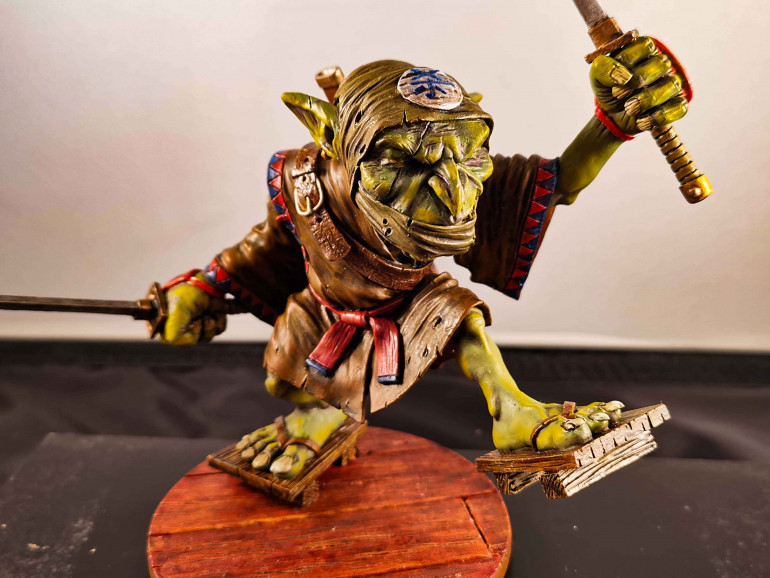
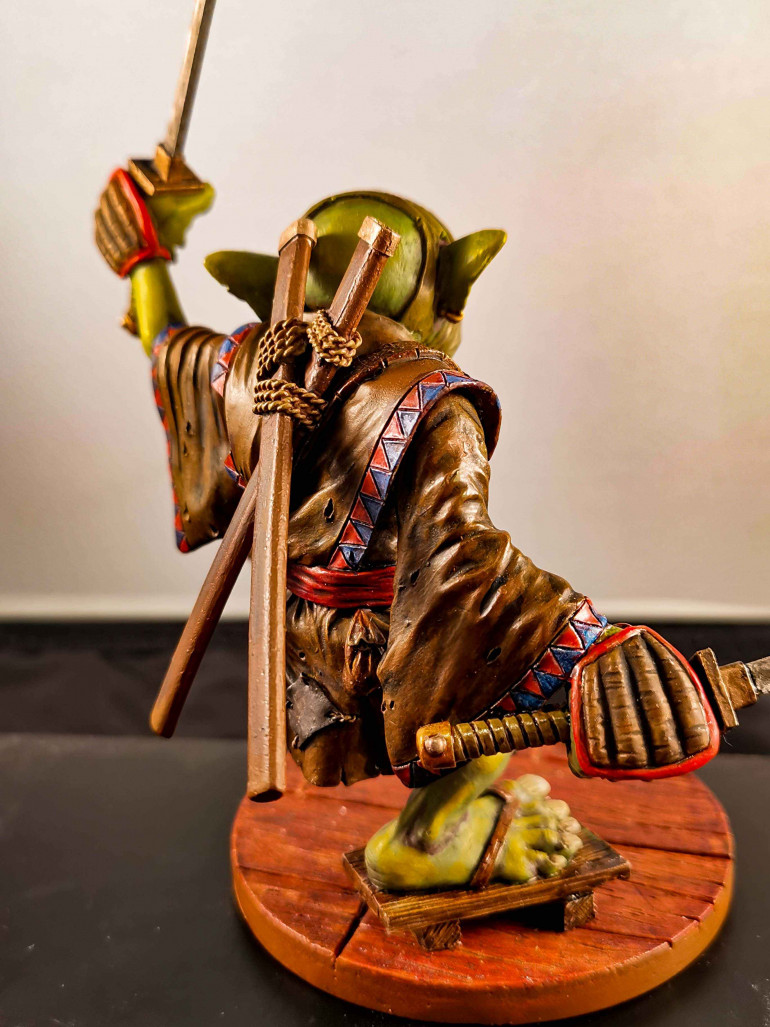
I’ve started a 3-up Ninja Goblin which was originally sculpted by Sean Green, former Forgeworld sculptor. I had purchased this model around 2012, so I’ve had him a few years.

During that time, I’ve moved around chasing work, so I never really had time or the space to build and paint this miniature, well that’s the excuse I given myself and I’m sticking to it.

IMG_20200329_121018

The base that comes with the mini is a large round resin with an effect sculpted on it, now I decided that I wanted a deep reddish colour wood. Below is a simple step by step of how I achieved this.

Stage 1; I under coated the base with Wraithbone by Games Workshop

IMG_20200329_153003

Stage 2/3

I decided that the first two coats would be Flesh Wash (which is more like an ink than a wash) by Games Workshop. Now this paint is no longer in production, so I’d recommend using an reddish ink by another company such as Vallejo or Army Painter. You could just use a dark brown ink/wash but remember to do two coats.

IMG_20200329_161055

Stage 4/5

The next colour I used was Game Ink by Vallejo and again I painted two coats of this.

IMG_20200329_171231

Stage 6/7

As you can see the first two paints, I’ve used have given it a rich dark work appearance, but I decided just to apply another colour, this time Seraphim Sepia by Games Workshop.

IMG_20200329_171454


As an alternative you could use different paints, a suggestion would be the following

Dark Tone by Army Painter

Strong Tone by Army Painter

Agrax Earthshade

Other suggestions could be Reikland Fleshwash by GW and Lavado Sepia by Vallejo.

IMG_20200329_211521


Two more Desert Rats finished

Tutoring 4
Skill 5
Idea 4
No Comments
Two more Desert Rats finished

Sister of Sigmar

Tutoring 4
Skill 4
Idea 4
No Comments

I finally got this mini painted,  I’ve had her for about 5 years sat waiting for a kick of paint. So whilst being stuck at home prompted me to finally paint her up.

front viewfront view
The Lloyd shotThe Lloyd shot

Sister of Sigmar

Tutoring 4
Skill 5
Idea 4
1 Comment

I finally got this mini painted,  I’ve had her for about 5 years sat waiting for a kick of paint. So whilst being stuck at home prompted me to finally paint her up.

front viewfront view
The Lloyd shotThe Lloyd shot

Painted minis so far

Tutoring 4
Skill 6
Idea 5
No Comments

This is a quick update about the minis I’ve painted so far whilst being stuck at home. I’ve concentrated on getting some Bolt Action minis painted so far. These have included 4 for the SAS/LRDG,  a single US airborne soldier,  a sniper for my Germans and another partisan armed with a Thompson.

Painted minis so far

Finding Gaming Influence in Asian TV and Film

Tutoring 4
Skill 4
Idea 6
3 Comments

I suspect that most gamers find influence on what games to play or scenarios from a number of sources, including books, history, comics and Film/TV. In this short article I’m going to look at finding influence in film and tv for Asian based game ideas. Getting hold of Asian films isn’t all that hard, as there has been for many years a regular influx of films from the east readily available for purchase in shops, but for the purpose of this article I’m not going to be looking at DVD’s that can be bought. I’m going to be reviewing some of the apps available to view Asian film and TV, at the same time I’ll be recommending some of the choice films or TV shows which I think are some of the best ones to view.

The apps I’ll be looking at are as follows;

Viki

Netflix

Amazon Prime

Last year there were several TV shows worth watching from China and Korea, one of the best was The Longest day in Chang An, this can be watched on both Viki and Amazon Prime. The TV series is about a former detective turned convicted criminal, who becomes China’s last hope to thwart mysterious invaders who threaten the empire’s capital city on the day before the Lantern Festival. This is a historical drama set in the Tang Dynasty, with the features of the 24 TV series. Its action packed, full of suspense, drama and great set design.

88f22984983593.Y3JvcCwzMjc4LDI1NjQsMjkyLDI1OQ

On Netflix one of the better series was a Korean historical Zombie drama, called Kingdom. I really enjoyed this first series, and a 2nd season has just recently been released. The series is adapted from the web comic series The Kingdom of the Gods, which was authored by Kim Eun-hee and drawn by Yang Kyung-il. Set in Korea’s Joseon period, a few years after the Japanese invasions of Korea (1592-1598).

6IFkUWgYqNsDoGK0xHJ6JmHckGF

It tells the story of Crown Prince Lee Chang (Ju Ji-hoon), who becomes embroiled in a coup/political conspiracy and is forced to embark upon a mission to investigate the spread of a mysterious undead plague that has beset the current emperor and the country’s southern provinces. This definitely one of the TV shows to catch on Netflix, especially if you’re considering an historical game with a supernatural flavour.

Over on Viki and Amazon there are quite a few dramas set during WW2 which are worth watching. The first is Sparrow on Viki, this is a spy drama set in Japanese occupied Shanghai, which revolves around a communist spy called the Sparrow, and Nationalist spies who have infiltrated the Japanese military and police. Set in the 1940s during Shanghai’s revolutionary times, communist agent Chen Shen infiltrates the Japanese’ base and adopts the code name “Sparrow”. His mission is to obtain the “zero” intel, a secret plan that could destroy China. To do so, he becomes the assistant of Bi Zhongliang, the leader of the Special Operations Team under the Public Security Bureau.

250px-Sparrow_Poster

The next recommendation is My Battalion which is available on Amazon, it has two seasons.  It is a heroic story of the Chinese Army courageously resisting the Japanese Invaders during the World War II. In the year 1938, the Japanese Army went south to invade Xu Zhou. Liao Guangyi, the Chief Commander of the 56th Corps were forced to retreat. This tells the story of this famous battalion from their retreat to the final battle which they fought. This is highly recommended for anyone thinking of building a Chinese army for Bolt Action or any other WW2 period rule system.

81KdO9Ndt3L._RI_

My final recommendation is My Country is a Korean historical drama set During the transitional period between the end of the Goryeo dynasty and the beginning of the Joseon dynasty, two friends become enemies following a misunderstanding. They try to protect their country, and the people they love, their own way. The series follows the bloody coup that started the Joseon Dynasty, centred around a group characters that are caught in the coup. They fight to survive against the turmoil and strife of this period.

My-country-poster-cover

There are several more TV shows that are worth catching such as the Candle in the Tomb, set in modern China, about tomb raiding, with ghosts and other supernatural phenomena. I’d recommend Viki as it can be watched for free, if you don’t mind the adverts and all of the programmes are subtitled. Ever Night which has 2 seasons on Viki is a great Chinese fantasy drama, with magic and martial arts.

Candle_in_the_Tomb

Some US Airborne added

Tutoring 4
Skill 4
Idea 6
No Comments

I found a sprue of US Airborne in a draw so I decided to build and add these to the collection of items to paint.  I’m planning to go through all my Bolt Action collection to work out what I have and what I need to purchase, that will posted on my Bolt Action project.

Some US Airborne added

Supported by (Turn Off)