Miniatures Rescue with Maledrakh (aka Spring Cleaning)
Recommendations: 24
About the Project
Some minis fall out of grace and by the wayside for one reason or the other, not to be taken out of storage until decades have passed.
Decades!
Inspired by the OTT "Spring Cleaning" challenge, we will try to heal these broken birds' wings so they might take to the skies once again. .
Related Genre: Fantasy
Related Contest: Spring Clean Hobby Challenge (Old)
This Project is Completed
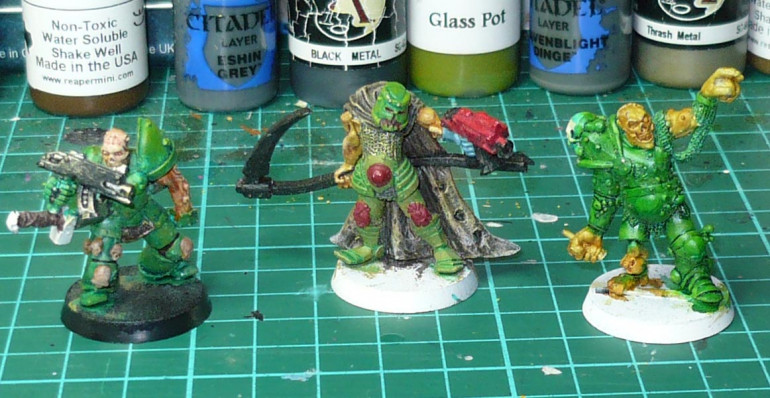
Three little badly converted little nurgly chaos warriors
Giving the old boxes a good rummaging, these three popped up like jack-in-the-boxes
A lifetime ago, I converted them for use in Warhammer 40.000. The left one had originally a smallish axe, the middle one a bell and the rightmost one a largish sword. I did not give them backpacks, and cannot for the life of me remember why not. Maybe I did not have any extra?
These are called “Chaos Warrior” something or other.
They were sculpted by Chaz Elliot and released by Heartbreaker Hobbies in the mid-1990s, and are made in a really hard metal.
They were sold in individual blister packs (as far as I remember), and I bought all the different ones I could lay my hands on back when they were new. Most of them even got painted. These three stopped at this stage for reasons lost to the mists of time.
Incidentially, these very same miniatures (toghether with most of the others in the range) were recently rereleased by Impact! miniatures and cast in so-called Trollcast spuncast resin. I actually bought the chaos set from that kickstarter as well. They are all lying about here somewhere….if I can find them amongst all the other boxes…
At any rate, they are currently available to buy from Impact!’s webshop.
Weapons and bases
so, the first thing to do is get rid of the bolters and bases.
I printed three 32mm bevelled rounds.
Weapons: I looked through my bits box and found a modern plaguebearers sword, and a sprue of “evil” weapons from of the Bones kickstarters. From this sprue I selected a one-handed clawed hammer and a big sword.
So, next stage is to break out the clippers and some glue.
Assembly complete
I snipped off the handles of the weapons, making sure not to cut too close to the crossguards (or whatever depending on weapon) and drilled carefully to make a hole for the pin (piece of a paperclip, 1mm diameter). I also removed the tab from the mini that still had one (The tab confirmed first production year as 1992! More than a quarter century ago!). I drilled a hole into the foot and inserted a pin, then eyeballed the position on the new bases and pushed down to let the pin make a mark. I drilled the corresponding holes, and applied some superglue to secure them to their new bases.
Assembly complete, superglue is drying. All the white gunk is Vallejo Plastic Putty (100% acrylic resin) which is such a life saver in many situations. It is a tube of this rather thin and sticky white putty, and I can squirt a drop or a line as I see fit. When dry it can be cut, sanded and carved.
I use it mainly for filling small gaps, here beneath the feet. I applied it here around the feet before the superglue had dried and when I do that it makes for a super hard gap filler that bonds the stuff down properly.
It can also be used to rebuild smaller, missing details, such as a pommel on the sword. I am going to make it slightly larger by applying more when the first dollop has dried and hardened.
It is too thin and sticky to sculpt with though.
Now to let them dry until tomorrow.
Day 2
Day 2:
Tomorrow has come.
My black has run out, so I used Vallejo Nocturna Shadow instead. This is a greenish black. I gave the new weapons, the bases and the putty around the feet a coat. I see that the little lump on the rightmost leg is actually a skull askew, probably the pommel of the original sword. I have since bent the arm slightly to line the sword up with the skull and rebuilt the sword’s handle with a drop of plastic putty. This made the swords joint crack, so that needed a drop of glue as well.
I am thinking I will do a complete repaint, with rusty steel platemail as the main color. We shall see what I come up with tomorrow.
Day 4
Rusting and decay:
A rather heavy drybrysh with Scalecolor Chink Orange (yes. still pretty dubious to that name). This leaves an uneven brownish-orange finish, and a great base for some more corrosion.
Dabbing here and there with a dryish brush of Army Painter Lava Orange
A lightish drybrush with old Citadel Hobgoblin Orange
Weapons and the impaled sword with new Citadel Nihilakh Oxide
Day 5
Day 5:
Careful drybrush with Scalecolor Thrash Metal to edge the armour and give back a metallic effect. This is usually the last layer on the armour, but here since I have started with the bottom layer a solid metal and not black, so I will be blacklining the armour plates to define them properly.
Vallejo Tinny Tin (Vallejo’s copy of old Citadel Tin Bitz) as a base layer on some of the weapon parts, and a heavy drybrush on the Plaguebearer weapon, the same way I did the actual Plaguebearers.
More Citadel Nihilakh Oxide over the tin bitz
Blacklined armour etc with Vallejo Nocturna Shadow, which gives a greenish tinge. Also basecoated some of the flesh with this.
Highlighted the bronzed bitz and the armour skull details with Army Painter Greedy Gold
Top highlight with Scalecolor Citrine Alchemy, also on the skulls on the armour
Gave the rightmost one olive green skin, plus some details here and there on the others, like the top of the cloak on the middle one.
Forgot myself a bit and did three colours without taking pictures in between. Here we have highlighting on the green with Vallejo Slimer Green followed by Army Painter Army Green. Then some fleshy bits (heads, arms,. etc) with Vallejo Nocturna Natural Flesh
I was not satisfied with the green, so did a bit of highlighting with Scalecolour Sherwood Green. Also did the Plaguebearer sword a bit with this before wiping off the tip with my fingers.
Citadel Athonian Camoshade to shade the green, the flesh, and the sword.
Day 6
Day 6:
Time to finish this. Note that any and all of the steps used on these minis take at most a couple of minutes each. so it’s is not as much work as it at first might seem. It took much longer because of the photographing.
Details like boils and the belly jewel basecoated with Army Painter Alien Purple
Slightly smaller coat with thinned Scalecolor Blood Red on top of the purple.
Further highlight with Hobby Games Products Dark Purple. (This was originally in an old round citadel-style pot from way back when, probably made at the same plant as the Citadel paints of the time.)
Some more highlight with Vallejo Nocturna Medium Flesh, also on a bit of exposed flesh. The belly jewel got a crescent on the lower side
Lots of sickly bits given a careful wash of Citadel Carroburg Crimson Shade. Also the innermost parts of the scythe handle.
Scalecolor Toxic Waste Green for top spots, also used thinned on the exposed skulls. Very light drybrush on the green parts of weapon handles. The belly jewel got a Nurgle-themed three dot highlight. The plaguesword got some dabbed on to make it stand more out.
Hightlighting the skulls with Reaper Graveyard Bone
Teeth and eyes with Reaper Linen White, which has a yellow tinge.
Redoing some mistakes, lining around the eyes, and fixing where the paint had rubbed off at the end of the scythe handle with Vallejo Nocturna Shadow
Soft tone on the skull bone
Milky blue cataracts in the single eyes with Scalecolor Caribbean Blue
Gloss varnish on the belly jewel of the middle one, and (only) on the exposed skull bone on the two at the sides to give the appearance of beling slimy.
Highlights on weapon handles and the orc-like green skin got knocked back a bit, also some fixing of mistakes here and there, and some covering of exposed metal. Vallejo Nocturna Shadow, Pale Flesh and Forest Skin.
Yes, I recently bought both the Fairy and Malefic Vallejo Nocturna Flesh Paint Sets. Giving some of the colours a go for the first time here.
The minis themselves are finished. I kept the cloak more or less in it’s original state, I only needed to cover a few spots that had gone bare metal, also I covered my sloppy mess on the front part with green that I carried over to the shoulders.
Now for basing.
I usually use Vallejo Earth on the tops and black around the rims. This is the last of my Reaper Pure Black. There might be a drop or two left in the bottle, but then it is spent. Two coats of black is needed.
Black flock around the feet, these are so noxious as to kill off anything they come close to…
Finished with tufts and standard flockmix.
Finished with tufts and standard flockmix.
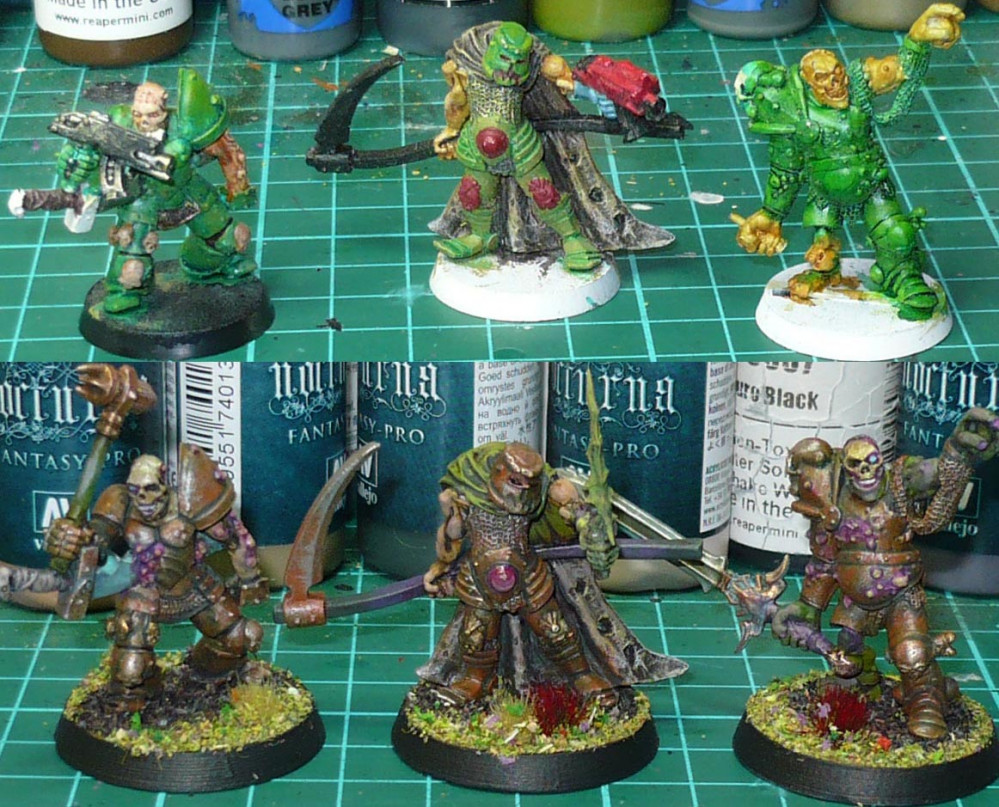
Bubble, Boil and Trouble, the Plague Brothers
The three something-chaos warriors from Heartbreaker Hobbies finished:
I call them Bubble, Boil and Trouble, the Plague Brothers.
(Most of) the cloak is the only bit I kept from the original paint.
How I painted them is documented in that post.
Plague Warrriors (I am actually unsure about what they were called)
Sculpted by Chaz Elliot
Released by Heartbreaker Hobbies, 1992
made in metal, with converted weapons.
32mm 3D-printed bases


