Photography in Gaming
Recommendations: 255
About the Project
Learn how to improve photography for your miniature, board and card games. This will be listed in sections discussing the following: - Technology - Lighting - Framing - Software I hope this guide helps you become a better photographer and if you have any helpful hints and tricks of your own, please make sure to comment along.
Related Genre: Game Aid
This Project is Completed
Technology: Common & High End
Photography in gaming can be difficult, moreso difficult can be the settings on new interfaces for the newest models of cameras and mobile phones.
If you’re looking for the easy route, you can use a simple mobile phone with decent lighting and layout of your subjects.
Perhaps you’re looking for other options with variable budgets, here is a list of opportune inexpensive cameras that can be useful when taking your photographs:
- Sony Cybershot W830 20MP
- Canon IXUS 185 Digital Camera
- Nikon Coolpix A10 Camera
- Samsung Galaxy S9 Mobile Phone
List updated in November 2018
Before I continue, please read up to date reviews on these cameras before purchasing as it can change overtime. You may have a better option with your mobile device or researching further on shopping sites.
Let's Look at Settings
I’m sure you’re well aware that every camera has variable settings to adjust and let’s not pretend that most often than not, we’ll just keep it on Automatic.
That’s fine if you’re taking a quick shot of your doggo chasing birds in the local park however it’s not so great for those times when you’re trying to get that perfect detailed shot of your 40+ hour paint job on your new miniature.
Let’s have a look at the different settings you can adjust on your camera.
If you take anything away from the above video, remember these three tips for your settings:
- Shutter speed – The speed of which the shutter is open for to expose your image. No less than 60th of a second (1/60 to ranges of 1/500).
- Aperature – How much light is being let through your lens. Between the ranges of 4.0 & 9.0
- ISO – How much light is generated in your image. Between the range of 200-800.
My personal settings for an average photograph will have the settings of: Shutter 100, F5.0 & ISO 800.
When using Mobile phones and tablets, you may struggle to find the same options or settings as you would on a standard camera controls.
If you are working with these devices, read up on HDR photography, High Dynamic Range applies when you are shooting subjects with variable lighting, such as sunsets on beautiful beaches.
What HDR does to help aid you in this lighting issue is take 3 photographs of the same subject and merge them together. Using the best from the 3 exposures.
Read More on HDR on this article.
Things to keep in mind when using mobiles:
- Take many photographs, your hand shakes more than you think and devices will show that on your images.
- Hold your device steady or use tripods or guerilla set ups.
- Experiment with filters if it helps your model, but don’t go crazy!
Lighting
Taking pictures of your miniatures can be an easy process once you’ve figured out your settings on your camera, however sometimes you wont get the best results with just that information.
The most common mistake people make when taking pictures of subjects whether it be miniatures, landscapes or people is always lighting. Lighting can make or break your image and if you don’t consider it during your photoshoot you will never have the best results possible without a good lighting set up.
Most of the time this can be simple for miniatures, sometimes taking them outside can help with the natural light however let’s imagine we don’t all live in LA and we need a home set up for those perfect shots.
Here are a few lighting products which are cheap and reliable for miniature photography:
Curated August 2018. Please read user reviews before purchase.
Optimal Lighting for your Miniatures
Having lights pointed at your models is great however you need to discover what’s best to achieve the best results with the least amount of exposure and shadows on your images.
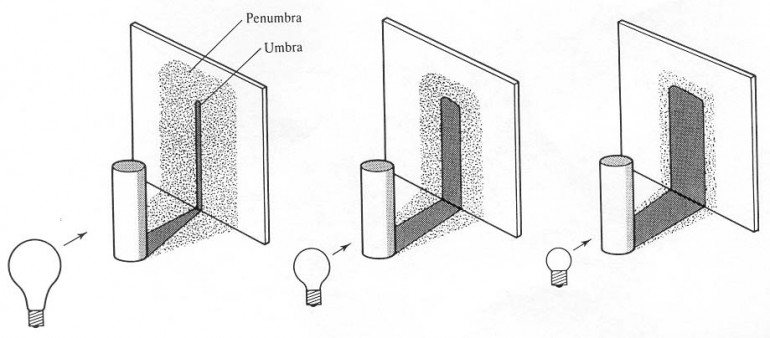
Here’s a handy detail of how light distances can affect your models when taking photographs.
The above image displays 3 distances which can drastically change your image during your lighting set up.
In diagram one, you see that the light is suitably distanced to reduce sharp shading and blur the Penumbra to create a soft shadow behind your subject. This is the optimal distance for using a single light on your model.
In diagram 3, the light distance is very close to the subject which affects the background shadow resulting in a very over exposed model in the foreground and a very destructive hard shadow behind with very little blur to blend into the background.
In the above image the model is in the centre of the table with 3 lights surrounding it to minimize hard shadows and good detail within your subject. Two lights if possible should be distributed at least 2 feet away and infront of the model at 45 degree angles to distribute natural soft lighting to each side of the subject.
A third light is placed behind the model to reduce any shadows hitting from the two infront.
If you do not have access to three lights, make sure that your single light is soft or bright enough with a suitable distance away to reduce the amount of hard shadows falling on your background.
You can also use natural light and bounce it by reflecting your light sources using white paper/card towards your subjects.
Something to note:
– Depending on your lights whether they be flourescent white or tungsten yellow in colour please make sure that your white balance on your camera is adjusted accordingly.
– If using Mobile phone cameras, you can use the HDR option on your UI to take 3 photographs simultaneously to capture the highest exposed area, darkest shadowed area and the midtones of the subject to merge together and craft a single image using the best of three.
Framing your photographs
A common mistake that can happen during photographs is composition and framing of your subject.
Framing at it’s core is to focus the viewers eye to a specific point of an image, there are many ways to frame a photograph for it’s dream composition in landscapes and portraiture however we’re talking miniatures here and while it’s not completely necessary, it’s important to highlight non-the-less.
There are 3 main lessons in composure that can be used in anything:
- Rule of Thirds
- Symmetry
- Golden Ratio
Each of these are very different techniques of thought and visual composure, keeping them in mind when taking photographs can be very useful and certainly dynamic and visually exciting in your final image.
Let’s look at a few examples of each.
Rule of Thirds
Most cameras have that annoying grid across their viewfinder which may seem as a burden however it’s actually pinpointing 4 optimal points of interest for your subject.
Ever noticed a lot of movies having their actor on one side of the shot? Rule of thirds, baby!
Imagine an image broken in thirds, horizontally and vertically. This leaves you with handy positions for your photographs using the 4 lines that the thirds have broken into.
Viewers eyes wander a lot when looking at visuals, these 4 points of interest are subtly very pleasing for the eye to gaze to and perfect for framing your models. Simply choose a point, and shoot it appropriately.
Symmetry
This may seem obvious but there are times when one model can just be best shown in the centre of the screen. That said, if you have a few models sitting around, why not pose them and add some dynamics to your shot rather than a single model?
Keeping one model and others completely symmetrical to each other in your shots gives a nice framework to build upon, try to avoid even numbers of models and always have your most impressive subject in the centre of frame.
Symmetry is also great for square photographs that are commonly used in social networks.
The Golden Ratio
Some photographers and conspiracy heads will argue to the bone that the Golden Ratio is better than the Rule of Thirds. In some cases, yes it can be. That said, for miniatures it’s a great rule for showing off parts of models and creating that dynamic field for your shot.
Imagine the Rule of Thirds as a framing shot, it sets up your piece beautifully and shows it clearly. The Golden ratio tells a story as it progresses around an image, it leads your eye into a point of interest.
The Golden Ratio is derived from the fibonacci sequence, the squares that the spiral is made up of, helps to position the elements of your scene into the flow of your image.
Which One Should I Use?
These three are very useful guidelines for your miniatures and there’s no right or wrong way to frame your piece. Experiment and take lots of photographs to find out which is best to show off your creations.
Check out this article for more information and framing you can use.
Software & Editing Images
Here’s where you can make or break your photographs, you can even turn what you thought was a horrible capture into something magnificent and worthy of uploading to your audiences.
There’s a few different types of professional software that you can use however as we’re looking at something that will have minimal cost let’s look at a few possible cheap options for the everyday photographer.
- Sketch.io A fantastic and cheap option for cropping and adding text to images, perfect for those Cover Images. You can even use it on your browser, here.
- BeFunky This is a perfect beginner online tool for photo editing. You have exposure settings, sharpening tools, the works. It even has filters that if you’re smart enough you could get away with screenshotting it without the need to purchase the premium. But I didn’t say that!
- Onlinephotoeditor Pretty much exactly as it says on the URL. It’s a little oldschool however there are some nice features like adding photo frames to your pieces if you want to give yourself a quirk.
- Pixlr This one is almost a duplicate of Photoshop and likely on par with some of the most professional editors out there, it’s not so user friendly as it’s a little daunting however with some play, it could be perfect for those who can’t access photoshop anymore.
New Project
First protocol when it comes to using your software is what size of image you’re planning to use. As we’re working in the digital, it’s preffered to use 1920 x 1080 pixels, 72dpi and using RGB colour grades. This is pretty default when using images that are for online usage.
If you click the image above and save it, you can use it as a template guide
Framing, take two
This is now a good time to frame your subjects and make them look perfect, if you’ve taken your photographs at a high enough resolution (biggest possible) you shouldn’t have to worry about scaling up which is best to avoid. You can certainly scale down, however always avoid scaling up.
Lighting, take two
Now is the perfect time to adjust your settings accordingly to make sure that your contrast and exposure is the best it can be. Have a look around for adjusting your levels, colour balance, exposure and contrast for the best results.
Don’t let your images burn too bright as you can destroy the detail, see below.
.PNG and .JPG are the best options for exporting your images online. Anything else and you’re making very big file sizes or losing quality on your photographs.
Happy Snapping.
Hanger 18 have some great backdrops that you can purchase for your photographs, however here are some free to download textures that would also look nice for your backgrounds:
Keep in mind that if you’re printing off these images, make sure that it is printed with a matt finish and if it’s too shiny don’t be afraid to hit it with some anti shine to reduce that lighted sheen.


















![Very Cool! Make Your Own Star Wars: Legion Imperial Agent & Officer | Review [7 Days Early Access]](https://images.beastsofwar.com/2025/12/Star-Wars-Imperial-Agent-_-Officer-coverimage-V3-225-127.jpg)


