


![TerrainFest 2024 Begins! Build Terrain With OnTableTop & Win A £300 Prize! [Extended!]](https://images.beastsofwar.com/2024/10/TerrainFEST-2024-Social-Media-Post-Square-225-127.jpg)


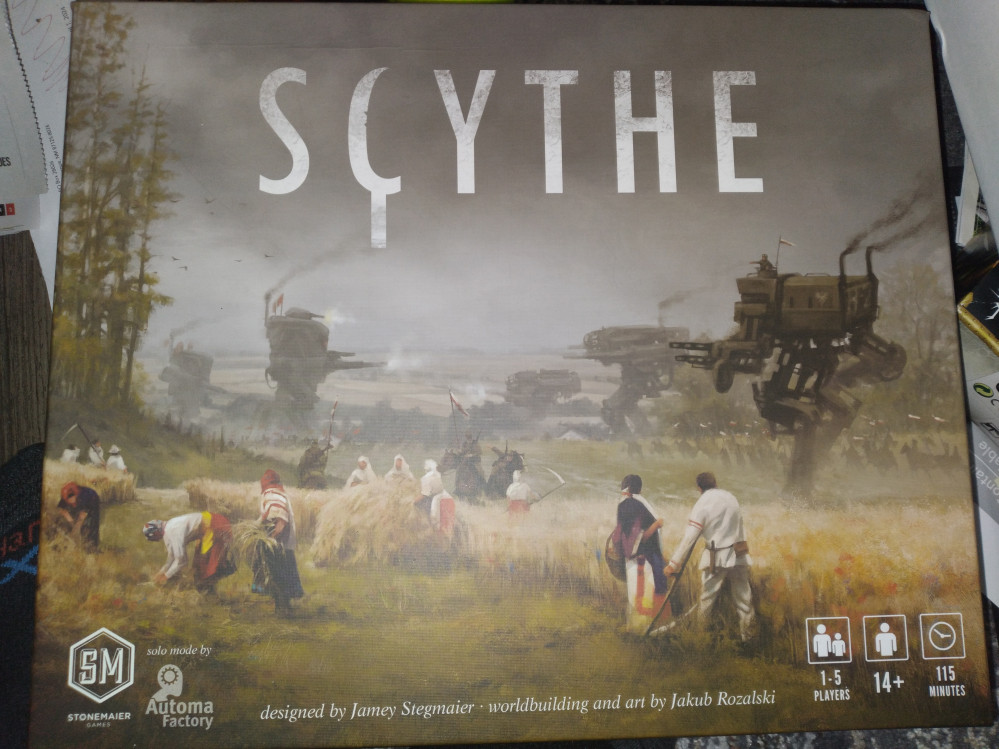
Scythe board game miniatures get steampunk spring cleaning


Project details
Well up until this point in time with this project, I honestly wasn’t sure what to expect in painting a set of board game miniatures which is a bit different than painting up a team in Blood Bowl, an ork army in Warhammer 40k or some scratch built terrain. I knew there were some fundamental stuff that would be pretty much the same but there were a few things I had to change in my mindset when painting the minis for Scythe.
So briefly I painted some metal RPG minis back in high school, I dove more into PC/console/video games for a long time, then getting more into tabletop board games & a couple years ago I got back in the hobby when an online RPG group fell apart (dumb pandemic also caused a big mess on the board game groups I was part of too) & I was looking back to a variety of GW game lines that always looked interesting plus it will take advantage of some of the art classes I had plus even more importantly I only needed one other person to play with which eliminated the schedule nightmare of many bigger person game groups.
Starting off with a variety of GW games, I’ve mostly been painting stuff for that for several years now & often document the stuff on my instagram ( @fox01313 ) and while not a master at painting minis, from a tabletop gaming perspective I think I do vaguely okay at all this so when I saw the challenge here I thought I’d go to visit one of my favorite games & paint up most of the minis except for the awesome Rise of Fenris expansion, I wanted to do the basic stuff 1st to see if it worked.
Now that all that basic introduction stuff is out of the way here’s the thoughts/steps/equipment used.
-Neutral colors & faction specific colors of miniature paint, I mostly used either GW citadel base/layer (and a little contrast) paints as well as some standard paints from Army Painter
-whatever color you want for the primer, you will need more paint to match it to hit the spots you miss or need to fix with a brush
-1 bottle of PVA glue (like Elmer’s school glue that dries clear) & another half full bottle of PVA glue mixed with water (half full one needs a descent opening for a brush)
-sand from a craft store
-rattle can of spray primer (I used rustoleum 2x primer/paint in matte black) & some masking tape
-good set of brushes for painting minis
-black and metallic
-a cheap set of brushes from somewhere like Dollar Tree for painting with PVA glue, varnish & more (please don’t mix these up, they’re cheap & this stuff will mess up your nice brushes)
1- With all the minis for Scythe or any board game I found for me that they just need to be a good looking paint job but the main thing is to make the stuff easy to spot with different faction colors. I’d like to say that I wanted to spend a lot of time on painting these but with the softer level of quality on these minis it was really tough to paint some of these so I just kept it simple.
2- You can either do the gluing the sand on the bases now or do it later (I’ll go over the details on basing later). I found the multi color sand at Dollar Tree & like the colors of it so I didn’t want to try to paint over it. If you don’t do the basing now, fine as it makes painting the minis easier. Before spraying any of this, put some masking tape over the hole on the bottom of the airships, this will make it easy to tell them apart & also not having to worry about messing up the hole with some paint. Spray prime all of it as this plastic feels a little more rubbery so it needs the primer to hold the paint better & if the spray will bond to plastic it might take a while to dry most likely overnight. I’ll note it here that the rustolem was marked matte black but it still looked somewhat shiny compared to the GW chaos black spray.
3-As stated earlier with the paints, you want to hit any areas you missed with the spray with a basic color to just get some paint on all of it. Color selection here is key because as these are board game minis you want to keep the colors to a minimum with the faction color kept on the base rim & somewhere on the minis. The other colors for the most part are just a variety of neutral colors (grays, browns, metallics, black, white) & on the characters I used a light tan/bone color for the base of the character skin then using a GW skin color contrast paint. When painting faction colors like white or yellow (and skin tones) especially with black primed pieces you will need a medium neutral color (brown or gray or a iron color like leadbelcher) on the piece first to make the lighter colors not need 400 layers to get solid. If the sand is glued on the bases earlier you probably want to get an inexpensive brush (or makeup brush) to just drybrush a lighter color on the sand to make some of the details stand out. With the base rim, I just used the paint straight out of the pot to paint the faction color around the rim to help it be visible across the table.
4-With the airships & mechs I decided with one of them to keep all the color schemes the same for 90% of the mini, especially with the airships where I did everything the same for them on the basic colors with the faction colors being different. With the mechs I started off with a bit more of a metallic base (using GW leadbelcher) on parts of it & other parts mostly getting the faction color. Then I got a simple black/dark wash for the minis to dull the color a bit. Some of the details I did with the minis were touched up with a permanent marker to do things like painting stripes or window frames.
5-Painting is done & now it’s time for the bases. As I found the multi colored sand to put on during this step. Get the cheap brush and the simple bottle of PVA glue. Put a good size blob of PVA glue on the base then push the blob around the base so it has a mostly white layer of glue on top. Get a container like one for butter or sour cream with a wide opening, fill it with sand & once you get the glue on the base, put the mini in the sand to just cover the base evenly. Use your fingers to smooth off the edge of the base to get off any loose bits of glue/sand. This might take a few hours to dry & the next step might be easier to just leave it to dry overnight & wash the brush with water. Last step of the basing is to now get out the other bottle with PVA glue + water, shake it up, dip the brush in the PVA+water mix & cover the sand layer on the base of the mini and yes it will look like it’s now drenched in milk. Don’t worry as it will dry clear and be rock solid. I’ve done this same technique for loose grass too for minis in Blood bowl & it works great for putting a 2nd layer of PVA glue. Again let these dry overnight & it will look normal once it’s dry.
6-All that’s left at this point is where I’m at which is just using the brush on varnish (using a cheap dollar store brush) and I’ll be using GW Stormshield to paint the matte varnish on though you can use a spray varnish.


Leave a Reply