Infinity Japanese Secessionist Army
The time has come to expand my JSA force to a full 300 point playable army.
As stated previously, my original models were painted many years ago and unfortunately I didn’t keep good records of how I painted them, so I was going to be going by eye to colour match the new models mostly.
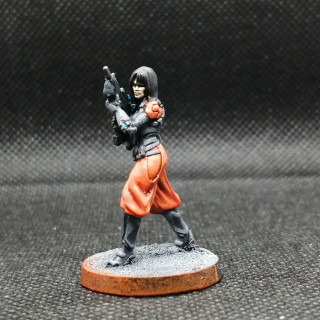
More keisotsu and two specialists
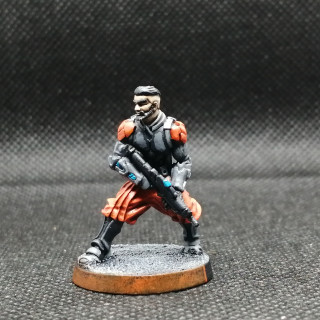
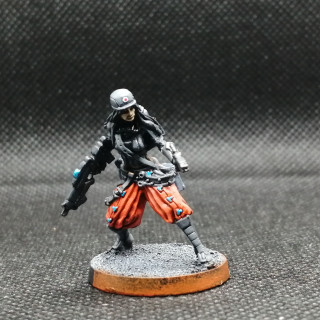
The first thing to paint was some more keisotsu who are the ‘basic grunts’ and backbone of the JSA army and a couple of specialists, a doctor and an engineer.
The specialists have a lot of similarities in their uniforms to the keisotsu so it makes sense to paint them together as a batch paint. I will use some different accent colours on the specialists to allow them to be differentiated on the tabletop.
First the (all metal) models were cleaned up and sand was applied to the bases with PVA before priming white. Then I applied the base coats to all of the models main areas. All paints are Vallejo Model Color unless otherwise specified.
All models Armour, boots – German Grey
Trousers, shoulder pads – Orange Red
Hair, gun – Black
Skin – Chocolate Brown
Boot details, straps, forearm bracers – Basalt Grey
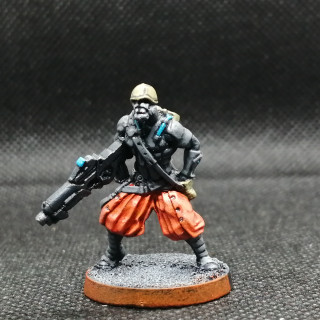
Engineer Helmet, backpack, pouches – German Fieldgrey
Face mask – Basalt Grey
Doctor Cap, backpack, pouches – Luftwaffe Uniform
With the base colours down I added some shade with Citadel Agrax Earthshade over the models.
Mostly I applied only a single highlight over each colour, as follows.
All models Armour, boots – Basalt Grey
Trousers, shoulder pads – Bright Orange
Hair, gun – Dark Grey
Skin – Cork Brown then a second highlight with Basic Skintone
Boot details, straps, forearm bracers – Neutral Grey
Engineer Helmet, backpack, pouches – Khaki
Face mask – Neutral Grey and then Sky Grey
Doctor Cap, backpack, pouches – Intermediate Blue
With the models mostly done I picked out some extra small details to create some interest.
Zeikotsu – Gun muzzles were painted Neutral Steel and details were added to the guns and forearms in Light Turquoise.
Engineer – Gun muzzle, rivets on trousers and the attachment points where the pouches met the straps and belts were picked out in Neutral Steel. Light Turquoise was added to the forearms, gun, pouches and neck pipes.
Doctor – The medikit (pistol like object in left hand), gun muzzle and pouch attachments were picked out in Neutral Steel and then details on the forearms, gun, pouches and trouser clips were picked out in Light Turquoise. The cap badge was painted White and a Japanese rising sun emblem was freehanded in Vermillion. A simple, but I think effective, touch.
The bases were painted German Grey and I applied two drybrushes of first Neutral Grey, then Sky Grey.
The bases were edged in black and as Infinity requires a models visual arc to be easily identified I then marked the base edges to indicate this.
Fire arcs
Many wargames require a models fire arc to be indicated on its base for determining line of sight and Infinity is one such game.
My method for doing this is to first create an arc template. Many versions of this can be found online but essentially it is a circle the size of your models base plus a small amount say 1-2mm with a large superimposed cross that passes through the centre of the circle.
This is a link to one by Wirelizard Designs that I found online. https://www.scribd.com/document/500525639/Arc-Marking-Tool-Letter
With this template you simply place your model on the circle with its ‘front’ (I usually use the direction the model is looking with it’s eyes but you can also use shoulder orientation or any other factor you wish) aligned with one of the arms of the cross. You can then mark the base edges where the lines to the left and right of the ‘front’ come out from the circle. These two marks give you a 180 degree arc on the models base.
I used a sponge to apply VMC Orange Red to the front of the models base defined by these marks, but you can use any paint or other effect you want to differentiate the front and back arcs.


![TerrainFest 2024 Begins! Build Terrain With OnTableTop & Win A £300 Prize! [Extended!]](https://images.beastsofwar.com/2024/10/TerrainFEST-2024-Social-Media-Post-Square-225-127.jpg)




Leave a Reply