2mm Strength & Honour
Printer setup from an absolute beginner
I got a Voxelab Proxima 6.0 for my birthday in January from my brother-in-law (Thanks Nick 🙂 ). It has sat unboxed until a couple of weeks ago when we decided to try to get it up and running.
After cleaning and checking the components and very straightforward assembly we were ready to go. I was given Voxelab basic grey resin to start. Knowing I wanted to print some 2mm miniatures for this game I purchased a set of Roman Legion stls from Project Wargaming. $4 for the files to print an entire Roman Legion – great value.
After a bit of experimentation and some failed prints this is the setup:
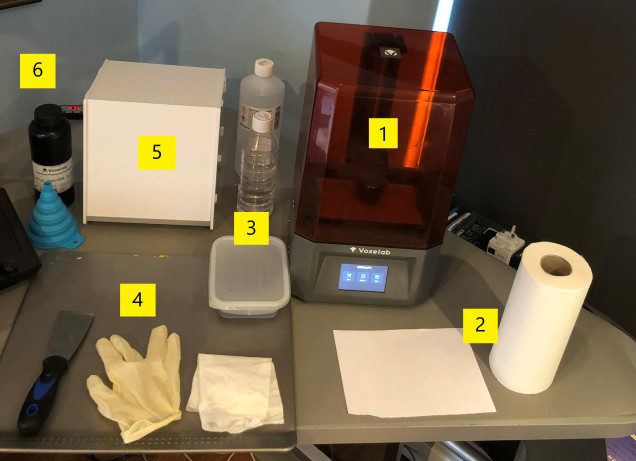
1 – Voxelab resin printer. The observant will notice it has a Creality screen showing. More on that later…
2 – Paper products. A half sheet of A4 for leveling and a roll of paper towel for cleaning and mop up.
3 – Alcohol. The takeaway tub is the cleaning bath, half full of isopropyl alcohol (99%) the parts are prised off the print bed and dropped straight in. A minute or two soaking and gentle swirl and they come out clean. Behind is the half litre bottle I use for pouring over the print block to clean it and the big bottle is one of the five that Amazon supplied.
4 – My work area. An old metal tray from a GW paining station is used as the surface that the prints are removed and cleaned on. A metal spatula is essential to get the prints off the bed. Latex gloves also essential and not in the photo is my breathing mask – the fumes are unpleasant and dangerous.
5 – UV light curing box. Part of my birthday present was this box. Came flat packed but simple assembly. It has a simple turntable and UV LED light array inside with a timer switch on the power lead. These are small prints so 75 seconds in here seems to be enough to cure them.
5 – Resin. This is a basic grey. The collapsible funnel is to assist with decanting resin back from the printer bath back into the bottle. I use paper filters specifically designed for resin (available on Amazon). You can use domestic coffee filters but they get clogged easily apparently.
Issues before it worked:
1st, 2nd and 3rd failed prints – print bed not level or far enough down – not enough bed adhesion so prints ended up stuck to the FEP film on the bottom of the bath. Also spilt about a third of a bottle of resin when the funnel collapsed because it was too full. Learned to hold it and pour SLOWLY!
4th failed print – printer stopped accepting the Chitubox slicer files. I was using the Voxelabs standard firmware and Chitubox 9.0+ isn’t compatible apparently with this older style printer. The fix was on Reddit. This printer has a Creality motherboard and is therefore effectively a Creality LD-002H. Ran the firmware upgrade supplied on Reddit and hey-presto I’ve now got a Creality printer 🙂 The print is now sticking to the print bed as I’m using platforms and upped the base layers to 8 from 6 and the exposure time to 50 seconds. Still some missing sections – print bed too crowded. Deleted about a third of the intended prints, you can’t totally fill the bed as I had and must leave a gap between each model and offset them on either side of the bed. Just over half of the bed surface covered is about right.
5th failed print – poor fine detail. upped the exposure time to 4.2 seconds for all layers and upped from light to medium supports which were already set to 74% density following guidance from the designer.
6th print – fine. Very minor detail missing but good enough for me.


![TerrainFest 2024! Build Terrain With OnTableTop & Win A £300 Prize [Extended!]](https://images.beastsofwar.com/2024/10/TerrainFEST-2024-Social-Media-Post-Square-225-127.jpg)


Leave a Reply