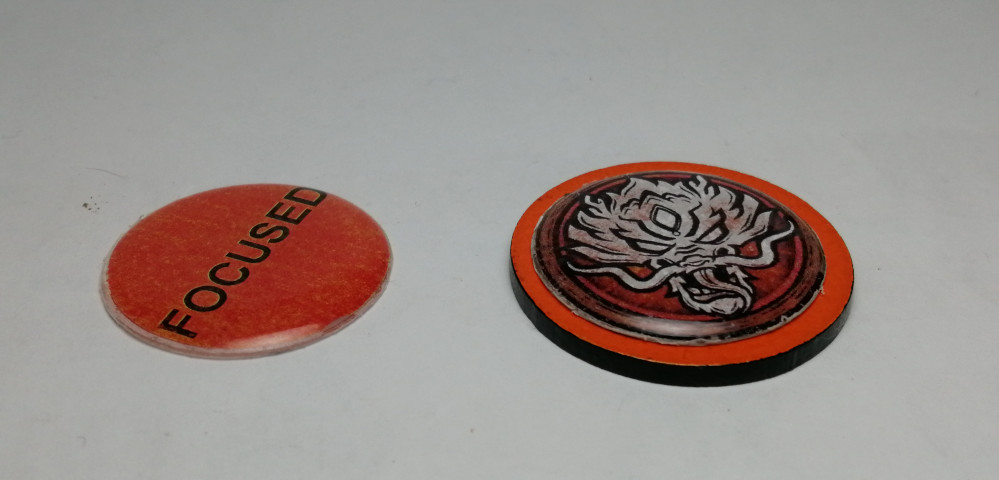
Home made gaming tokens
Making custom tokens
Many times during the playing of miniature wargames we need tokens to represent modifications for combat, track wounds etc. For some games these tokens are baked into the system and the games manufacturer will supply tokens in their game, usually in cardboard. Good examples of this are the Batman miniatures game or Infinity.
Some games have a need for tokens but do not supply them. For example I find it very difficult to track effects in Age of Sigmar that originate from spells cast in the command phase but only affect the game in the combat or battleshock phase, much later in the turn.
Many third party manufacturers have whole businesses geared towards providing tokens for games that don’t have them or providing upgraded tokens to replace cardboard originals. These tokens are normally made from laser cut acrylic or MDF.
It is now also also possible to create tokens in 3D rendering software for printing on a 3D printer.
My preferred method however is to create my own using the process outlined below. This method is one I have shamelessly stolen and I first saw it done by Ash Barker on his Guerrilla Miniature Games channel.
Tools
In order to easily create our tokens we will need 4 tools and an optional 5th.
-
A printer: Any printer will serve. Obviously the better the printer the better the final look. I personally own a colour laser but the best looking tokens comes from a photo quality inkjet printer.
-
Software to create the token ‘images’ for printing: Many free pieces of software available, so this step need have no cost associated. I personally know Draw program included within the OpenOffice suite of programs, so this is what I use.
-
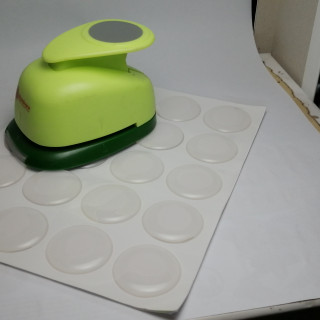
A 1 inch hole-punch: These are available to purchase from many outlets and are commonly used in various crafting activities such as card making etc. 1 inch is not the only available size but I find it gives a good sized token without making the process overly laborious.
-
Bottle cap stickers: Another crafting staple available relatively cheaply from a number of retailers. These are the ‘body’ of our token and importantly should the SAME SIZE as our hole-punch.
-
Thick paper or card (optional): Having made many of these tokens I have realised that standard ‘cheap’ printer paper does not punch cleanly all the time. The blades in even a relatively expensive hole-punch dull over use and then have a tendency to crush thin paper rather than cut it. A better quality of token can be punched from slightly thicker paper or card. Standard paper is normally in the region of 80 grams per square meter (80gsm). Basically I use the thickest paper I can make work. The limiting factor will probably be your printer so check it’s operating specifications for details on paper that will feed through it. For example my Brother laser can take paper up to 160gsm through the manual sheet feed at the front of the machine. I buy 150gsm relatively cheaply on Amazon as it is a relatively common weight of paper.
Step 1: Token images
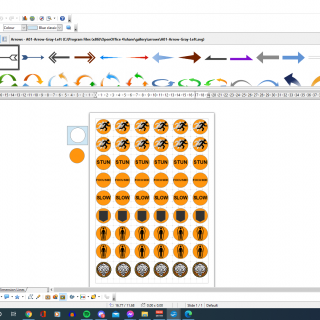
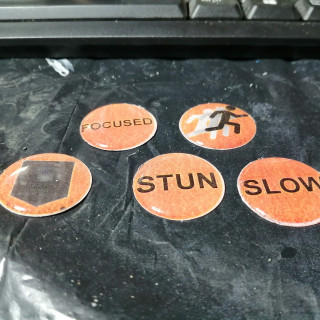
The first step in the process is to create our token images. As I said above the details of this process will depend upon the software platform you are using so I cannot give too many specifics. Essentially you will need to create a series of coloured circles 25mm in diameter and then place an image or text upon them to denote the purpose of the token. The images below show some of the token images I created for my Malifaux Ten Thunders crew recently.
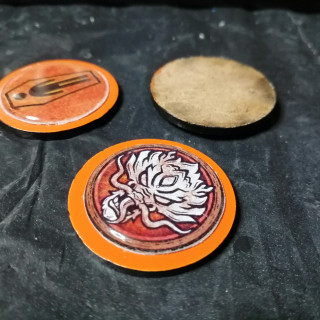
Text can normally be added within the software itself but if you want images such as the coffin image on my corpse tokens simply search in Google for free SVG(scalable vector graphics) files. There are literally hundreds of online libraries containing free images for use in powerpoint presentations and other business and presentation uses and these are perfect for our needs. These images can be saved to your computer and imported into your software and scaled to fit within the circular tokens you have as a background.
This is by far the most complicated part of the process and with practice your finished results will improve.
Step 2: Printing
When you have created images for each of the tokens you need arrange them in your software so that you have them laid out neatly on a page ready for printing. Don’t be tempted to crowd them too closely together as you will need room to punch the token cleanly without damaging it’s neighbour.
If you need multiples of a particular token it should be a matter of seconds to copy and paste them multiple times on a single sheet.
When you are ready you can print the sheet. Remember to also save the finished sheet just in case you need to print extra tokens later.
Step 3: Token creation
When the sheet is printed you simply need to punch out each of the token images using the hole-punch.
These punched paper tokens can then have a bottle cap sticker stuck over the printed side to complete the token.
If the paper is misaligned or slightly too large then excess paper can be removed with a fine sanding stick or fine grit sandpaper.
The back of the token does not require protecting and will be resilient enough for normal play.
Double sided tokens can be created by simply making both sides separately and then gluing the unprinted sides together with a dab of superglue.
Step 4: Other sizes
Occasionally tokens need to be a specific sizes, for example Scheme markers and Corpse markers in Malifaux. One option is to source a hole punch of the required size or cut larger tokens out with scissors (time consuming and awkward) and then source bottle cap stickers of the required size. However it happens so infrequently I simply create a 25mm token then glue it to a model base of the required size. Model bases can be bought in bulk in various materials such as MDF or nylon for negligible cost. As with any other model base these can even be painted in a variety of colours to co-ordinate with an army or faction.





![TerrainFest 2024! Build Terrain With OnTableTop & Win A £300 Prize [Extended!]](https://images.beastsofwar.com/2024/10/TerrainFEST-2024-Social-Media-Post-Square-225-127.jpg)






Leave a Reply