Spring Cleaning Military Orders
Photography
The previous steps were all around lighting and the set. The next decision I wanted to take was photography. This is a hobby and profession of its own like casting or 3D printing. I used to take photo’s using manual mode on my mobile phone but a couple of years ago got a DSLR camera. This advice goes for both mobiles and DSLR. It would be great if mobiles and camera’s have a miniature mode they don’t. The closest you can get is Macro mode, which is horrible for models as it magnifies it, but it has it’s uses and can be used for models. This is what I would recommend doing as a beginner. Taking a photo on auto mode and being angry because it didn’t come out great is frustrating, but all equipment has limitations. Some cameras have a small slow lens, some have large fast lens or can change out the lens. Some can take a picture over days and some you can’t select the shutter speed. Some are great in low light, have great ISO options without introducing grain and others take every photo even outside like a pissed morning in a nightclub. All can take a great picture (mostly e.g. Gameboy camera)
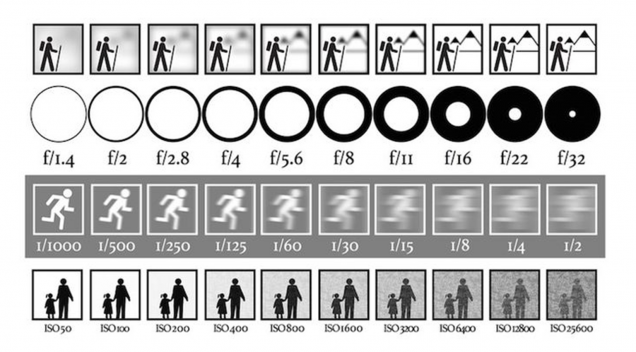
 You have probably seen this picture a lot. It’s true on the left there is lighter and on the right it’s darker. You can manipulate these settings to correctly expose a model. But there are downsides. Larger aperture means more light but also a shallower depth of field. Meaning what’s in focus on and around the subject. The slower the shutter speed the lighter but if there is any movement in the camera it will blur the photo. And the higher the ISO the more sensitive you make the camera to auto correct the light but the more grain or noise this introduces. The choices you make with these are all stylistic when taking regular photo’s but not so much (in my opinion when it comes to models.
 Aperture for me if the main choice when it comes to taking pictures of models. Changes this changes the depth of field. On taking photos with a plain background, you may wish to blur the background, so it looks like one colour. You can do this using aperture selecting one that makes your model sharp but everything around it fuzzy. You may also want the focus of the viewer to be on the model and not everything around it. You could also be taking a picture of a game in progress and want everything in focus. So, you would use a small aperture. Mobile phone cameras have this option, however most of it is done digitally and not through the lens. It still gives you the effect
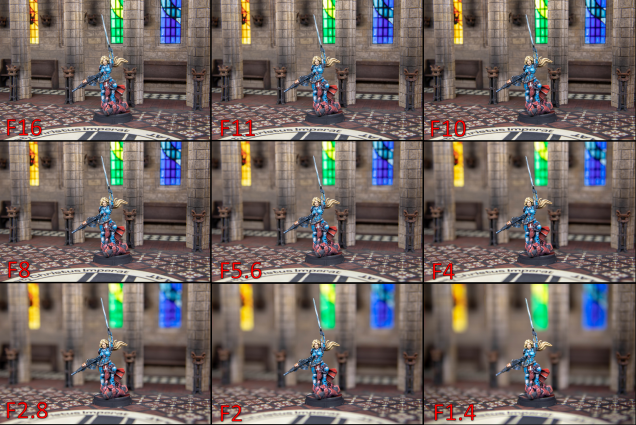
 Aperture is described in F numbers and in lenses the lower the aperture the lens can be described as faster. A fast lens is one with a low aperture number and the speed of the lens dictates how low you can go. The distance from the subject and how far away they are from the background dictates what’s blurred. But in photography terms everything we do is so small. Any changes at the distances we shoot at are quite noticeable on the final photo. This is the same photo taken with different settings. I changed the aperture and corrected the exposure with the shutter speed which I will come onto next. You can see the effect of each main F setting (or stop) on my camera. for this picture I like F8 but it’s subjective.
  Shutter speed matters in terms of how sharp you want the photo to be. You need a lot of light for the fastest shutter speed. If you turn this right up in most cases your picture would be very dark. This doesn’t really affect most of my photo’s as I take them using a tripod (you can also get mobile phone mounting options). This means that the camera doesn’t move when taking longer exposure pictures. However, as you will see earlier in the project this hurt a lot taking pictures at night, even on auto my camera couldn’t make up the difference within the limits I set meaning it took blurry photos. I would also say just use auto for work in progress or quick snaps or just use a priority mode, so you only have to think about one thing I would strongly recommend aperture priority mode if you have it.
  ISO is tough. It’s there to be used and can make it possible to take photos in what other circumstances would make it impossible to take a photo. In old film camera’s this used to be the sensitivity of the film to light. In digital camera’s it turns the sensitivity of the sensor up. Turning this up makes grain. Though this has a nostalgic feel on older photos and can in digital as well. I am firmly against this personally for taking photos of painted models as it introduces texture that you didn’t put on the model. Keeping this on the lowest setting is the best option however if it’s a choice between taking a useable photo of a model and turning up the ISO to get the correct exposure. Just turn up the ISO.
 There are loads more things to do with photography and model photography in general you can go through. But the main rules are put as much diffused light on the model as possible more lumens more choice. It will help you use the settings you want without messing around too much. Use daylight temperature bulbs / lights and try and light evenly. Select your settings for the result you want. Take a picture and look at it. We are not taking pictures of wildlife that moves you can look on all digital cameras to see if you are happy. Don’t be afraid to break any of the rules. Coloured lights, different metering modes, different temperatures of light, smoke effects, angles. light sources the world is your oyster. Be creative, a finished photo should be a celebration of your hard work.
Blame the projects system for the amount of words in this project. It’s certainly not my fault. As I am typing on Word, apparently I cant be cogent and concise and want to fill the paper. Sadly it’s endless, so you see my problem?
More to come, just more waffling or actual pictures of work? Who knows.


![TerrainFest 2024! Build Terrain With OnTableTop & Win A £300 Prize [Extended!]](https://images.beastsofwar.com/2024/10/TerrainFEST-2024-Social-Media-Post-Square-225-127.jpg)


Leave a Reply