


Persei-Aries War Resumes


Rasmus and Tuffyears take on Oriskany
Hello one and all. This past weekend we had another great game of Darkstar with the community, this time with veteran Rasmus and newcomer Tuffyears. Together they teamed up to take on some of Oriskany’s Americans in a larger, 241-point game. Rasmus had two of his Japanese warships, including the mighty Kama. Sleek, powerful, bristling with weapons and sensors, she’s a 149,000-ton Katana class heavy cruiser, escorted by the scrappy little Akashi class strike frigate Sakito. Their allies in this game were two Baroness class security frigates, high-tech “escalation action” response ships sailing under the auspices of a ASDA, a powerful shipping and commodities corporation here along the Andromeda Arc.
That’s right, after almost two years of gaming we finally have to take a break from the Hercules Rim of the recent Third Hercules War, because in that war, the Japanese and Consortium were firmly-entrenched enemies. But of course Hercules is just one of 24 strategic command sectors (SCS) in the Second Band of Known Space, in any other one these two factions could be fast friends. The Andromeda Arc (Andromeda-Pisces SCS) was chosen for this game simply because the American and Japanese navies fought a bitter war here in 2514-15, and its easy to imagine tensions sparking again into open conflict.
Such is the nature of Darkstar, a setting designed to allow warships of any nation to fight any other nation without wondering about lore or mythos or “current situation.” Yes, such background is available, but it’s set up specifically to never be in the way. Next week might see me team up with Tuffyears against Rasmus, but with my Black Dragons, or Russians, or French … against Rasmus or Damon or Hegemongary or who knows who … playing who knows which faction. Not until a definitive campaign is set up do the factions solidify a little, and even then only in the specific campaign area (usually 6-15 star systems) and even then only temporarily (1-2 years of campaign time).
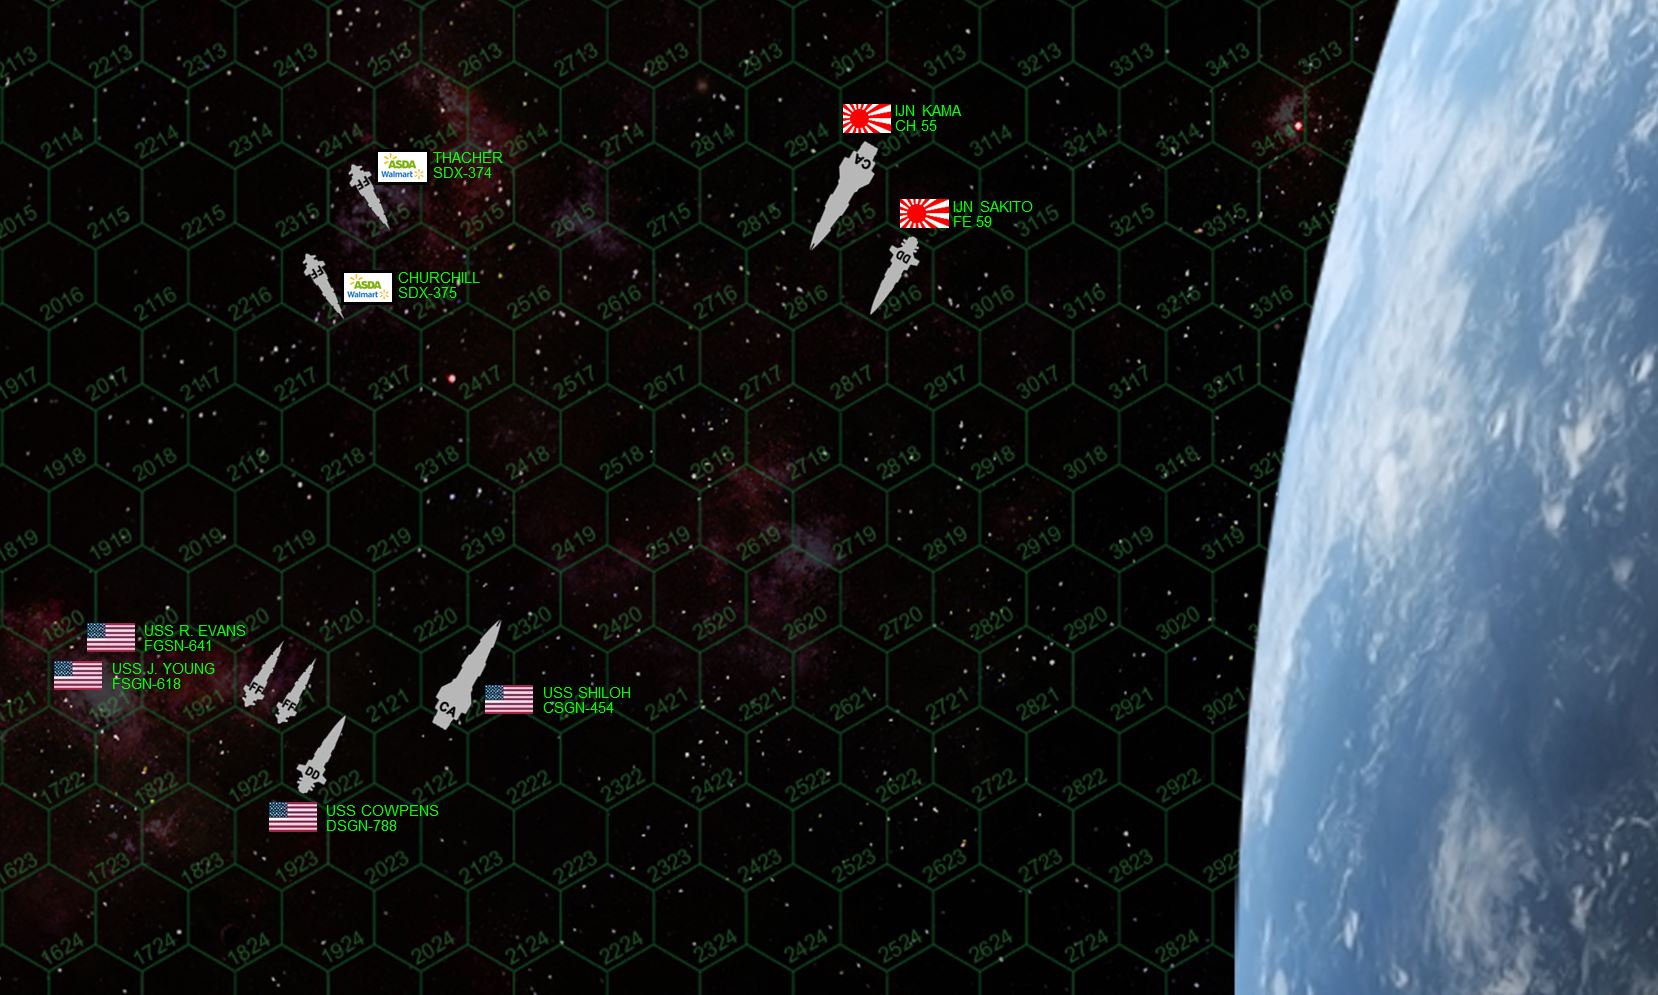 So here is the matchup. People who’ve followed this project before will know the big Japanese flagship, Rasmus’ IJN Kama. She’s a true “gun cruiser,” a hypertech 26th-century equivalent of the old Pacific War Takao, Chikuma, Mogami, or Mikuma. Although a little sluggish (as all heavy cruisers are), lacking in significant secondary weapons, and mounting NONE of the dreaded Ki-45 “Toryu” (Dragon Slayer), the Kama mounts three triple turrets of huge 18-teravolt EPCs, some of the biggest guns you will find this side of a full battleship. ASDA Wal*Mart has the same flagship WMS Thacher as last week, but now she’s joined by her sister ship WMS Churchill. Both are Baroness-class “security” frigates originally built by the Cignis megacorp, armed with the 6-teravolt “Tachyon” model EPC (electron particle cannon) and 8-megakelvin “StarSabre” laser emitter. Extremely fast, maneuverable, their small weapons are slaved to a deadly-accurate “ZenCloud” command and control system, allowing them to punch far above their weight. The opposing American flagship is the Gettysburg-class heavy cruiser USS Shiloh, sailing beneath the flag of Rear-Admiral Virginia Saunders, packing three triple turrets of 10-gigawatt rail guns, a secondary battery of 9-teravolt EPCs. She outweighs IJN Kama by 20,000 tons, but she’s not as high-tech. Escorting ships include the Valcour-class fleet destroyer USS Cowpens (same class as USS Oriskany, just not nearly as well-upgraded) and two Shepard class frigates USS Ronald Evans and John Young (Shepard frigates are named after early American astronauts of the Mercury and Apollo space programs).
 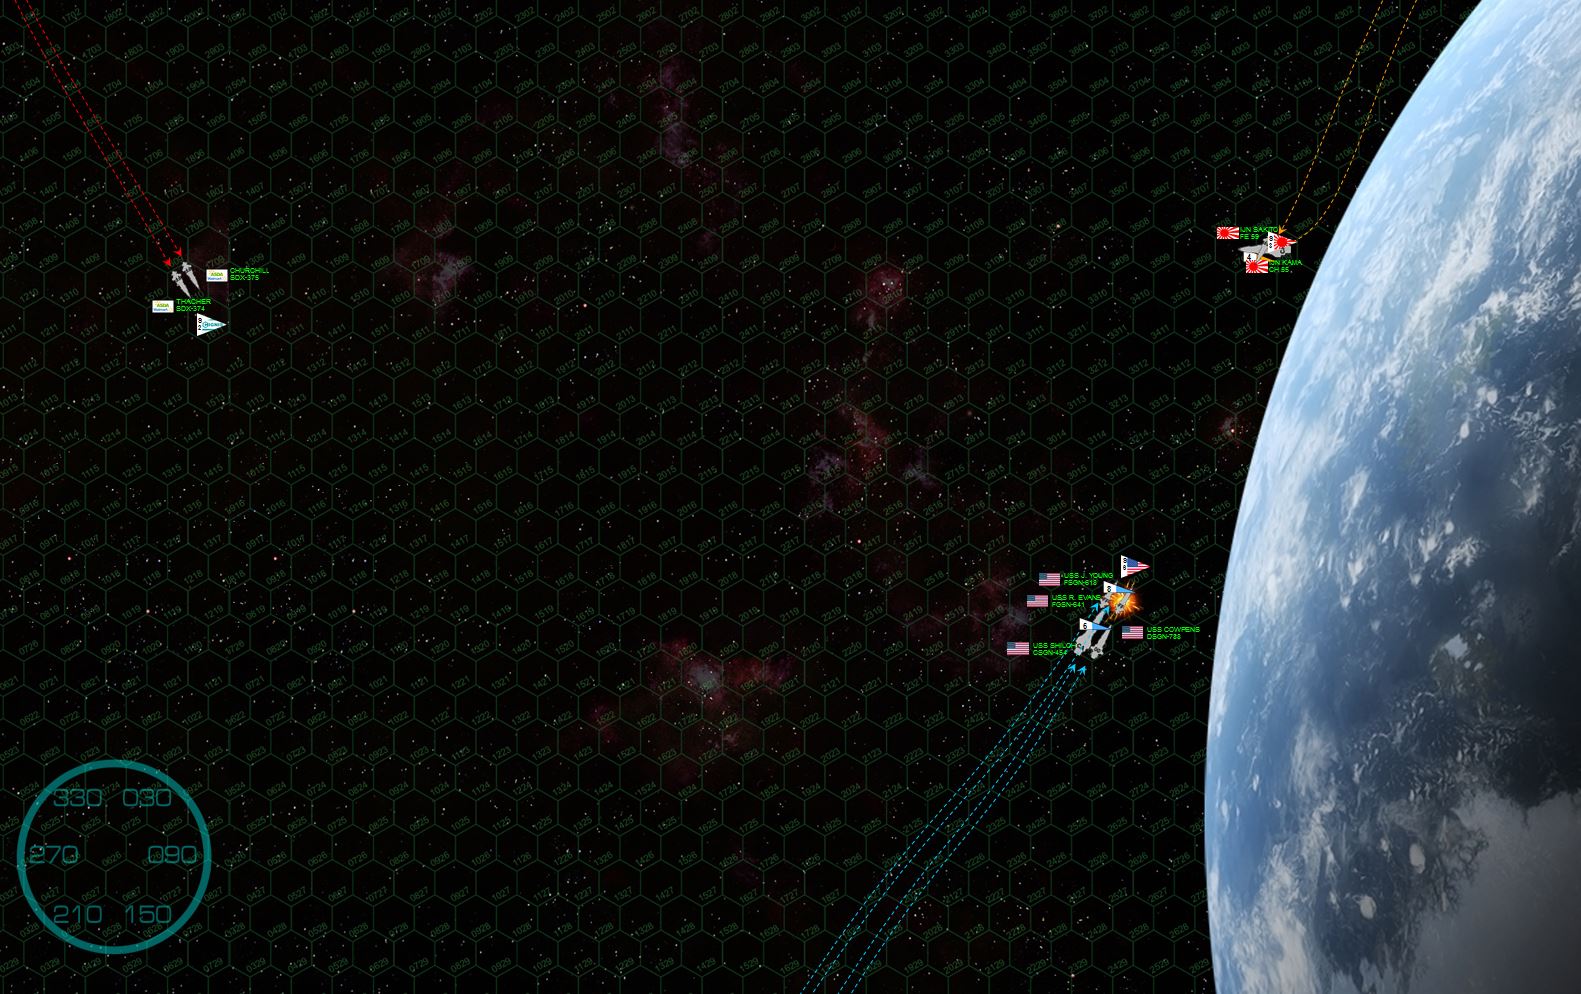 The two battlegroups make their approach. For the most part, the Americans lose initiative and have to move first. They stay together, setting a powered glide-path down into the planet’s gravity well in an attempt to gain the “gravity gauge.” This is a tactic where the the commander tries to put his or her ships between the enemy and the planet, forcing the enemy to turn TOWARDS the planet (very dangerous) to engage. Also, by turning away from the planet to engage the enemy, the gravity-gauge commander can use the gravity to help slow his fleet and sharpen his turn after a high-speed approach run like this. It doesn’t really work out for Admiral Saunders, however, as I straight-out miscalculated the course of my ships and their effect gravity would have on them. So when Rasmus thunders onto the table with Kama and Sakito, presents a broadside, and opens fire at 1800 kilometers, the hapless frigate John Young has her fo’c’sle blow practically clean off. EPCs and lasers slash into the bridge, Lt. Commander Emily Sanchez narrowly escapes but her ship is doomed, pulled down into a deteriorating orbit that will soon have it burning up in the planet’s atmosphere.
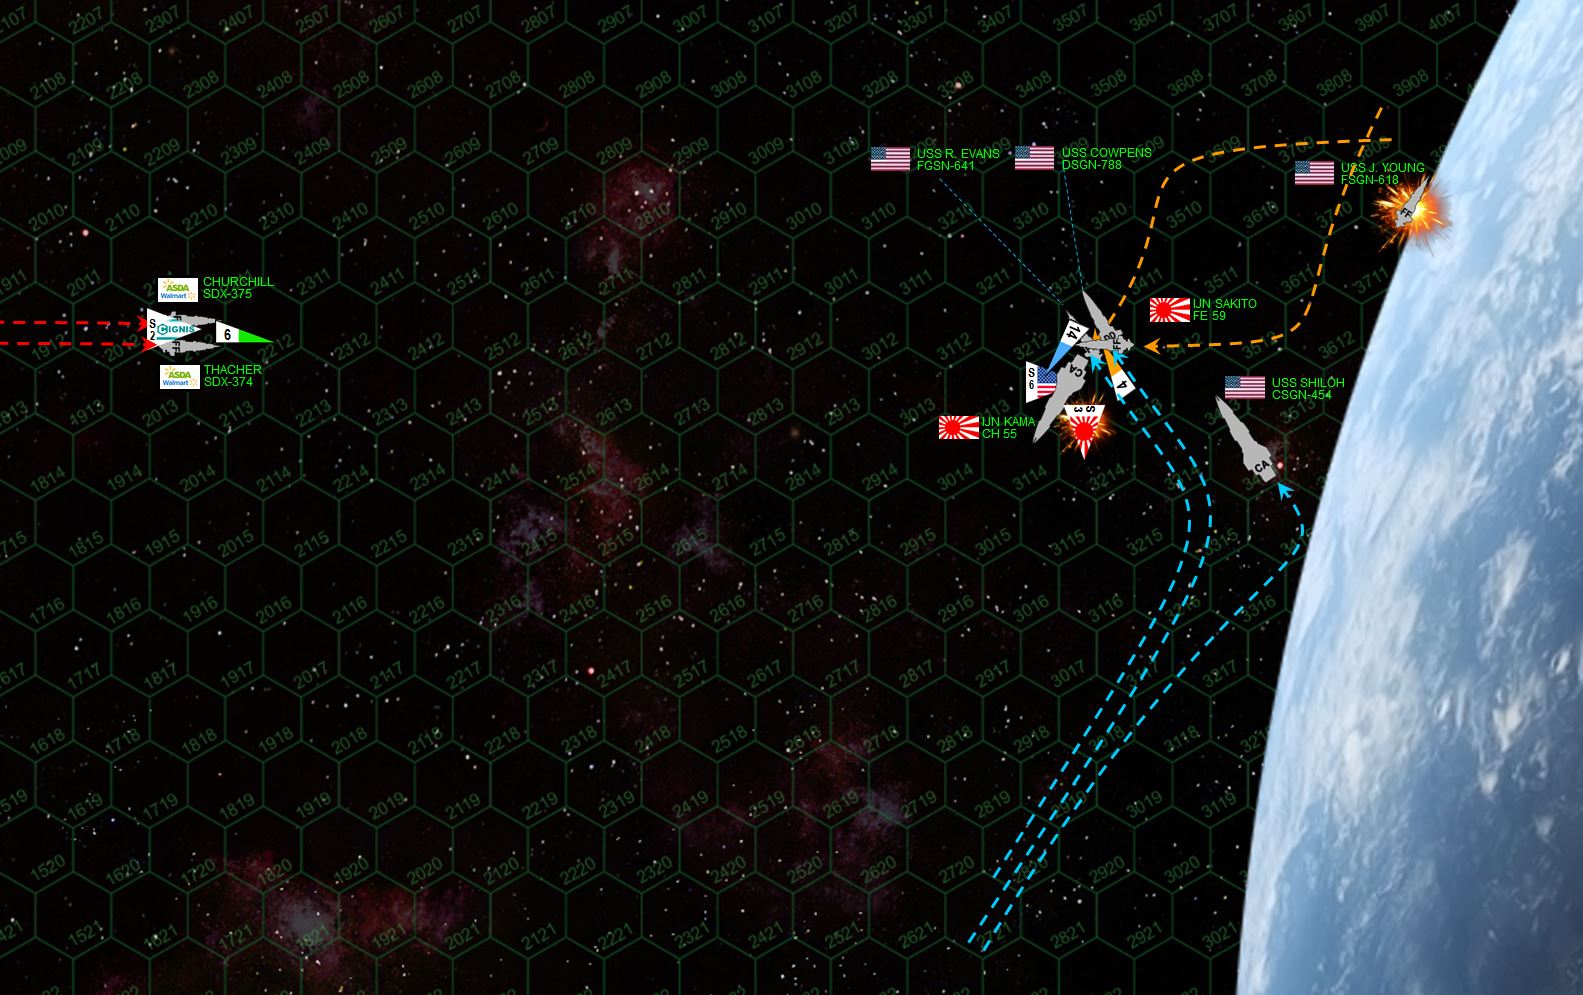 As USS John Young evacuates, the 25,000 ton hull burning up and exploding in the planet’s atmosphere, the two fleets close to a brutally-close engagement range. Here the advantage starts to swing a little to the Americans, at this range my guns are almost as accurate as Rasmus’, and those expensive targeting arrays give him less of an edge. He again wins initiative though. All I can do with USS Shiloh is continue to slow her approach, turn away from the planet at the last moment, and use the planet’s mass to screen my vulnerable stern. Rasmus positions Kama to deliver another broadside on my port bow, while not accepting one in return (only my forward guns can fire here, but most of Shiloh’s heavy guns are forward anyway). Rasmus comes off better in this brutal, point-blank exchange (3 hexes = just over 500 kilometers, spitting distance for these main-battery guns) … at least until my destroyer USS Cowpens (Commander Rachel Collingsworth) and frigate USS Ronald Evans (Lt Commander Charles Watson) cut across Kama’s stern for a point-blank broadside into her reactors and engines. The swift strike frigate Sakito rushes up behind Cowpens and releases a full barrage (ALL Sakito’s weapons are mounted forward) … but misses with EVERYTHING. All Japanese scouts are then shot down as well. Has the tide begun to turn?
 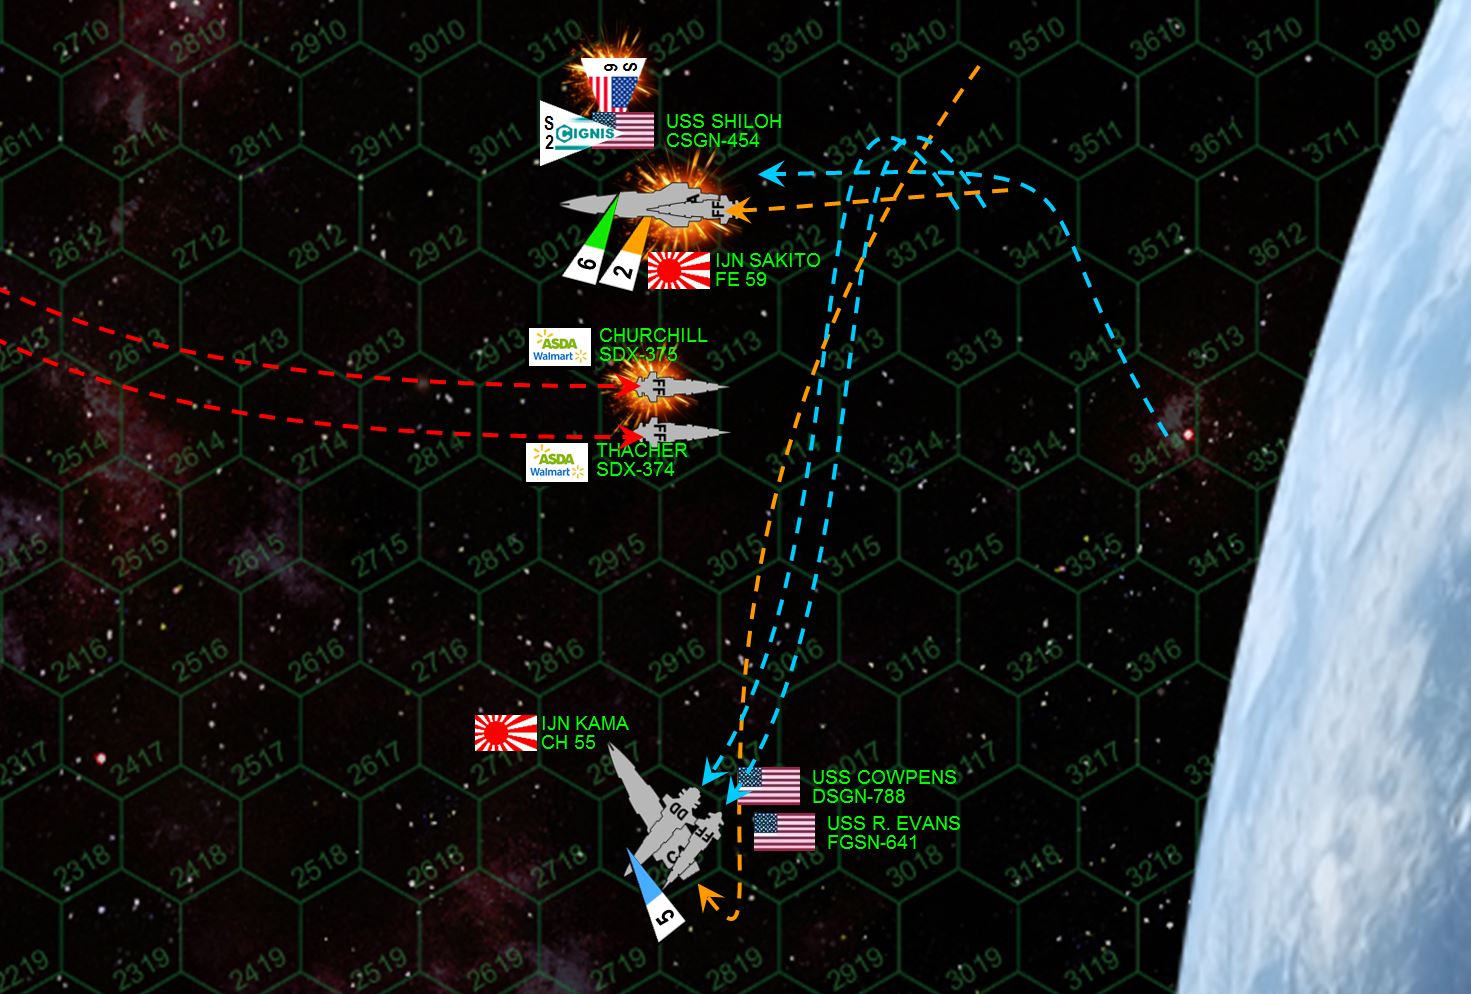 Thee minutes into the engagement. USS Shiloh completes her peel-up form the planet’s surface, ready to at last broadside the Japanese. Rushing into her gunsights, however, are the two tiny corporate attack frigates, diving at 33 kilometers per second (11 hexes) directly toward the planet … in the broadside of an enemy cruiser, at optimum range. They’re even positioned so Shiloh can put her big guns into the port quarters, immediately hitting vulnerable engines and reactors. THEN Sakito rushes up behind her, to put another point-blank forward volley into Shiloh’s engines. For just a minute, USS Shiloh has almost the entire enemy force in full broadside. Of course, the Thacher and Churchill hammer Shiloh in return. All American scouts are shot down. Sakito takes the full brunt of Shiloh’s aft batteries, I knock out her starboard engines and reactors while hitting her from the FRONT, meaning I have basically blow off the starboard side of the ship. Shiloh’s forward guns turn on the corporate frigate Churchill, where I literally hit the 20,000 ton ship with … and I’m not kidding here, 20,000 tons of guns. Needless to say, Churchill is all but blown in half, the flaming remains in a fatal dive toward the planet where she will impact not far from here the John Young blew up. Her skipper, Director Moore, is not among the survivors. The Thacher is also hit hard in sensors and maneuvering thrusters, affecting her two best attributes, accuracy and maneuverability. The Kama, however, hammers the heavily-damaged port bow of the Shiloh, and she does not survive a second such fusillade. EPCs and 12-MgKv lasers slash through the bridge, and while Rear Admiral Saunders survives the loss, her ship is crippled. The battle is far from lost, however. USS Cowpens and Ronald Evans are again on the Kama’s stern, and despite a withering fusillade from Kama’s aft guns, the American destroyer and frigate manage to backload Kama’s engine planet until she’s forced to eject her reactors. The Kama is adrift and crippled.
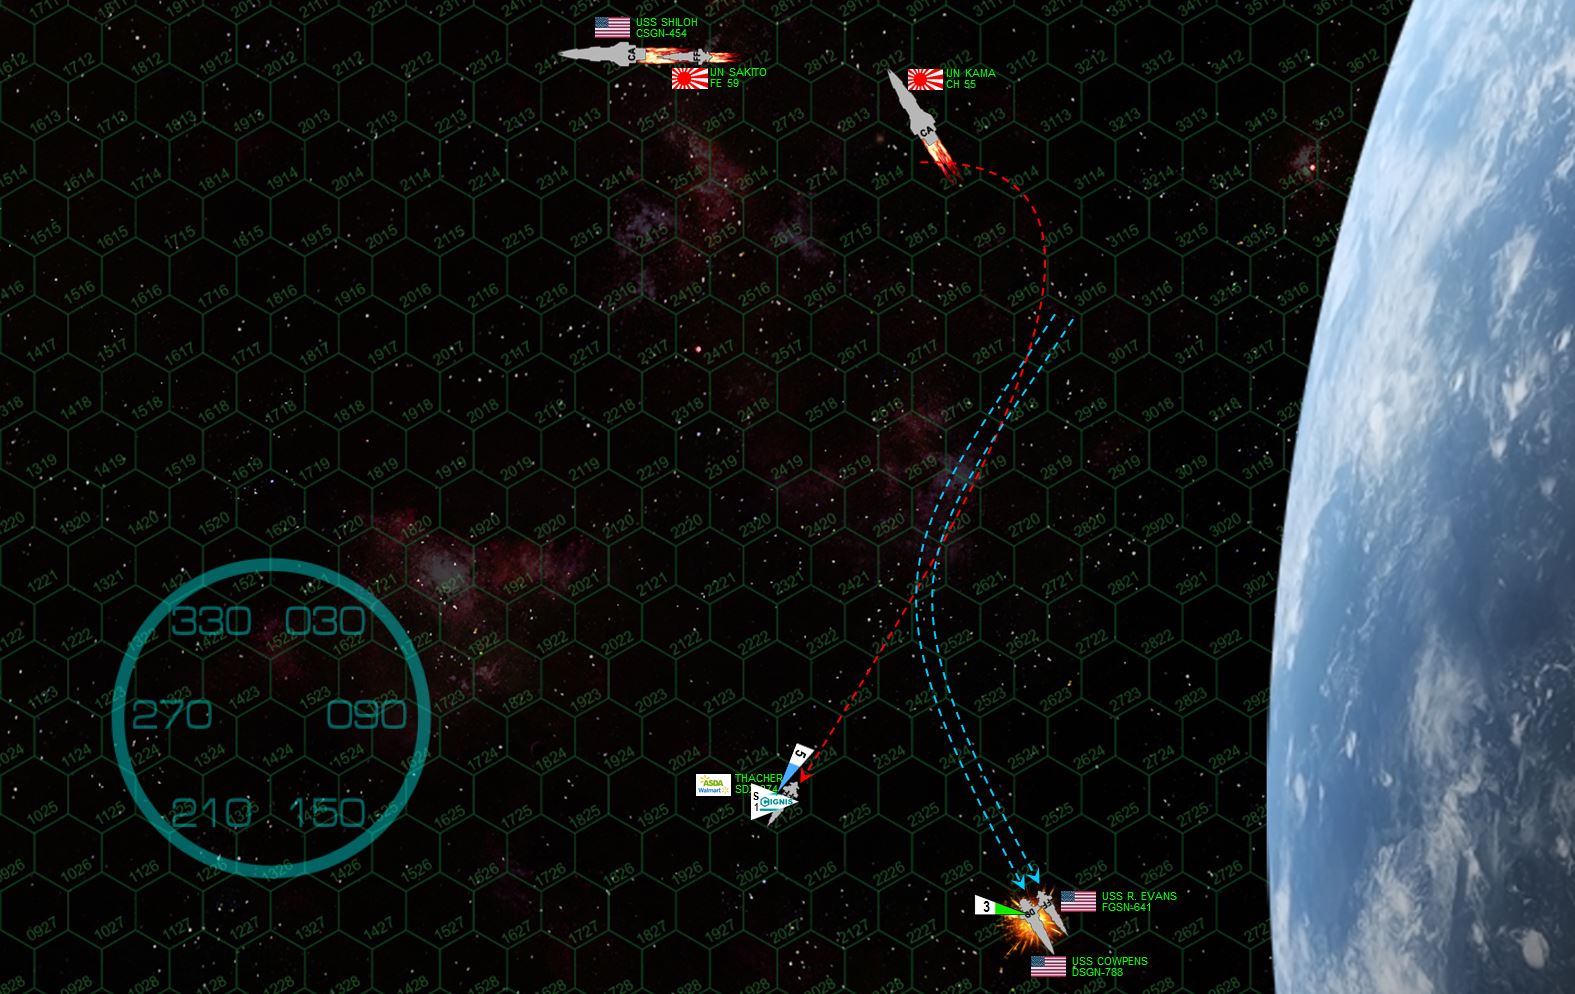 Straight out, I have now WON this game. I have a destroyer and a frigate against a half-blind, half-hobbled frigate. All I have to do is break off. Read on to see how I throw the game away with a series of stupid mistakes. Although USS Cowpens has indeed crippled the Kama, in doing so she received brutal 18-teravolt EPCs that shut down (amother other systems) her starboard quarter shielding. I deliberately turn away from the battle, accelerating back into the planet’s gravity well to screen my wounded side from any fire that might come from the last enemy ship, Tuffyear’s WMS Thacher. Except … in a straight-up rookie blunder, I literally mix up my left and my right. My starboard, burning and completely unshielded, is exposed to an east turn and broadside from the Thacher. Two hits are scored in Cowpens engines, giving Tuffyears a 5+ chance to cripple Cowpens on a d6 … and she rolls a 6. My bad navigation has combined with fortunate dice to put the Consortium back in this game.
 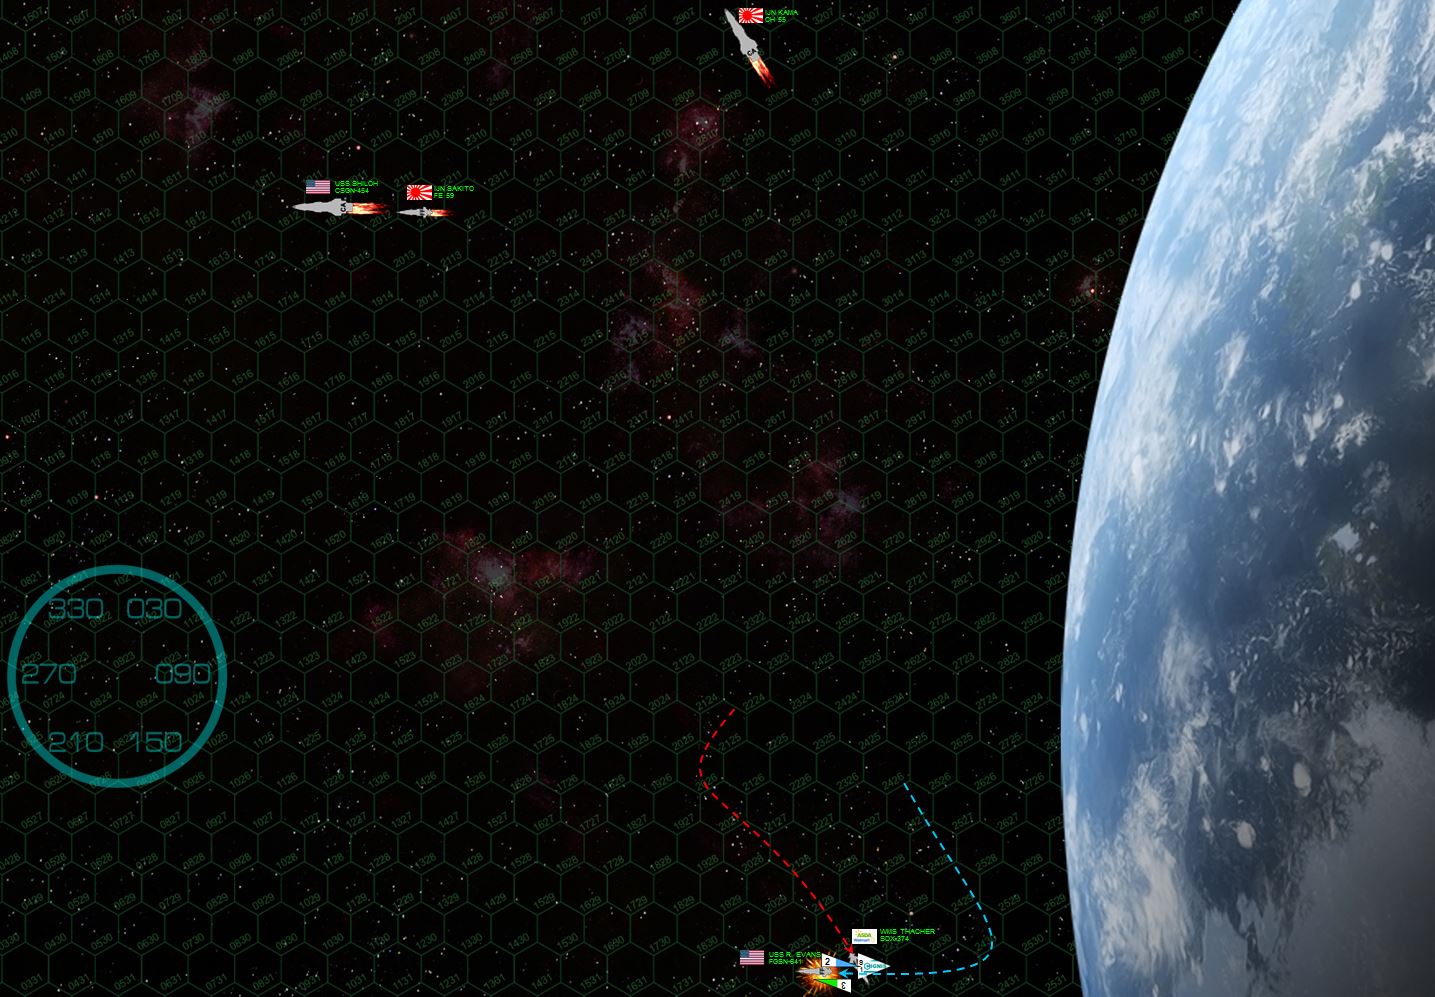 Dumb decision number two … USS Ronald Evans turns BACK into the fight instead of leaving the table. If I had simply kept drifting, I would have escaped with a 24-point frigate while Tuffyears would have a 29-point frigate, that 5-point difference nowhere near enough to score this 241-point game as a “victory” (per Darkstar Rule 522.A.ii., you have to win by at least 5% of starting points or else the game is considered a draw). So I could have easily had a pleasant draw. Nope. The WMS Thacher is badly damaged, recall, and I somehow hope that I would knock her out and steal a win. I even said to the players, “if I lose initiative, I’m out of here. If I somehow win initiative, I’ll try to get on your damaged side and knock out the Thacher.” I lose initiative (no surprise given Thacher’ edge in thrust) but then remain on the table anyway. WTF??? THEN I roll a “1” on the mass driver defense table when Tuffyears sends three “Sparta XII” class V torpedoes at my stern (worst possible roll, obviously). So only one torpedo is shot down, the two other two hit, THEN the Thacher’ broadside … yeah, that’s all she wrote for the Ronald Evans. The game goes down as a 29-point win Consortium-Japanese win (12%).
 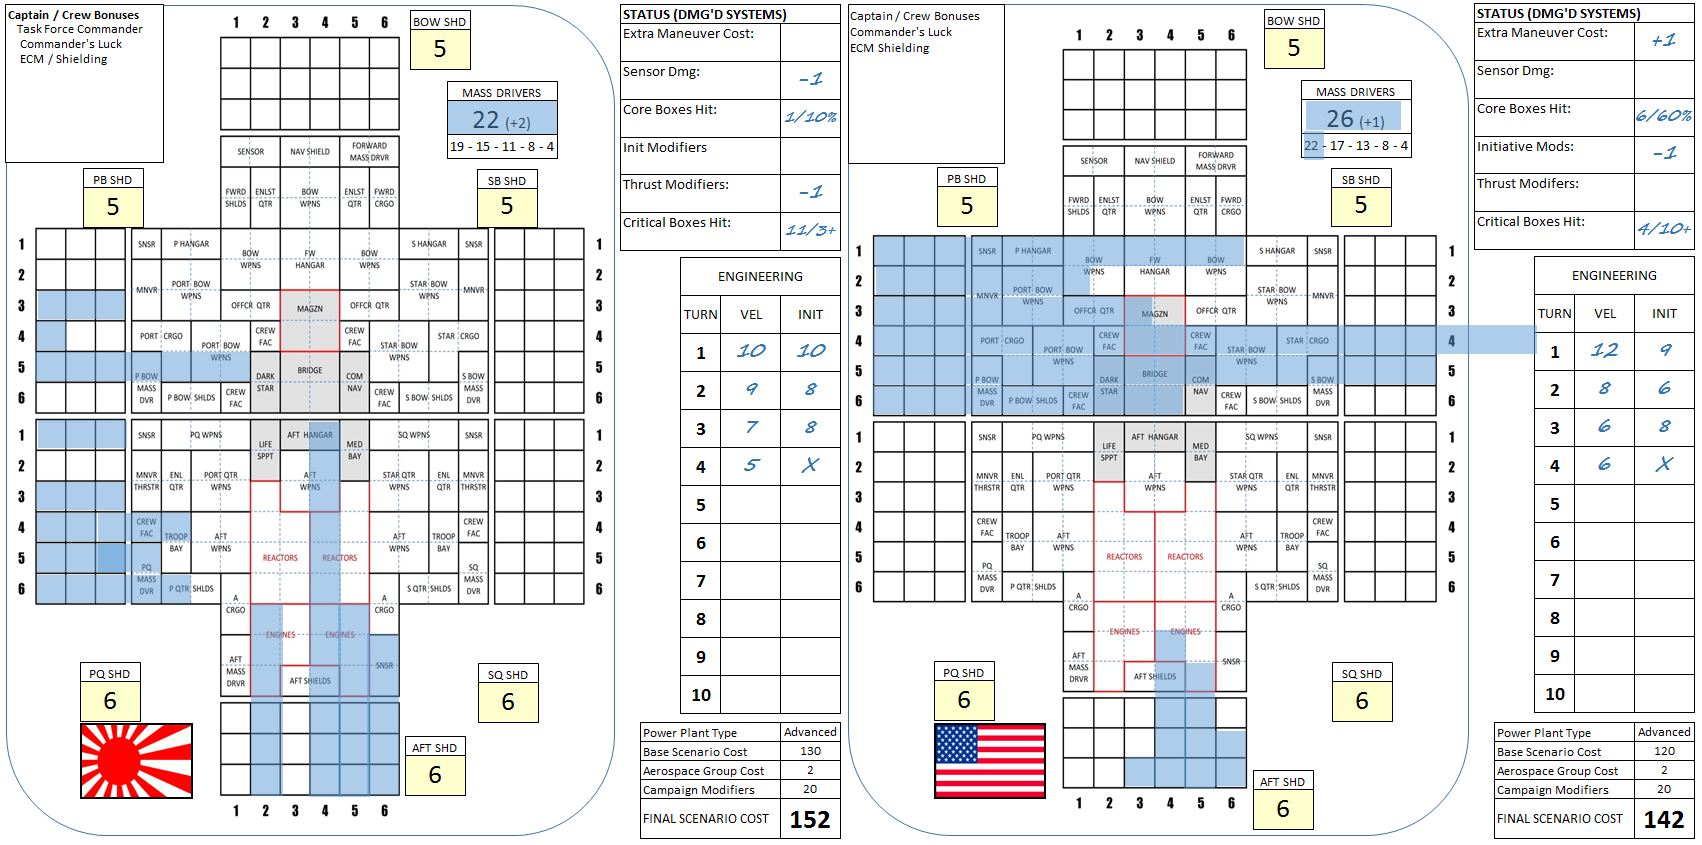 So here we see the clash of the titans, the warship record sheets of the USS Shiloh and IJN Kama. Clearly the Shiloh has taken much more damage, but the damage against Kama is much more precise … the footprint of smaller, more maneuverable ships as opposed to head-on slugging matches like we see with the Shiloh. In the case of the Shiloh, her commander (Rear Admiral Virginia Saunders) has to make a 60% survival check when her “Bridge / CIC” boxes were completely filled in (bridge blown up, did she personally survive that). Whether Saunders lives or dies, the ship itself makes a recovery check (different for each warship type and dependent on whether your side won or lost the battle). Then, if the ship was lost, and the captain survived the actual bridge hit, the captain rolls again to see if she’s among those rescued from the wreck. Good news, she gets to make these rolls more than once thanks to “Commander’s Luck” campaign upgrades (Rule 571.A).
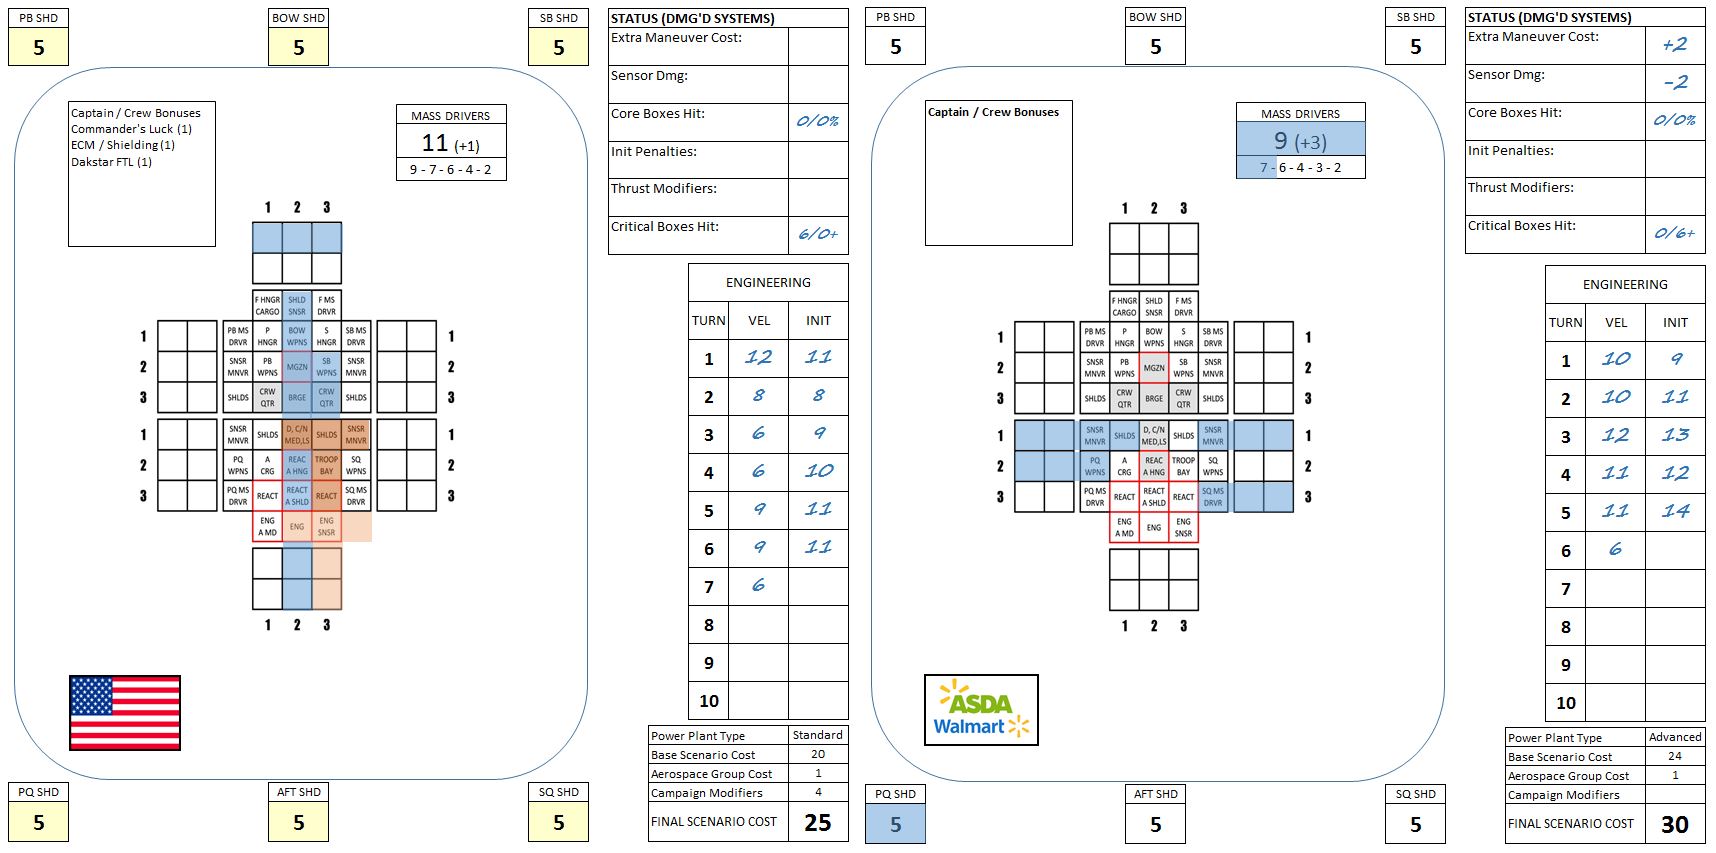 And the two ships that would actually determine the battle’s outcome, frigates USS Ronald Evans and WMS Thacher. In orange you can see the devastating damage caused by the two Sparta XII Class V torpedoes. Note the second torpedo sailed straight into the hole blasted by the first torpedo, and detonated inside Evan’s starboard reactor room. And while I certainly damaged the Thacher, I never really hit anything vital. So congrats to Rasmus and Tuffyears on the win!


Great game, congratulations to all.
You should join us on the discord one of these days
That’s a good point @rasmus and @gremlin – I should start linking our Discord here for Darkstar games and commentary.
https://discord.gg/Ju6m27db
If that link doesn’t work for anyone, drop me a PM and I’ll send a new one (sometimes these links only last a day or two).
Did you guys ever finish that Star Trek version of this game?
More or less finished … just never playtested rigorously.