Romano-British for Dux Britanniarum
Building a storehouse
I recently added a storehouse to the collection of buildings making up my Romano-British farm. The image above shows the completed build. I spread PVA over the walls and then sprinkled sand on them before sealing it with a mix of PVA and water. The building was from Warbases as was the mounted MDF terrain base in which it is mounted.
This shows the painted building. The roof tiles were painted VMC Hull Red and washed with Army Painter Strong Tone ink. I then picked out individual tiles with VMC Cavalry Brown to show areas of recent repair. I then drybrushed the lot with Cavalry Brown.
The walls were painted Light Grey, then Light Grey mixed with Off White, then finally highlighted with Off White.
The stone window was painted in the same way as the drystone walls described in the entry below, whilst the door was painted Khaki Grey, washed with AP Strong Tone and drybrushed with Iraqi Sand. I then picked out the details in AP Dark Tone ink.
The storehouse is actually intended to be part of a larger Roman villa set and be glued in place alongside an adjoining building. As such, one end of the roof is flush with the wall while the other extends out to form eaves. As I wanted this to be a free standing building I needed to extend the end of the roof that was flush with the wall in order to make it look even.
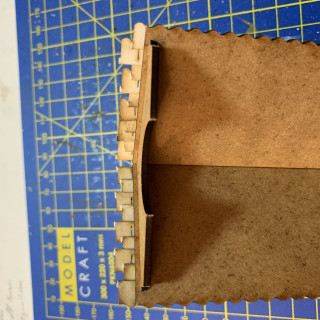
the sequence above shows how I did that. When laying down the tile strips on the roof I took care to extend each row out to the distance I needed. Because the tile pattern alternates with each row, every other row needs to extend out a little further than the distance required. I then glued strips of card under the tiles and adjoining the roof. This extended it out sufficiently to balance the building and ensure that it wouldn’t be lopsided. PVA glue ensures this a rock hard. Once the glue holding the card strips in place was dry I trimmed off any excess tiles that were protruding beyond the now extended roof. The final step was to extend the piece of dowling that forms the apex of the roof. This was done by rolling a small piece of green stuff to the approximate shape and pushing it into place. If you look at the image at the top of this entry you can see it at the left end of the roof.


Leave a Reply