Hot wire pen for hot wire cutter
Testing the "hot pen"
I was surprised at how well the pen worked, straight away. I put no planning into the nib, for example, just squashing some vape-coil-wire with pliers and hoping it worked. And it did!
I had to play with the power settings to find the right range (4% to 15% seemed to be the absolute minimum and maximum values for the working range). But once these had been worked out, I was creating all kinds of wood grain effects!
At the lowest power setting, the wood grain could be drawn very tightly together, with quite thin lines. As the power was increased, the width of the line also increased.
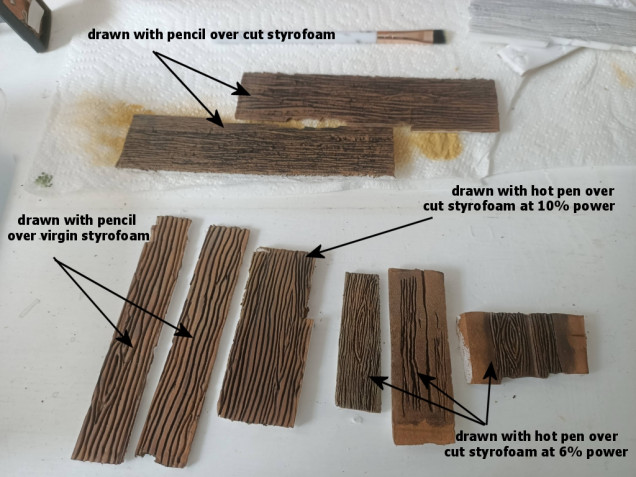
In the photo above all the “planks” have been painted the same way:
- Primed with Coat D’Arms “smelly primer”
- Painted with Coat D’Arms “leather brown”
- Washed with Army Painter water-based Quick Shade Strong Tone
- Drybrushed with Coat D’Arms “putrid brown”
I felt that the thinner lines (drawn at 6% power) looked more realistic after being painted. But I actually preferred the slightly thicker lines (drawn at 10% power) – they looked closer to the original pencil over “uncut” styrofoam that got me so excited about this project in the first place.
Yes, it’s a slightly cartoon-y look – but I’ve spent months trying to fight the cartoon style, yet all of my minis end up that way; it’s just the way the paint comes out of my brush – so I’m learning to embrace it, instead of trying to fight it all the time!
I’ve no idea just yet how I’m going to use the hot pen with a ruler to create straight lines (for brickwork, for example). But for now, I’ll just have to content myself making lots of foam-based wood effects!


![TerrainFest 2024! Build Terrain With OnTableTop & Win A £300 Prize [Extended!]](https://images.beastsofwar.com/2024/10/TerrainFEST-2024-Social-Media-Post-Square-225-127.jpg)


For cutting straight lines, have you considered a circular, rotating blade to run along a straight edge? Like a pizza cutter with a heated edge? I see a possible limit to the number of rotations before the wires get tangled but should be able to make a few rotations before it has to be ‘unwound’ and I can’t see needing to cut massive lengths unless you are making huge buildings, so might not be too limiting? If the disc is made of wood and wider than the cutting wire, this would act as a limit on the cutting depth and… Read more »
A couple of weeks ago I was so lucky to attend a workshop from Gerard Boom. It was to see if I like / am interested enough in building with XPS foam. The answer is YES and I will be investing in a Proxxon hotwire cutter pretty soon. I’m going to make Steampunk buildings for my Wolsung table and are going to make 3D boards for Batman Gotham City Chronicles (I got inspired last year by a Facebook post). At the workshop Gerard showed some of his tools he sells on Shiftingland.com. One of these tools was his rake-set which… Read more »
Those rakes look like a brilliant idea! I’ve tried using texture rolls (ones I’ve 3d printed from thingiverse as well as etched acrylic from Green Stuff World) and while the initial result looked promising, when I came back to them the following morning, the foam had “bounced back” and looked very faint and unconvincing. I guess I’ve a lot to learn with this foam building lark! (I’ve some blue XPS on order due to arrive later in the week…. can’t wait!)
What I know is that there is quit a difference in types of XPS foam. There is a YouTube show by Black Magic Craft which features Gerard where the differences beteren US and EU foam is explained. I think there’s a link on the Shiftinglands homepage.
I’ve tried about six or seven different XPS foam types now – each one from a vendor claiming it’s “XPS modelling foam” (or some similar description). Not one of them is as good as the stuff used in the Black Magic Craft video. Almost all have some degree of “bounce-back” causing details to fade (sometimes after a day or so, but details are always less sharp after time) and all of them rip/tear when trying to draw on them with pen/pencil. I’ve decided I’m only going to use a “hot pen” for drawing on my foam. I’m going for a… Read more »