Persei-Aries War Resumes
Franco-Russian Raid on Belinda's Promise (Mu Hercules 3.6Beta)
FROM: ADVISORY OFFICE, UNITED NATIONS REGIONAL COLONIAL CENTER
04:10 SOL GMT, 28 FEBRUARY 2522
BREAKAUTH: 181072.18J
CLEARANCE: NATIONAL COMMAND AUTHORITY
SUBJ: FRANCO-RUSSIAN RAID ON BELINDA’S PROMISE (Outer Hebrides – Mu Hercules C.6Beta)
Another battle has broken out in the Hercules Rim warzone, the twenty-fifth recorded engagement in the ongoing Third Hercules War. Eager to follow up on their recent successes against the British at the Indian Boghavati colonies (HD176051 system) and against the Arab League at Krasnaya Nadhezda (“Red Hope”, 72 Hercules system), the Holy Russian Empire launched another strike against Royal Navy holdings in the Outer Hebrides colonies (Mu Hercules).
In an effort to maximize their chances for success, this Russian force (built around the Admiral Lazarev task force) was reinforced by warships of the Leclerc battlegroup of their new allies, the New Roman Alliance. Based out of the Catania colonies (Gliese 623 system), the light cruiser Leclerc and her escort, the sleek Milan-II class destroyer Corsica, rendezvoused with the Russian strike force in the interstellar space just outside the helioshock boundary of the Mu Hercules trinary star system. There they set a short, “stealth-wave” approach trajectory for Belinda’s Promise, second moon of the sixth planet of Mu Hercules-C, smallest red dwarf of the three-star system.
The Outer Hebrides colonies, however, have been a major battleground of the Third Hercules War for some time, however, and by now the British administrators of the system are well-prepared for unwelcome visitors. Although the Americans of the Liberty battlegroup defended the outer orbital bands of these stars last time the New Romans came calling, this time the British themselves are on hand to meet the threat. Recently repaired, refitted, and recovered from their sharp defeat at Bhogavati, the Agamemnon Task Force under the flag of Lord Commodore Edward Cavendish has been alerted to the enemy approach by several of the tens of thousands of automated “darkwave” gravimetric detection drones deployed along likely approach routes to vulnerable “blind side” sectors of this three-star system.
The American Liberty Task Force, still under repair from the Battle of Lewis Hill (29 January), is no match for this invading Franco-Russian force. It’s therefore up to Cavendish and his Agamemnon task force. Intercepting this strike force is no mean feat, given the FTL and sublight speed of the French and Russian ships. The light cruiser Leclerc is a Foch-Hispaniola class, renowned for their speed, while the destroyer Corsica is even faster. The larger, heavier, much more powerful Admiral Lazarev has also been upgraded, able to match sustained speed even with the Leclerc.
Fortunately for the British, however, the HMS Agamemnon is the fastest heavy cruiser in known space, at least in sublight. Able to keep pace with most destroyers, she raises best steam for Belinda’s Promise and reach high orbit above the day side of the small terrestrial planet just as the Russians and French emerge from behind the planet’s dusk terminator. With just minutes to spare, the battle is joined.
What is less clear, at least initially, are Franco-Russian intentions. This is a light, speedy force . . . able to inflict tremendous damage not really packing the “hit-and-stay” firepower of an invasion spearhead. Furthermore, no planetary assault ships loaded with Russian zero-g naval infantry are detected behind the strike force. Rather, this seems a simple “run and gun” raid. Only after the battle will British Naval Intelligence confirm that Russian spies have discovered Lord Commodore Cavendish’s plans for a converging British-Arab strike on Russian colonies in 72 Hercules. Accordingly, the Russians now seem determined to keep the British off-balance, on the defensive, and unable to coordinate this potential war-ending invasion of their “Krasnaya Nadhezda” colonies.
GREAT BRITAIN: @damon
RUSSIANS / FRENCH: @oriskany
RAID VICTORY CONDITIONS (535 points)
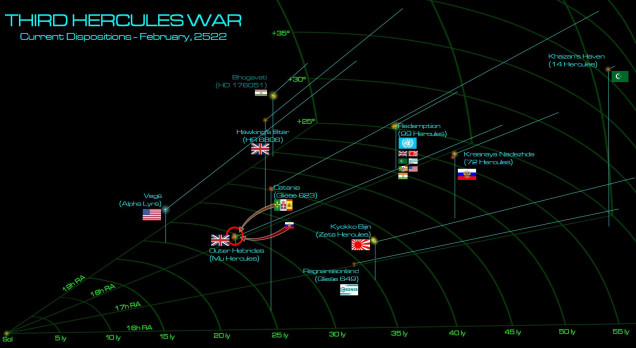 The general situation of the Third Hercules War at the end of 2522. Having now uncovered Lord Commodore Cavendish’s plans for a coordinated invasion of the Russian “capital” at 72 Hercules (cooperating with the Arab League from the “Khaizan’s Haven” caliphate), the Russians seem determined to keep the British bottled up at Mu Hercules with fast, sharp strikes like this one, leveraging their alliance with the New Romans at Gliese 623 whenever possible.
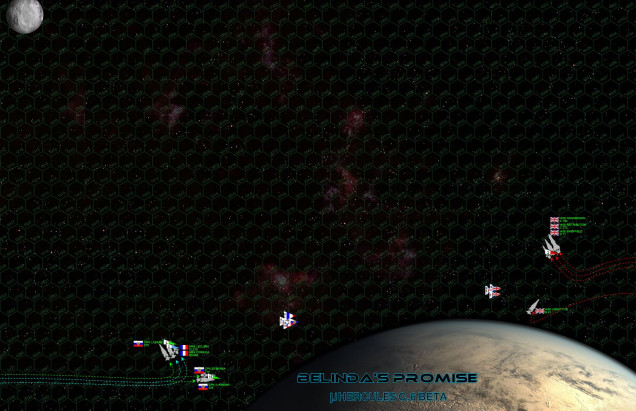 As noted earlier, the Franco-Russian invaders have snuck into the system via a short, slow, and stealthy Darkstar wave from the night side of the Belinda’s Promise. Emerging from beneath the planet’s eclipse shadow, the Franco-Russian commanders (Captains Pyotr F. Myshaga and Rafael deChalemonde) find Lord Commodore Cavendish’s counter-strike force bearing out of the sun (red dwarf Mu Hercules-C) right at them. Both fleets break away from the planet, presenting long-range opening broadsides delivered at 4700 kilometers (the distance from London to Tehran), while the respective aerospace strike carriers (HMS Vindictive under Commander Alfred Carpenter and CPK Ivanishin) begin launching bombers and escorting fighters. The Russians also deploy formidable spreads of their dreaded P-500 “Plamya” (Flame) gravitic torpedo, along with supporting “Lancea” torpedo fire from the destroyer Corsica (Captain Daphne St. Croix).
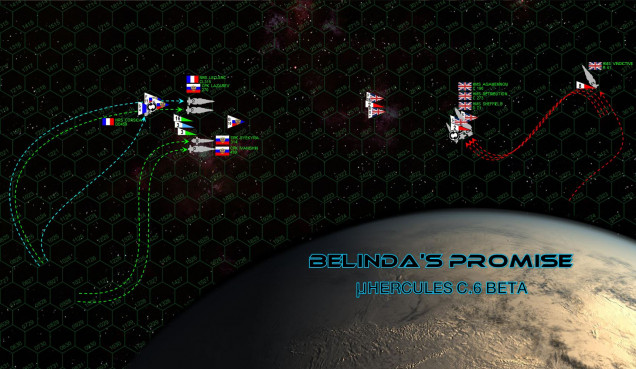 The French and Russians wait for the British to move toward them, then execute a nearly-perfect converging pincer to get MOST of their ships close together for mutually-supporting defensive fire against an anticipated British aerospace and torpedo attack. But the British forestall their attack for now, instead crossing the Franco-Russian “T” with port broadsides from heavy cruiser HMS Agamemnon, light cruiser HMS Retribution, and destroyer HMS Sheffield. Note the Franco-Prussian reform is *nearly* perfect, the destroyer NRS Corsica can’t quite complete the maneuver at her current speed due to maneuvering thrusters damaged in the opening British broadside. Slower Russian torpedoes, meanwhile, can’t quite reach the British this turn and besides, the Ivanishin is still launching the last of her Tu-97 “Zvesburya” (Star Storm) bombers.
 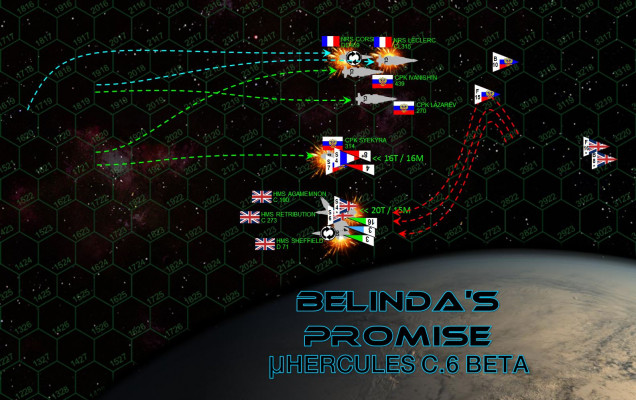 Until now this skirmish has been a slow, measured dance, a careful chess game of angled approaches, measured timing, and calculated strike ranges. Cavendish, deChalemonde, and Myshaga have all proven equals, however, and finally the storm breaks on both sides more or less evenly. The British make an abrupt break toward Belinda’s Promise, leaning hard on their thrusters and grav rudders to pull hard AWAY from the planet at the last moment, using the upper atmosphere to protect Agamemnon’s stern from the Russian torpedo-missile strike sure to hit any second. But the Retribution opts instead for a broadside her guns smashing into the destroyer Syekyra as she and the rest of the Franco-Russian force bolts ahead to broadside the British in turn. The Retribution is positively torn apart astern by the massed missile and torpedoes, the carrier Vindictive much too far away to help with any mass driver defense (she instead broke for high orbit, not even in this picture). Massed Franco-Russian gunnery hammers into the Sheffield, also knocking her out of the battle with her whole starboard engine array smashed clean out of her hull. The British return fire just as hard, however, smashing into the engines and reactors of the swift, sleek, but rather weakly-shielded Leclerc, almost instantly knocking deChalemonde’s flagship out of the fight. The luckless Syekyra is also struck by most of the British aerospace strike, having lost her forward shields she’s basically executed despite the absolute hurricane of mass driver fire that wipes most of the British warheads from the sky. The Agamemnon’s forward guns then cut loose, heavy EPCs tearing through the Corsica’s engines and leaving her crippled and adrift as well. In sixty furious seconds, five warships, totaling some 335,000 tons, have been reduced to charred, drifting wrecks.
 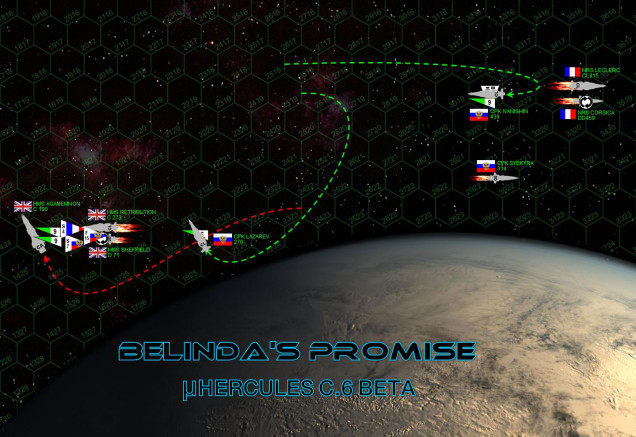 Although they came off slightly worse than the British in that exchange, the Russians under Captain Pyotr Myshaga are far from ready to give up the fight. The Russian bombers are all close enough to immediately land aboard the Ivanishin, where they can swiftly be turned around for another strike. The British carrier, meanwhile, is ordered to break out of orbit and leave the battle completely. A controversial move, perhaps, but Cavendish knows this Franco-Russian incursion is just a raid, NOT an invasion. By keeping his starships intact, he knows he can ensure LONG TERM superiority in the Mu Hercules system. The Admiral Lazarev, meanwhile, hauls around to engage the Agamemnon, who likewise begins a powerful acceleration away from Belinda’s Promise. The Lazarev and Agamemnon exchange withering broadsides, and both mighty cruisers inflict hideous damage on each other. But while the Agamemnon might have an advantage in size and firepower, the Lazarev has an advantage in position. Note her broadsides are hitting Agamemnon’s starboard QUARTER, while Agamemnon is hitting Lazarev on the port BOW. This Lazarev is digging into Agamemnon’s engines and reactors . . . Russian fighters and torpedoes also have their say . . .
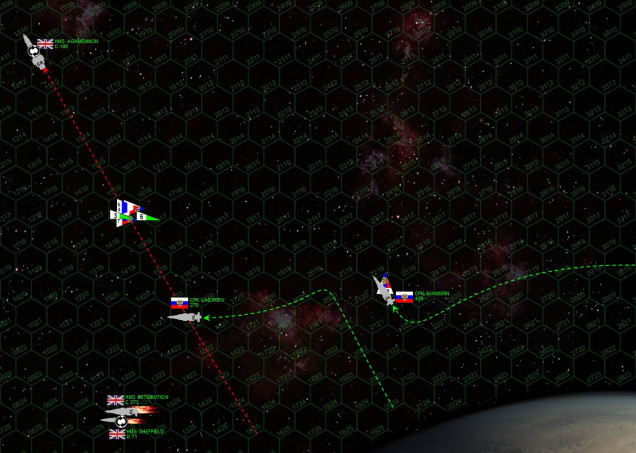 The Agamemnon continues her fiery escape. By now Myshaga knows he will never catch her, so instead cuts across her stern for a last-ditch frantic broadside across her stern. If he can cripple Cavendish, Myshaga’s road will be a success and he may even be able to establish a small foothold in the outer reaches of Mu Hercules, or at least compel the British to drive him out rather than mount their anticipated invasion of 72 Hercules. But by now Cavendish is doing almost forty kilometers a SECOND, literally outrunning the swarm of Russian torpedoes coming after him. He can’t fire much back at the Russians, having lost his aft laser array, but the Russians lose this last chance to cripple HMS Agamemnon and claim victory.
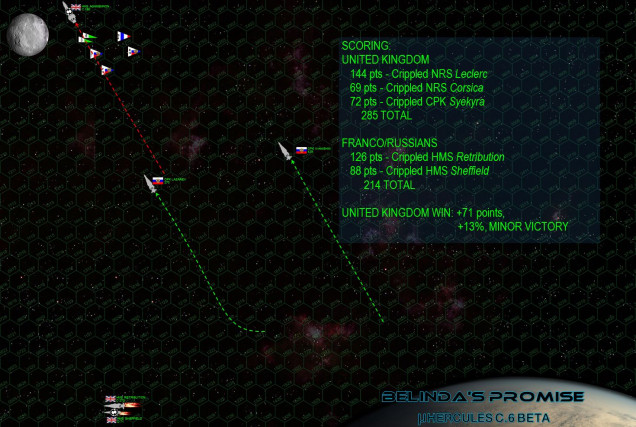 The final results, positions, and score. Remember this is a RAID, scored by how much enemy shipping you destroy or cripple (not what you have left standing). So even though the Russians “hold the field,” they’ve lost more than the British. In campaign terms, with HMS Agamemnon and Vindictive still operational out there (along with a full aerospace strike group), Captain Myshaga cannot linger to destroyer British facilities or even set up a small outpost of his own, he has to return to Krasnaya Nadhezda (once he completes what rescue and recovery efforts he can mount). Ironically, Myshaga’s first task is to rescue to French destroyer Corsica, who repeatedly fails post-battle recovery checks, it’s only Myshaga’s “Commander’s Luck” reroll (campaign upgrade) that saves her. Aboard the Russian destroyer Syekyra, Captain Ekaterina Duranov must also roll for personal wounds or survival since her bridge was hit by British aerospace missiles launched by Supermarine Starfire fighters. This was a nasty one, folks. Hard-fought and close-run. Congrats to Damon for a hard-knuckled win!
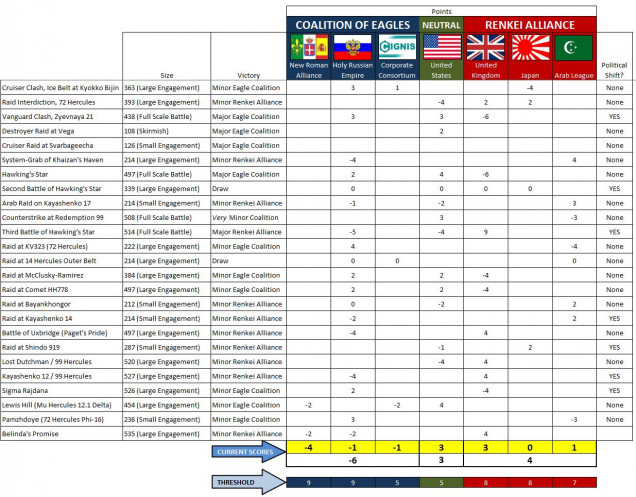 So after some recent defeats, the Royal Navy is again poised to launch an actual planetary invasion into the Russian colonies at Krasnaya Nadhezda, and perhaps end the bulk of this war. They need an ally to help them, but right now the Japanese or the Arab League need a “preliminary victory” to set them up (rough campaign rules, you need to win your PREVIOUS battle to choose the site of your NEXT battle). So if the Japanese or Arab League want to “choose” 72 Nadhezda as the site of their next big smash to support a full-scale British system invasion . . . they need a win somewhere against the Russians to “tee it up.” So stay tuned to see what happens!


![TerrainFest 2024! Build Terrain With OnTableTop & Win A £300 Prize [Extended!]](https://images.beastsofwar.com/2024/10/TerrainFEST-2024-Social-Media-Post-Square-225-127.jpg)




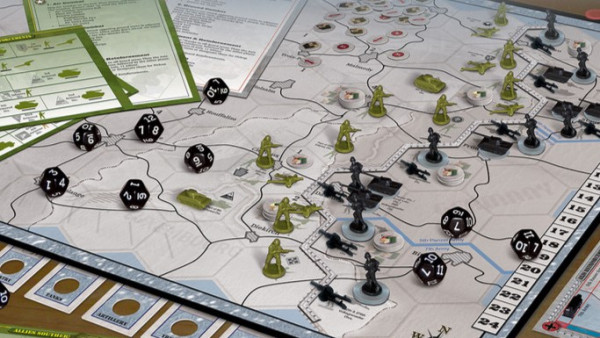


Definitely a rough game, wasn’t sure how it was going to go after turn 3. I did not want another defeat and would of been happy with a draw, the win was quite lucky.
Arghh … @damon – I thought I could steal this one back from you on Turns 4 and 5.
Next time, Cavendish!
Next ti-i-i-i-i-ime!
Nicely done Damon.
Hopefully I can rectify the situation I made in my last game. If you are free some time mid-week @Oriskany I would love to try and get that Arab League Victory the Alliance needs for our next step!
Sure, @muakhah. Just let me know which day works best and I’m sure we can work something out. 😀 I’m usually free starting around 7PM my time (7AM next day your time) but I know that’s early in the morning to be chuckin’ dice. We can always push back to 8 or even 9 if you want.
My Weds, Thurs, Friday mornings, your Tuesday, Weds, Thursday Evenings are probably best for me if thats ok with you.
As for time 8:00 am my time seems ok. It won’t disturb people at that time.
I’ll try and put some padding in my shoebox lid too.
Okay, @muakhah – let’s shoot for my Tuesday night 20:00, your Wednesday morning 08:00. I can set up a small Russian assault into 14 Hercules. We STILL WANT that system, damn it! 😀 😀 Even if they can’t keep any footholds they win, the Russian aim will be to tie up your Arab League warships in retaking planets and moons in 14 Hercules (Khaizan’s Haven) rather than assisting the British-proposed invasion of 17 Hercules (Krasnaya Nadhezda). This may force the British to turn to the Japanese for help at 72 Hercules … except the Americans have tied up the Japanese… Read more »