Persei-Aries War Resumes
Updates Complete - MAJOR CHANGES in Third Hercules War
Okay, everyone. This post should complete the updates on the Third Hercules War Community Campaign up to date.
It covers Darkstar Web Games 45 and 46 (The Lost Dutchman and Kayashenko 12), and brings the timeline up to the end of November, 2521.
The end of the post shows the current state, what factions have dropped out (sort of), and what new faction has joined.
>>>>>>>>>>>>>>>>>>>>>>>>>>>>>
FROM: UNITED NATIONS REGIONAL COLONIAL CENTER
02:00 SOL GMT, 25 OCTOBER 2521
BREAKAUTH: 181072.18J
CLEARANCE: SECRET (NATIONAL)
BRITISH ASSAULT ON THE LOST DUTCHMAN (Redemption / 99 Hercules)
With the Japanese having defeated the Indo-American incursion at Shindo 919, the “Khaizhan Caliphate” of the Arab League defeating the Russian counterstrike at Kayashenko 14, and especially the Royal Navy’s solid win at the Battle of Uxbridge in the Outer Hebrides (Mu Hercules system), Royal Navy high command senses an opportunity to decisively turn the tide of the Third Hercules War once and for all.
Thus is born Operation “Rodney,” named for one of the battleships that helped sink the Bismarck in 1941. Originally conceived by Lord Commodore Edward Cavendish, the plan met with eager approval at Hercules SCS (strategic command sector) Naval Command at Uxbridge, who immediately assigned the plan tier-one priority in Royal Navy support facilities, supplies, and repair / refit scheduling. Having ensured the plan’s adoption, Cavendish also made sure his force (Task Force Agamemnon) would get the orders to spearhead the effort.
The orders are to launch consecutive assaults against the Royal Navy’s two primary enemies in this Third Hercules War, the United States and the Holy Russian Empire. Rather than strike far-flung targets at Port Halsey or Krasnaya Nadhezda, the British will hit much closer to home, at American and Russian holdings in the UN’s “Redemption” Mandate (99 Hercules system).
First, the Americans will be struck at their newly-secured holding, the outer terrestrial planet of The Lost Dutchman (99 Hercules-12.A). With a mass roughly that of Mars, but an orbit more like Pluto or Eris, the Lost Dutchman was a British possession until early defeats in HR6806 and Mu Hercules forced the British to reinforce these threatened sectors at the expense at less-vital areas like the Lost Dutchman. In a word, the Americans “stole” it, practically without a fight, after the British suffered yet another defeat in 99 Hercules, trying to shove the Russians out of the moons of the Kayashenko gas giant.
The “Stars and Stripes” flying over a British colony simply won’t do, and on 25 October 2521, Task Force Agamemnon mounts a short, slow, and very precise intrasystem Darkstar jump out of Zubrin (the main British holding in 99 Hercules) to the night side of The Lost Dutchman. They find themselves confronted by one of the major American flagships in the Hercules Rim, the Gettysburg class heavy cruiser USS Shiloh under the flag of Rear-Admiral Virginia Saunders. Raising steam for a parabolic orbit around to the day side of The Lost Dutchman, Saunders denies battle just long enough for help to arrive in the form of the bulk of Task Force Oriskany (Captain Matthew Spencer).
The Battle of the Lost Dutchman is on.
UNITED STATES: @Oriskany
UNITED KINGDOM: @Damon
ASSAULT VICTORY CONDITIONS (520 points)
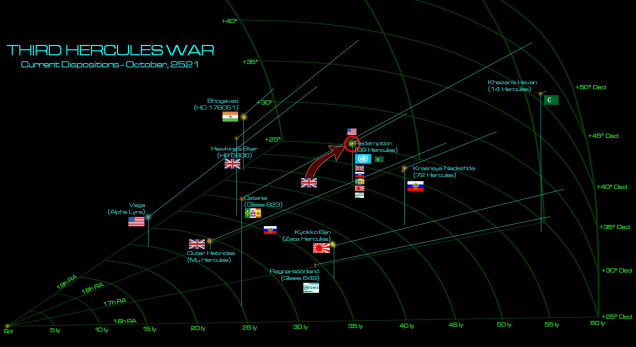 Make no mistake. This will be no “raid,” but a knock-down, drag-out, last man standing assault to determine possession of The Lost Dutchman (outermost terrestrial planet of the “Redemption” / 99 Hercules star system).
 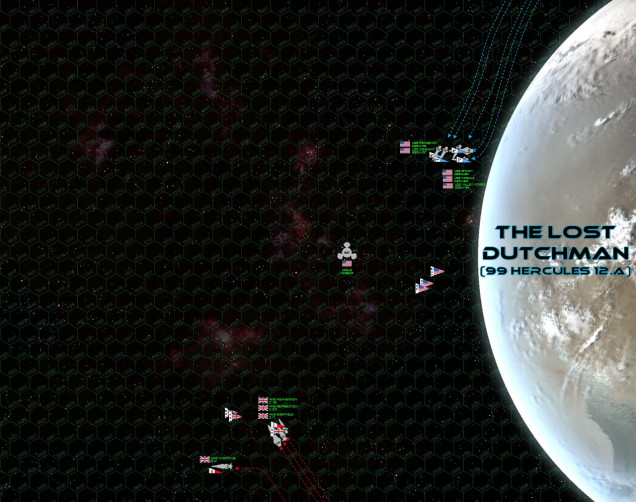 The Americans come on very fast, eager to close the distance with the bigger guns of USS Shiloh. Also, most of these British ship have more accurate guns than the Americans, at accuracy advantages tend to count less at shorter ranges. The Americans thus thunder toward “Arauz Harbor,” the Shiloh just missing lining up a broadside on the approaching British while the destroyers of Task Force Oriskany line up torpedo spreads and the USS Tarawa starts launching her aerospace group (Marine Corps strike squadron VMF/A-319 - the “Tigersharks”). The British, meanwhile, sets a slower speed, content to keep the range open for the time being, the light fleet carrier HMS Vindictive angling away from the Americans so she can launch her strike group in relative safety.
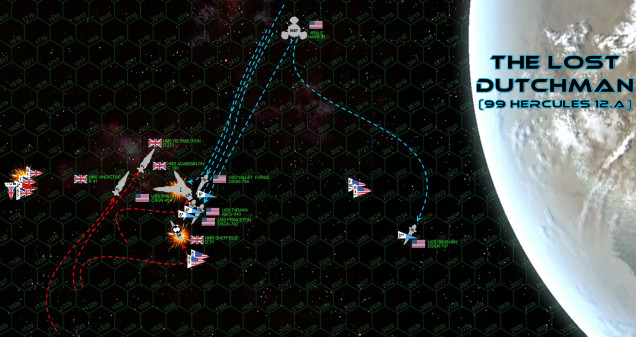 By Turn 3, things are already going pretty badly for the Americans. Out of her first three fire phases, the biggest American guns (10 gigawatt rail guns aboard USS Shiloh) have hit exactly ONCE out of 18 shots, and now she’s being broadsided point-blank in the engines by the faster, more maneuverable HMS Agamemnon. She ... doesn’t last long. USS Oriskany has also been hammered, forced to break off yet trying to sling additional torpedoes into the fray. She gets lucky when one of her Mark 48s, along with strafing scouts, manages to hit the HMS Sheffield astern, crippling the ship with a detonation right in her engines and reactors. The main Marine Corps aerospace strike, meanwhile, along with point-blank broadsides of the USS Princeton and Valley Forge, manage to cripple the HMS Agamemnon. British fighters and bombers, meanwhile (Supermarine Starfires and Nebula Star Typhoons) try to set up a launch against the Americans, venture a shade too close and before she is crippled, the USS Shiloh’s long-ranged 40mm mass drivers knock down most of the British bombers. Although diluted, the British torpedo and missile strike still manages to cripple the USS Princeton with hits astern in her reactors and engineering sections.
 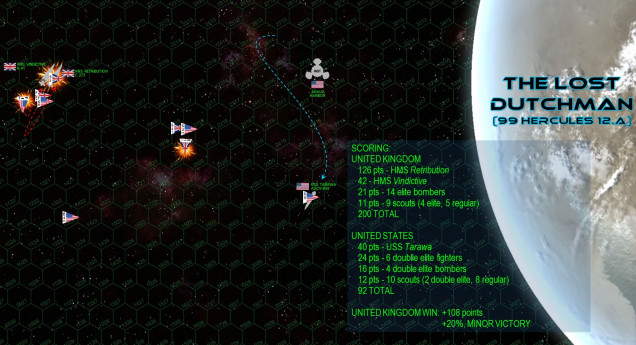 Turn 7, and like we saw against the Japanese at Shindo 919, by the end of the game the Americans are desperate to steal back a draw, and like we saw at Shindo 919, they come up short. Successive Marine Corps strafing attacks have been chewing away at the stern of the HMS Retribution. The Valley Forge has also put a broadside into her stern, but Retribution’s deadly-accurate guns have crippled her. The USS Oriskany has been forced to break off. USS Tarawa, unarmed except point-defense mass drivers and torpedoes, keeps slinging in Mark 48s until she actually runs out. The bombers land, are re-armed, and re-launch for a second strike which, combined with the suicidal courage of the Marine Tigersharks (flying F/S-44 Star Corsairs) and the Tarawa’s very last torpedoes JUST MISS crippling the HMS Retribution (I rolled a 3, I needed 1 4) – even as the last British bombers are shot down by American “Hawkeye” scouts. But it doesn’t matter. The British still have too much firepower in orbit over The Lost Dutchman, including HMS Retribution a larger carrier than HMS Tarawa, and MANY more surviving fighters. It’s a narrow, bloody win, but a clear outcome nonetheless. The British have re-taken The Lost Dutchman, and the Americans have lost their foothold in the UN “Redemption” Mandate (99 Hercules).
 FROM: UNITED NATIONS REGIONAL COLONIAL CENTER
23:40 SOL GMT, 18 NOVEMBER 2521
BREAKAUTH: 181072.18J
CLEARANCE: SECRET (NATIONAL)
ROYAL NAVY ASSAULT ON KAYASHENKO 12 (Redemption / 99 Hercules)
With the Americans for the most part limping back to Port Halsey, the Russians stand more or less alone in the UN “Redemption” Mandate (99 Hercules). Accordingly, Lord Commodore Edward Cavendish (commander, Task Force Agamemnon) is determined to maintain the momentum of Operation “Rodney.” His warships are thus patched together at the nearby Zubrin gas giant in record time (in the same 99 Hercules star system) and within three weeks, he’s sortied against his next target, the Russian Kayashenko gas giant.
If Cavendish can repeat his last win, he’ll have knocked the Royal Navy’s two biggest enemies clean out of the UN Redemption Mandate, marking the first clear territorial win for Great Britain in the Third Hercules War.
Yet however brief his pause has been to repair ships like HMS Agamemnon, Retribution, and Sheffield, that same time has allowed the Americans to repair some of their smaller ships as well. While there’s no way they can repair USS Shiloh in time, the USS Oriskany and Valley Forge have been repaired (the Princeton is also unable to make it in time). The Americans also send in their FTL-enhanced light fleet carrier, the legendary USS Liberty (Captain Zachary Irons). The Coalition of Eagles can only hope that these slender reinforcements, combined with the Russian Light cruiser CPK Lazarev and destroyer Syekyra might be just enough to stop Cavendish’s follow-through to his “Rodney” offensive.
The two fleets meet at Kayashenko 12, a captured asteroid in a freakishly close, rapidly-decaying orbit around the gigantic bulk of the Kayashenko gas giant. As fate would have it, this battle is not only the largest yet seen in the Third Hercules War, but even beyond its tremendous battlespace impact, will also prove to have fateful and controversial political impact across over fifty light-years of space, changing the shape of the conflict going forward.
UNITED KINGDOM: @Damon
RUSSIA / UNITED STATES: @Oriskany
ASSAULT VICTORY CONDITIONS (527 points)
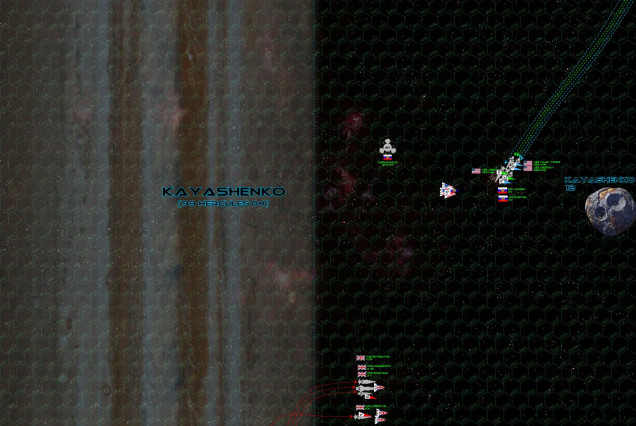 No need for a “theater map” on this one, it is taking place in the same 99 Hercules system as the battle immediately prior. We see the British task force moving up slowly from actually WITHIN the gas giant’s upper most cloud layers, keeping as slow a speed as Lord Cavendish dares (he can’t go too slow of if any of his ships are crippled, they won’t have escape velocity to leave the table - gravity rules are MUCH more harsh on gas giant tables). The Americans and especially Russians, meanwhile, are setting a VERY high speed well over 40 kilometers a second, more or less dive-bombing straight into the planet’s gravity well. This seems insane, but the Coalition ships are actually much more agile and maneuverable than the British task force. The American commander (Irons) wants to launch that decisive aerospace strike as soon as possible and he’ll need the help of slow Russian torpedoes to do it, while the Russian commander (Captain Pyotr Fedorovich Myshaga) wants to put his plasma accelerators, EPCs, and rail guns across a British stern five minutes ago. Note the how the Russo-American trajectory is affected by the planet’s gravity
 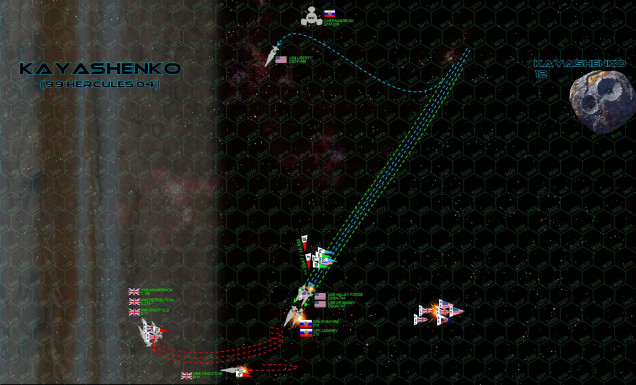 And here it is, the movement phase that doomed the Americans in the Third Hercules War and damned near KILLED two of the game’s most famous ships. The British have moved first (lost initiative), jack-knifing back and ducking back into the clouds of Kayashenko. The decision is a chancy one, braving the gravity and lightning to keep the range open on the Coalition warships and hit them with a broadside as they race forward. Although previously decelerating, the Russians and Americans now RE-accelerate, hoping to close the range with the British as soon as humanly possible. Their speed, however, combined with Kayashenko’s merciless gravity, leave them only one option for a starboard turn if they want to stay in the battle. The destroyer Sykerya doesn’t have to worry about that choice. Already damaged by the British forward batteries last turn, she is smashed open so hard by the second volley (now a complete broadside) that she loses power and careens off the table anyway, crippled and out of control. The Lazarev, Oriskany, and Valley Forge, meanwhile, are in desperate trouble already ... even if they don’t already know it. At least the British aerospace strike largely fails, a single Supermarine Starfire’s missile hits USS Oriskany astern ... but that’s a hit that will be telling later. Meanwhile, all forward Russian and American guns tear into the carrier HMS Valiant, inflicting such damage that Cavendish elects to order her out of the battle area. Note where USS Liberty is, near the top of the pic. THAT’S where the Russians and Americans should have ALL gone, weathering one more British broadside at longer range against their enhanced shielding, all while hammering the British with their far stronger aerospace strike coming up ...
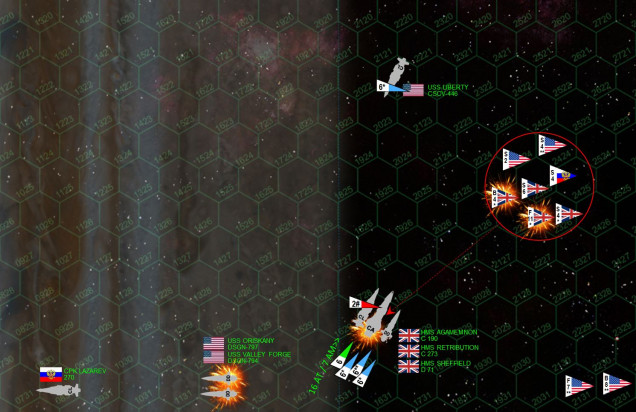 Turn three, and it’s all over but the crying. Even decelerating as much as they can, the Lazarev, Oriskany, and Valley Forge BARELY manage to make a starboard turn and dive head-first into the gas giant’s gravity well, literally at flank speed into the jaws of death. Even much of the speed they managed to shed was regained due to the enhanced gravity rules within a gas giant atmosphere. Meanwhile, the British have powered back OUT of the atmosphere and looped behind the Coalition with a full-scale broadside directly astern ... as the Coalition dives headlong into Kayashenko. THIS ... IS NOT HOW YOU PLAY DARKSTAR. I of all people should know not to do this. By losing patience and setting too high a speed, I have made my position nakedly predictable, so all the points I spent in speed and initiative bonuses are for naught, Damon lost initiative and was still able to easily put himself in perfect position. The Agamemnon fires into the stern of the Oriskany and Valley Forge, doing tremendous damage against both ships’ engines and reactors. Note: if they lose power HERE, they are DEAD. Commander’s Luck, nothing saves you from being pulled down to the crushing incineration thousands of kilometers deep in a gas giant’s blistering ocean of hyper-pressurized liquid hydrogen. The American aerospace strike slams into the stern of the Agamemnon, crippling her, but her far wiser commander has her on a trajectory and velocity where she will drift off the table and be rescued after the battle. The Retribution and Sheffield now fire as well . . . The Oriskany winds up taking 5 boxes of “critical” damage. Destroyers are crippled on a d6 roll of 7+, from which you subtract the number of crits. She’s now at a 2+ to die. At the end of the turn, I get to roll 2d6 to repair internal damage (Resolute Crew upgrade). I get lucky and score two successes, so I repair two critical engine boxes and now Oriskany is at 7-3=4+ to die. I ask Damon of he’s willing to let me out of this roll if I break off the Oriskany and Valley Forge (in an assault game, this gives him the same number of victory points, I just get to keep my favorite ship for future games). Damon agrees, but only if the Americans break off ENTIRELY and also sign a peace treaty with the British. Desperate not to lose the “Lady O” forever, I reluctantly agree. Unfortunately for me, we roll the dice anyway just to see what would happen and Damon rolls a “1” – Oriskany would have survived anyway.
 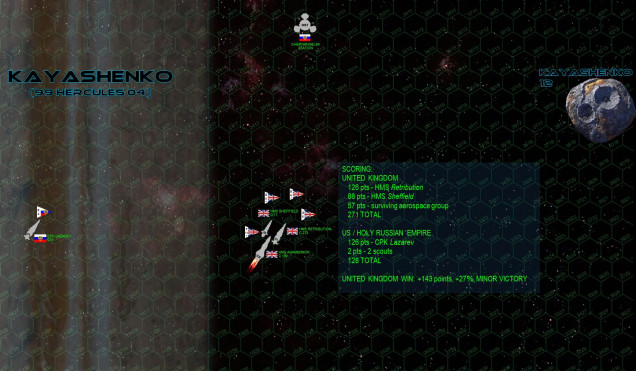 Well, that was a f***ed game, mostly through my own stupidity. The Americans honor their word, pulling out of the battle entirely. Leaving CPK Lazarev on her own. With Retribution and Sheffield still operational, the British thus score a minor victory. The Russians have lost their holdings in Kayashenko and the UN Redemption Mandate. Interestingly, the crippled CPK Syekyra misses her post-battle recovery check, her Commander’s Luck point, and Lazarev’s commander’s luck point as well. It takes one of Oriskany’s luck points to save her from the decaying orbit, meaning the “Lady O,” as bad off as she was, took the Russian destroyer under tow and saved her from oblivion. At least she managed to do SOMETHING right.
So where does this leave the Americans, the British, and the Third Hercules War in general? Well, it’s complicated.
First up, the US and UK sign the Treaty of Zubrin, with the stipulations below:
- The Americans agree to cease any and all combat operations against the United Kingdom throughout the Hercules Rim.
- The Americans agree to a “mutual assistance” clause if British holdings in Hawking’s Star, Outer Hebrides, or Redemption (99 Hercules) are attacked.
- Yes, this includes if the Holy Russian Empire, Republic of India, or Corporate Consortium attacks these holdings. The Americans will be obligated by treaty to help defend British possessions against their former “allies.”
- The British agree to grant the Americans a 50-year lease on the Lost Dutchman, a British outer ring planet in 99 Hercules. This allows the Americans to save no small degree of face, “winning” the shipping route through the Hercules Rim which was their casus belli in the first place.
- The price of this lease is very high, the “overcharge” is quietly recognized as war reparations for damage done to British facilities in Outer Hebrides and Hawking’s Star.
- The Americans agree to pay tariffs (very, very steep tariffs) for shipping through Lost Dutchman / 99 Hercules.
- At the end of that 50-year lease, the British retain the right to reclaim operation of the Lost Dutchman, complete with improvements / facilities the Americans made in that time.
- American war conditions with the Japanese and Arab League remain in effect, neither Japan or the Arab League were a party to these concessions and they are not happy with the outcome of this “separate peace.”
- Americans are not allowed to cooperate with the Russians, Indians, or Consortium against the British in any way.
- In fact, Americans may well wind up fighting AGAINST the Russians, Indians, or Consortium if they attack a British star system.
In game terms, the Americans are AT PEACE with the British and their “campaign threshold” is reduced from a 10 to a 5. In a weird way, they are almost neutral, fighting on both sides of this war although only in a limited fashion. Along the coreward shoulder of the Hercules Rim, they remain at war with the Japanese and Arab League. Along the spinward shoulder, they will probably wind up fighting on the side of the British if anyone attacks a recognized British possession.
Those five American missing campaign commitment points will be taken up by a new faction joining the Coalition of Eagles (although only at a campaign commitment level of “5”).
This new faction is … from their Catania colonies in the Gliese 623 binary red dwarf star system … the NEW ROMAN ALLIANCE (primarily Italians, Spanish, and French).
This is all pretty confusing, but the chart below has been updated to show the complete updated geopolitical situation along the Hercules Rim going forward into 2522. Let me know in the comments if you have any questions.
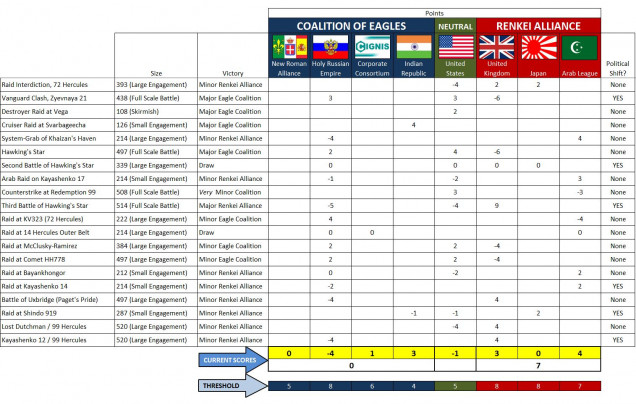 Note some other nations’ “Commitment Threshold” numbers have been slightly tweaked so both coalitions remain at 23. This is the number, positive or negative, that a nation reaches before leaving the war either as winners or losers. The YELLOW number is their actual score at present, and shows how close to their political commitment threshold that faction actually is. So the New Roman Alliance is brand new to the war (score 0), but their archbishops aren’t THAT keen on a bloodbath, they will leave the war when their score hits +/-5. The Russians are more committed with an 8, but they’re already at -4 with a string of recent defeats. So one more solid loss and they might cut a deal as well. The British, having won against the Americans, have reduced their “hawkish” war commitment from an 10 to an 8, but they’re at +3 after recent victories, so five more points of victory gives them a complete win for Hercules Rim. The Japanese are also “cooled down” from a 10 to an 8, probably because they no longer 100% trust their British allies. Closest to an outright win are the Arab League, just three points shy.














1. Gas Giants are a bitch!
2. New Roman Alliance? No, just no. There is no way de Chalemonde is invited into Hercules! I will HAVE to break out the Kraken. Though from these reports, I have a feeling she is outgunned now since she hasn’t been playing.
That’s right @Gladesrunner! Your old friend Raphael deChalamonde is back! “Oui oui, mon cheri! Did you miss me? Please do not be too angry that I have not kept in better touch, the void of space is cold enough without your frigid English disapproval. Oh, Commodore Rhea Aubrey, august and venerable iron warhorse of His Majesty’s Navy! Battleaxe mistress of HMS Kraken, that most unfortunate of garbage scows. Respected as a warrior, if only she could be loved as a woman … if only we could be sure she WAS a woman …” ???
Sir, you offend my lady Commodore’s honour, only a coward or a Frenchman could stoop so low, we will have a reckoning.
*Yawn, sniff, lights up a thin cigarette*
Another overstuffed Englishman. We lions of France were offending her honour (and much more besides) long before you showed up!
** actually deChalamonde is talking a lot of shit here, you own victories against TF Oriskany and Liberty, Battlegroup Leclerc will need a lot of reinforcement before they’re ready to take on TF Agamemnon…
You may insult me, the French know not better manners, but your will NOT insult the Kraken. That ‘garbage scow” has kicked your as multiple times. So what does that say of your all flash no substance fleet?
It means that the British fight the French, as God intended ?
@damon – with plenty of Spanish and Italian help!
Oh boy is the Caliphate pissed at this treaty! We spend ages losing ships in raid and counter raid warming up to an assault to take Russian holdings in redemption Hercules-92. And then the British just sweep in and snatch them up! And then conclude a peace with the US! This has seriously derailed Caliphate strategic planning. Ooooooooh boy!
Oh and a question. The Americans are now leasing a British Base. What would be the ramifications of someone attacking what is still essentially British property (in the long term) to get at the Americans? I can’t see a nation allowing something it leased to be taken by a third party.
This lease could be the crack that breaks the Renkei Alliance…
Not necessarily, diplomatic moves may be afoot…
Your diplomatic efforts have been received and appreciated.
@damon and @muakhah – secret international correspondence the campaign referee doesn’t see?
This will end in tears.
🙂 🙂 🙂 🙂
@muakhah – just to be 100% clear … the Treaty of Zubrin doesn’t take anything AWAY from the League, it just didn’t GIVE you anything. Holdings you have at Kayashenko 14 are still yours, in fact that may be safer than before because successive Russian defeats have chased the Russians away from the Kayashenko gas giant (that super-Jupiter has something like 60 moons – your Battlegroup still has the caliphate’s flag over Kayashenko-14. That said, certain leaders in the League will be irate that the American draw-down from the war yielded no benefits to the League, as the League fought… Read more »
Ah yes, I forgot that we have a toehold in the system. And that there is still plenty to fight over in said system.
What if the Renkei were to Assault The Lost Dutchman though… technically it would be taking a British Holding? I can imagine diplomatic solutions such as the US not being able to lease it until the war was over (assuming things continued to go well for the Renkei)
The good news is that 99 Hercules is a target rich environment. I just like a little friction and tension twixt allies.
@muakhah – “What if the Renkei were to Assault The Lost Dutchman though… technically it would be taking a British Holding?” It’s an American holding, though. Per treaty (i.e., international law). We just have to give it back in 50 years. Which gives us 49 years to figure a way out of this agreement. 😀 Unless we don’t like the place. Then we just have to figure a way out of the payments. 😀 (Did I mention Trump’s great-great-great-great-great-great-great-great-great-grandson is our President?) President Donald the XXIV? Of course, if the British want to come in and HELP us defend it… Read more »