Persei-Aries War Resumes
Third Battle of Hawking's Star: The Empire Strikes Back!
FROM: UNITED NATIONS REGIONAL COLONIAL CENTER
21:55 SOL GMT, 25 MAY 2521
BREAKAUTH: 181072.18J
CLEARANCE: SECRET (NATIONAL)
**UNITED NATIONS COMMUNIQUE**
Another titanic battle has taken place in the far-flung reaches of the Hercules Rim, objectively the largest yet in the Third Hercules War. After recent peripheral battles in the open UN mandate of the Redemption Colonies (99 Hercules) system, focus seems to have shifted back to what has recently become the epicenter of this war, the Hawking’s Star colonies (HR6806 system) of the United Kingdom.
Hawking’s Star is a major shipping, industrial, and population center, and a key component of the United Kingdom’s interstellar colony network. Together with the Outer Hebrides Colonies (Mu Hercules), Hawking’s Star lies directly between the American colony at Vega (Lyra Alpha) and the UN “open colonies” at Redemption. Clearly, as soon as the Americans entered the Third Hercules War with intentions on expanding into Redemption and the Hercules Rim in general, systems like Hawking’s Star found themselves in the way. At just 13 light-years from the huge American Port Halsey naval base at Alpha Lyra, Hawking’s Star in particular has been a target almost since the moment this war started.
Thus far, British fortunes in Hawking’s Star have been less than stellar. The United States Navy (with support from their allies in the Holy Russian Empire) claimed a major victory here when Task Force Liberty (Captain Zachary Irons) spearheaded the initial drive into the system, all but smashing the Royal Navy clean out of Hawking’s Star colonies in a stunning carrier/cruiser strike. Indeed, if Task Force Liberty had been supported by a US Marine Corps planetary landing force, Hawking’s Star might have fallen entirely right there.
Now firmly lodged in the outer orbital zones of the system, the Americans (Task Force Oriskany, Captain Matthew A. Spencer) and Russians then fended off a determined counterstrike by British reinforcements and their Japanese allies in a frustrating and hard-fought draw.
British plans for a second counterstrike to drive the invaders out of Hawking Star were muddled, delayed, and unfocused. The commander of the primary British naval force in the region (Task Force Agamemnon, Captain Lord Edward Cavendish), hardly held the Admiralty’s confidence at the moment. Political tension had reached as far back as Earth, where the Prime Minister struggled to hold his government together against the threat of a Vote of No Confidence. Indeed, it seemed as if no counterstrike might come at all, with Hawking’s Star traded away to the Americans in exchange for a favorable peace.
The Americans, meanwhile, were in little better shape. Admirals at Port Halsey pointed fingers for the lost opportunities of taking Hawkings’ Star with the initial Task Force Liberty strike. In truth, this strike was never intended as an “invasion,” the startling degree of its success as much a surprise to the Americans as the British. The Russians, struggling in their campaign against the newly-arrived Arab-League, bitterly complained of a lack of American assistance along the coreward shoulder of the Hercules Rim. Finally the Americans had to commit Task Force Oriskany to the Battle of Kayashenko Four in the Hercules 99 system, further delaying any renewed efforts in Hawking’s Star.
In the end, the next move in Hawking’s Star would come down to whichever side finally aligned its resources for a belated, overdue strike. As fate would have it, the Americans could win this race, albeit barely. Once again, elements of Task Force Liberty would mount a full-scale strike, once again with heavy Russian cruiser support, this time into the inner orbital zones of HR6806, this time with two US Marine Corps Saipan-class planetary assault ships standing by. Although they’d missed the chance to strike the Americans first, the Royal Navy was more than ready to meet the threat, with heavy elements of not only Task Force Agamemnon but also Cruiser Squadron Kraken, namely the carrier HMS Vigilant and the destroyer HMS Londonderry.
On 25 May 2521, Task Force Liberty (reinforced) sets a short, low-speed, high-stealth Darkstar wave to Lucy’s Hope, a small, Mars-analog terrestrial world (named for Steven Hawking’s daughter) in the heart of the embattled system. Task Force Agamemnon and Cruiser Squadron “K” move to intercept. One way or another, the fate of the HR6806 system is about to be decided. The Third Battle of Hawking’s Star is on.
United States / Holy Russian Empire: @Oriskany (Jim)
United Kingdom: @Damon and @Gladesrunner (Jenn)
514 points per side
ASSAULT victory rules
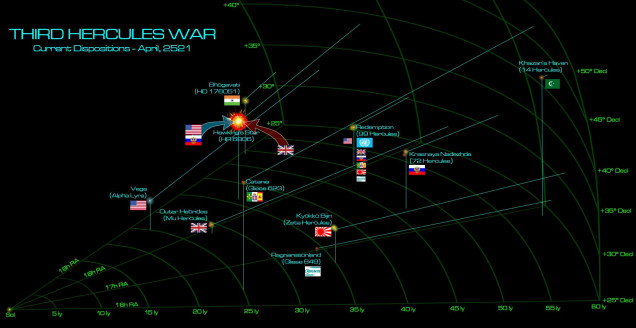 Current disposition on the Third Hercules War. The US and UK (supported by the Russians and Japanese, respectively), have been trading heavy blows in the Hawking’s Star colonies for months now. With a battle this big, with “ASSAULT” victory conditions declared IN ADVANCE, this time there is no doubting the implications. Whoever wins this battle, gets this system. Having suffered a string a defeats already, a loss here definitively causes a change in the UK government and an ignominious exit from the Third Hercules War. If the victory is heavy enough, the Americans may be able to “cash out” of this war as victors, with a shipping path now open between Alpha Lyra and 99 Hercules via their new colonies in HR6806. If the Americans lose, it’ll be a setback, but they’ll still be in it. If the British lose ... it’s
 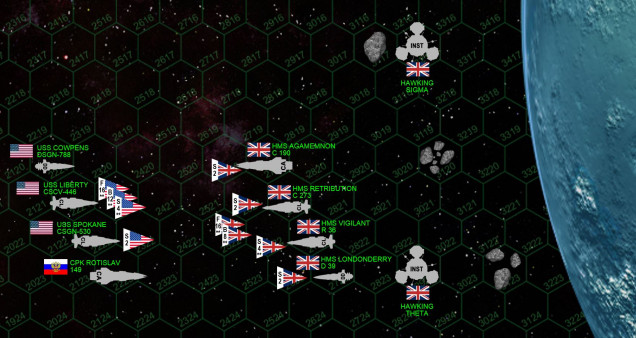 The matchup. Damon has his two heavies - the “hero ship” HMS Agamemnon (Trafalgar class heavy cruiser) under the flag of Lord Cavendish and the Relentless class light cruiser HMS Retribution. Both these ships are upgraded with elite crews and expensive enhancements, very fast for their class, and deadly accurate with hard-hitting guns. The Agamemnon in particular is the fastest heavy cruiser in Known Space. Jennifer has her Valiant-class light fleet carrier HMS Vigilant, carrying the legendary “Mad Hatters” fighter squadron and “Royal Griffins” bomber squadron, and the Commonwealth-class destroyer HMS Londonderry. The Americans have also brought their “A” game, with the veteran Endeavor-class light fleet carrier USS Liberty, carrying the fighters of VSF-221 “Dead Rabbits” Squadron and bombers of VSA-193 “Eight Ball Express” strike squadron, under the flag of Captain Zachary Irons (twice decorated with the Navy Cross). There is also the San Antonio class light cruiser USS Spokane, probably the most advanced light cruiser in Known Space after the loss of IJN Sendai in the Xi Scorpio War. Rounding out the American force is the Valcour-class destroyer USS Cowpens, sister ship of the USS Oriskany and replacement for the USS Vincennes lost last month. Providing heavy gunfire support is the Russian Slava-class heavy cruiser CPK (Holy Russian Ship) Rotislav.
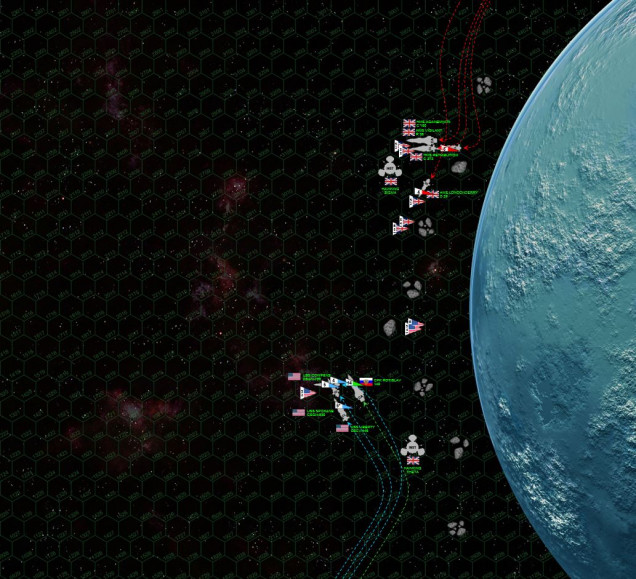 The Americans and Russians set a high-speed approach from beneath the south pole of Lucy’s Hope. The Russian cruiser Rotislav leads the way, very aggressively cutting a shallow dive toward the planet, hoping to close the range as quickly as possible and perhaps use the remains of the planet’s moon (broken up by gigantic mining installations Hawking Sigma and Theta). The American commanders are less than thrilled by this idea, preferring to engage the British at a distance (game terms: Rotislav did terrible with initiative). But with the British now approaching and the Vigilant launching her aerospace wing, the Americans have to keep pace to provide maximum point-defense support. Carefully nosing their way through the rubble of the former moon, the British have also kept close to Lucy’s Hope, neither side wanting to yield the “gravity gauge” to their enemy (many players prefer to keep themselves between the enemy and any major planetary bodies, forcing the enemy to turn dangerously TOWARDS a planet to engage them, while using the planet’s gravity as auxiliary brakes by cutting away after making high-speed attack approaches). The two fleets open fire, with the HMS Londonderry positively smashed open by a withering broadside from the Spokane and the Rotislav. However, fortune shifts to the British as 2200-kilometer broadsides from the HMS Agamemnon and Retribution savage the starboard quarter of the Spokane. Successive hits in Spokane’s starboard reactors and engines set off fires and decompressions that quickly grow out of control, and Captain Daniel Cheatham is forced to eject his reactors to save his ship. JUST THAT FAST, the biggest American warship is crippled and adrift.
 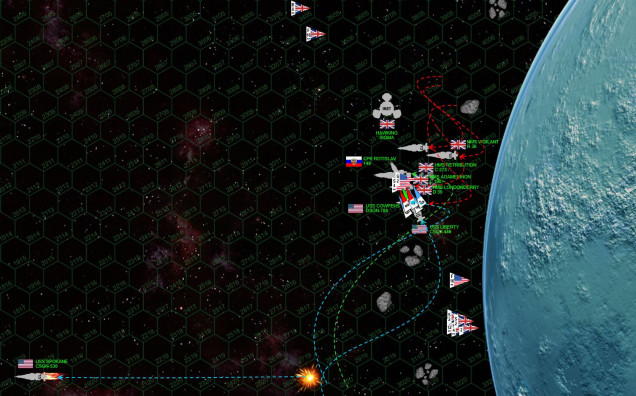 As the stricken USS Spokane careens out of the battle, the Rotislav continues to charge toward the British. Using the lunar debris to her benefit, she lines up a broadside on HMS Retribution while screening her starboard quarter (engines and reactors) from any immediate counterfire. At least that’s the idea ... until HMS Agamemnon cuts to the hair-raising close distance of less than 50 kilometers with a broadside directly across Rotislav’s stern, followed by the limping, burning destroyer HMS Londonderry. Please remember that all these ships are WELL within the gravity well of the planet, and players have to make their moves based on the previous speed, momentum, and gravity effects of their movement. If a warship ever drifts into a hex containing lunar debris, a collision automatically results and the ship in totally destroyed ... and again ... Sir Isaac Newton is steering these ships as much as the helmsman. USS Cowpens, despite protests to the Rotislav’s captain, must move in to provide gunfire and point defense support, while the carrier USS Liberty brings up the rear, trying to use the lunar debris for some protection. So does the carrier HMS Vigilant, but that same lunar debris that protects her from the guns of the Rotislav also cut her off from point-defense coverage from Agamemnon ...
 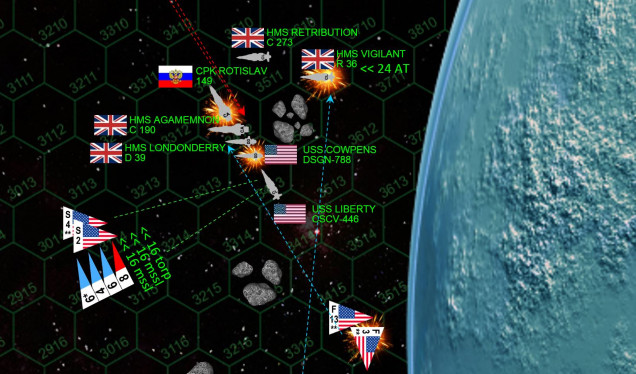 A zoom-in of what’s happening, and a LOT is happening here. First up, the Rotislav absolutely MAULS the port bow of the Retribution. But too many of her huge 30-kg plasma projectors and 10-gw rail guns hit too far forward, and while the bow of the Retribution is all but blown clean off (including an entire triple-gun laser turret), the bridge remains intact and the ship incredibly remains operational. The Rotislav survives the aerospace attack of the Royal Griffins and the Mad Hatters, mostly due to American point-defense fire. However, four Model 41 gravitic torpedoes fired from HMS Vigilant and HMS Londonderry hit the stern, one cavitating to explode INSIDE the Rotislav’s starboard engine compartments. But it’s the guns of the Londonderry and the Agamemnon which really cripple not only the huge Russian cruiser, but the destroyer USS Cowpens as well, even landing a few hits on the bow of USS Liberty. It’s not all going the Crown’s way, however ... Isolated by herself, the carrier HMS Vigilant is hit by a swarm of ASM-56 Harpoons fired from the FS/A-81 “Avenger” torpedo bombers of VSA-193 “Eight Ball Express” strike squadron. No less than 11 warheads are turned aside by the gravitic shielding, but 12 more hit the hull. The last three are in fact self-detonated by the Americans, the Vigilant is already more than crippled and whole ship comes within a hair’s breadth of exploding as it is. Other aerospace strikes by VSF-221 “Dead Rabbits” Squadron doesn’t do as well against the Londonderry (too many warheads are shot down by the Agamemnon)and even with the damage she suffered previously PLUS the last broadside from the crippled Cowpens, the Londonderry somehow survives ... although her skipper is forced to break off the action.
 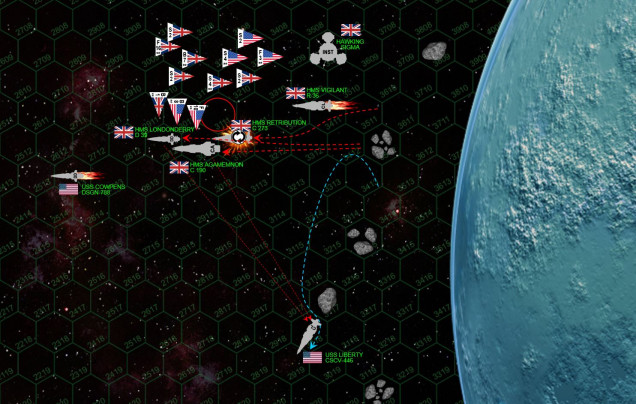 Just that fast, the USS Liberty finds herself the last American warship at Lucy’s Hope. As a carrier, she is unarmed except torpedoes and point-defense guns, so Captain Irons turns away ... trying to remain within recovery range of his aerospace group while keeping lunar debris between himself and the British guns. It doesn’t work, the Agamemnon and Retribution are just too fast, powering out of Lucy’s Hope’s gravity well and drawing long-range broadside angles on Liberty’s starboard quarter. Meanwhile, the F/S-44 Star Corsairs of the Dead Rabbits, covered by a screen of Liberty’s Mk 48 gravitic torpedoes, make a run at Retribution’s ravaged port quarter. Note that Retribution has rolled on her back, trying to keep her wounded port bow away from the Americans, but this is a tactic that rarely works against fighters. With Retribution’s port bow shields gone, the elite Dead Rabbits make a deadly strafing run at her bridge, the resulting damage actually crippling the ship and badly wounding her skipper, Commander Helena Seacole. But the cost is heavy, with all of the Eight Ball Express’s bombers shot down along with most of the Dead Rabbits by the vengeful Supermarine Starfire fighter pilots of the Mad Hatters. All the while, the Liberty herself is hammered by the Agamemnon and the Retribution’s last broadside ... and although she loses her starboard reactors, “Lady Liberty” remains operational but Captain Irons has already sounded a general retreat.
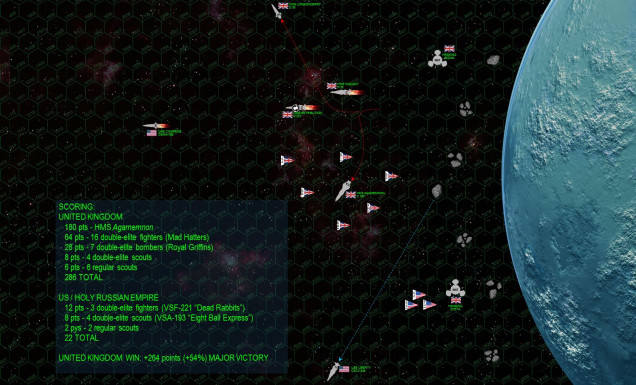 In all, the Third Battle of Hawking’s Star has lasted just four incredible minutes. The cost to both sides has been grim, but the Americans and Russians have come off the clear losers here. Although Londonderry’s retreat leaves the Agamenon the sole British warship at Lucy’s Hope, she is unscathed ... her paint not so much as scratched. And that’s a BIG damned ship to remain unchallenged over a disputed planet, or even an entire star system. This, combined with the near complete annihilation of the Dead Rabbits and Eight Ball Express ... while the elite Mad Hatters and Royal Griffins remain virtually unharmed (even if they will have to land on Lucy’s Hope to refuel and rearm) ... means that the Royal Navy remains FIRMLY in control of Lucy’s Hope.
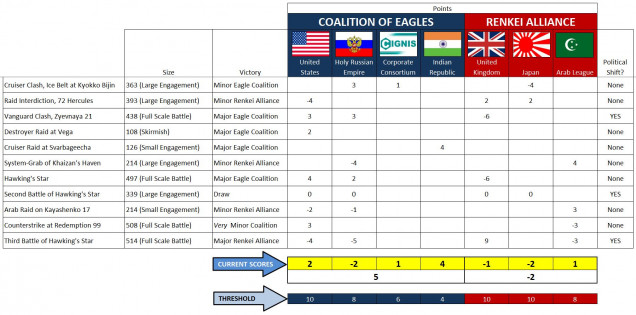
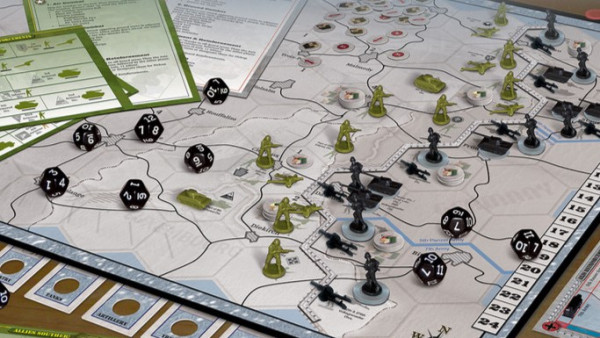
 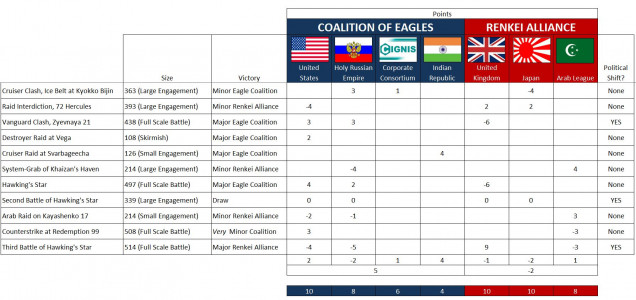 The Third Battle of Hawking’s Star has decisively ended Russo-American hopes for a conquest of this system. (Game Terms, +/-9 campaign points and 45% chance of political shift, which IS rolled). Lord Edward Cavendish is awarded the Distinguished Service Order (political shift) and promoted to Commodore (commander points at player’s option), the shadow of earlier defeats lifted at last from his record. Commander Seacole will recover from her injuries, but only after she is evacuated to the Medical Bay of HMS Agamemnon (she actually died, but a re-roll was allowed due to Cavendish’s “Commander’s Luck” upgrade). The Americans and Russians limp home after recovering their derelicts and ejected aerospace pilots. It’s a stinging blow to the US Navy, but the Russians wind up taking slightly more blame due to the reckless charge of CPK Rotislav. The US Navy, in fact, comes off is surprisingly good light for that torpedo strike against HMS Vigilant (political shift, also self-destructing those last three torpedoes ... which also helps explain why the Royal Navy allowed them time for rescue / recovery efforts in the battle’s aftermath). Make no mistake, as the charts shows above, the British are still technically on the losing end of this war. Even a victory as thunderous as Third Hawking’s Star can’t COMPLETELY balance the scales for the string of previous defeats. But no longer does the Royal Navy stand on the brink here in the Hercules Rim. Meanwhile, relations between the Americans and their Russian allies grow increasingly strained (political shift). Only time will tell if they can shake off this setback and regain the initiative in the continuing Third Hercules War.


![TerrainFest 2024 Begins! Build Terrain With OnTableTop & Win A £300 Prize! [Extended!]](https://images.beastsofwar.com/2024/10/TerrainFEST-2024-Social-Media-Post-Square-225-127.jpg)









Congratulations to our British allies! Well done defending against the common foe! Epic ships dueling in the depths of space, or shallows given the planets proximity.
I am a little confused by the campaign chart though. Could we get a quick summary of the state of the war etc.
Thanks, @muakhah . 😀 Okay, the campaign chart. Current state: Two Coalitions are fighting. The “Coalition of Eagles” is made up of the Americans, the Imperial Russians (hence the name of the coalition), the Corporate Consortium, and the Indian Republic. The “Renkei Alliance” (“Cooperation” Alliance in rough Japanese) is made up of the UK, Japan, and the Arab League. Each row beneath that shows a battle. A number in that row for a nation indicates whether that nation was involved in that battle (hence a lot of blanks). Another chart (not shown) assigns a value for the battle based on… Read more »
Thanks for the update! Going to have to look at my schedule and see when I can contribute more to winning the war!
Awesome write up. I love the cinematic moments like a Carrier being taken out by Fighters and Bombers who are dog fighting all while the Big Ships pour fire into her.
Thanks very much @elessar2590 – indeed this was a big one. Not the biggest we’ve done on-line so far, but the biggest in this particular war. Congrats to @damon and @gladesrunner on a well-deserved win. I think my biggest mistake was in fleet composition … A fast, high-speed, high-tech American carrier / cruiser force … coupled with a big hulking Russian heavy cruiser. Both kinds of ships totally work in Darkstar … maybe just not so much work TOGETHER … or at the very least, I didn’t do it right. Let me know if you ever want to bring Prussians,… Read more »
Been following your development on this for a few months now, is there a resource somewhere where youve posted all the rules and stat sheets, etcor do I have to go through it post by post to find it all? Really interested in giving the game a go, thanks!
Thanks very much, @chaos0xomega – yes, there is a “published” rules set and even an expansion of additional factions and warships. I will re-post these at the top of the project thread. They were previously published waaaay back at a previous iteration of this project thread, which was retired when it grew too large.
Stay tuned, I will re-post the rules / expansion .pdfs on this thread very soon!
And WELCOME TO ONTABLETOP! 😀 😀 😀
Awesome, thank you! Id be lying if I said that Darkstar/your blog wasn’t the reason why I signed up for the site 🙂
Thanks very much for the kind words, @chaos0xomega !
You’ve probably already seen this by now, but the rules / background (not QUI-I-I-I-ITE 100% complete) have been re-posted here:
https://www.beastsofwar.com/project-entry/1481939/
I did indeed, already downloaded it and tried to start wrapping my head around everything. I just launched a kickstarter for 3d printable terrain so I probably won’t get a chance to actually play it until next month unfortunately.
Thanks again!
This was a another good game, but I did feel bad leaving the Vigilant swinging in the breeze without any AAA support, it was only the generosity of the American commander that saved her from a fiery end. Apart from that, it was one of those games where pretty much everything worked the way I hoped it would.
Honestly, @damon – the Americans and British have been allies in Darkstar far more often than enemies. The Andromeda Arc War is the biggest example (against the Japanese and Panasian Union – the Americans and British actually LOST that war). So it seemed strange to “execute” a British warship. For others in the thread: Darkstar is written to provide NO gaming benefit to EXPLODING another player’s ship (into which he or she may have spent many games’ worth of campaign experience, upgrades, even background writing). The game is specifically structured (vis-a-vis victory points and win conditions) so everyone can play… Read more »