DARKSTAR CAMPAIGN UPDATE: DUCHESS ANNABEL’S WAR IS OVER
Royal Navy vs. Black Dragons
We’re back to the stars, folks, with a return to Darkstar with my friend @damon .
The last year or so of Darkstar play has been a wild ride for the British. For at least nine months, from @dignity ’s game on camera, to games with @gladesrunner , @davehawes , @damon , and @rasmus , the British just couldn’t seem to lose. My Japanese lost to them twice. My Russians barely survived. Imperial Prussian battleships were broken. The renegade Black Dragons couldn’t catch a break. My French were beaten so badly I actually lost one of my commanders … Even when things started going badly for them, the British would rally back for at least a draw if not a narrow win, as we saw with @elessar2590 against a powerful force of Prussians.
Then about three months ago, the British started losing. A lot. @rasmus scored a win with his Japanese. My French finally rallied enough to steal a draw. The Panasian battleship Honghu (Red Tiger) crushed a British cruiser force. Worst of all were the Russians, who came back against the British … hard. And not just with Damon’s British, but Gladesrunner and as well. The British were smashed over and again, to the point where in a recent game, quite by accident, Damon lost his whole fleet. As in the ships weren’t just beaten, but destroyed (actually somewhat of a rarity in Darkstar). The whole task force, the cruiser Bellerophon (“Billy Ruffian), the light cruiser Indefatigable, and the destroyer Terpsichore, all were gone in a single disastrous afternoon. Although all of Damon’s commanders survived, the task force itself had to be rebuilt from scratch with all new ships.
Yesterday, that new task force saw combat for the first time. The new flagship was the recently-completed Trafalgar class “fast cruiser” Agamemnon, with an upgraded engine plant making this 145,000-ton heavy cruiser as fast in sublight as most destroyers. Sleek, modern, and also fast for her type, the Relentless class light cruiser Retribution replaced the venerable Indefatigable. She carried most of “Indy’s” expert gunnery crews now aboard, and so added the Indefatigable’s years of experience to far more advanced targeting systems. Finally, the new Falklands class fleet destroyer Sheffield filled the role of her late sistership, Terpsichore – fast, advanced, and bristling with aerospace defense mass drivers.
Meanwhile, “Duchess Annabel’s War” continued in the Second Band of Libra, Ara, Scorpio, and Sagittarius constellations. Having started out as a trade and tariff dispute between shipping lanes through the British-controlled “Annabel’s Star” (41 Arae) system, the issue had ignited into a local war against the nearby Prussian Eisenwolf Colony (Gleise 570). But now that war has dragged in other powers, with the New Roman Alliance and Japanese joining the Prussians. Outnumbered three-to-one, the British courted allies with other major powers in the sector, namely the Panasian Union (Chinese) and Holy Russian Empire. These nations had huge industrial colonies closer to Sol along these trading routes, and in exchange for support the British promised favorable shipping treaties through the “Annabel’s Star” system, which the Panasians and Russians desperately needed in their ongoing war against the renegade “Black Dragons” of the self-proclaimed Khitan-Tunguska Free State.
Which, in a very roundabout way, brings us to today’s battle. With the Black Dragons now an enemy of the British as well in the Libra-Sagittarius sector, the newly-refurbished Agamemnon cruiser squadron is given orders to preempt a possible threat building up in the Prussian star system of New Bremerhaven (Gleise 581). Black Dragon cruisers have been detected there by snooping British “Q-Class” gunboats and “Superb” class torpedo corvettes. The Agamemnon cruiser squadron is ordered to set a high-speed Darkstar Wave into the enemy star system, engage and damage the Black Dragon rebels as badly as possible, and then get home.
Make no mistake, this is a raid, not an assault. Although the British are in no position to invade New Bremerhaven at the moment, the British need this win not only to counter the growing Prussian-Black Dragon threat against Annabel’s Star, but also to steady their Panasian allies and smooth things over with the Holy Russian Empire.
So can Damon use his new fleet to get a comeback going for the British, and end this recent British losing streak?
September 14, 2519 – New Bremerhaven (Gleise 581 - M3V Red Dwarf - 20 LY from Sol)
The Agamemnon and her escorts drop out of their Darkstar wave and begin hard deceleration to attack speed. With their advanced powerplants, especially aboard the Agamemnon herself (seriously, the fastest heavy cruiser ANYWHERE in Darkstar at the moment), they were able to shave their Darkstar exits relatively close to the outer moons of a Gleise 581 gas giant. However, with such large ships setting such fast Darkstar waves, the gravimetric disruption was significant and enemy detection was inevitable. Sure enough, the Black Dragons have a sizable force already on a hard intercept course, including two former Slava class heavy cruiser and a former Gagarin class light fleet carrier.
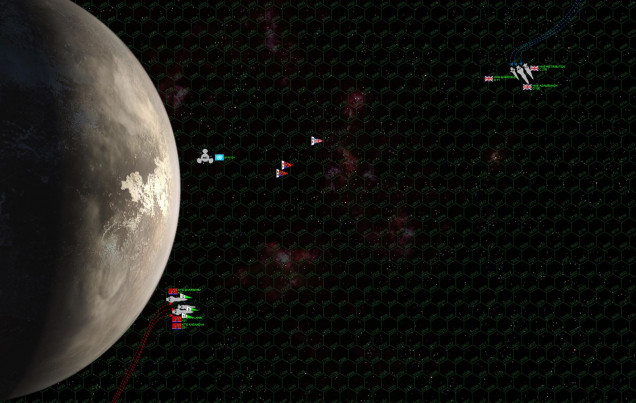 Here we see the British (top) and Black Dragon (bottom) cruiser forces on their approach. The moon is a big one, slightly smaller than the planet Mars. Here the opposing task forces are almost 5400 kilometers apart, yet are already exchanging long range gunnery. Ominously, the Black Dragons are also launching waves of bombers and scouts from the light fleet carrier Kazhinkova, vectoring toward the British ships along with a hair of P-500 “Plamya” torpedoes. British scouts, hopelessly outnumbered, fly out to meet the threat, hoping to shoot down at least some of the torpedoes before they reach the British cruisers. The Black Dragons, for their part, are using the moon to their advantage. First, by hugging the moon and turning away from it, they’re forcing the British to turn TOWARD the moon to engage them (never a good thing). Second, those big Slava class cruisers are moving very fast ... the better to close the range and take away the British advantages in long-range accuracy. But they’re also ponderous, and the moon’s gravity will help them slow down when it comes time to engage.
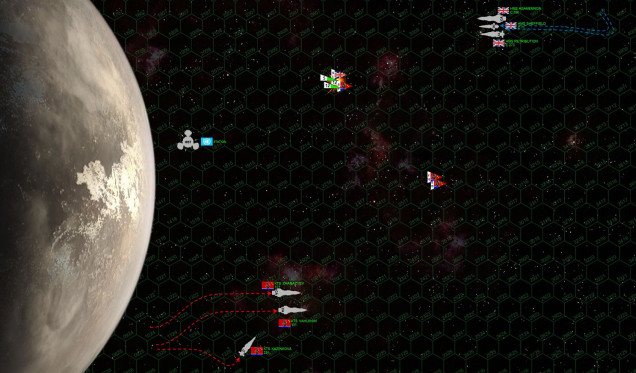 The Black Dragons draw first blood. As British scout planes manage to shoot down one of the torpedoes, Black Dragon scouts shoot down a British scout. Black Dragon fighters (a far bigger threat) have now also launched (carriers are limited in how many aerospace craft they can launch in a given turn) and are escorting the bombers in. The bombers could have launched their ordinance this turn, but do not, opting to wait until ALL torpedoes are in range (P-500s, aerospace missiles from the fighters, and aerospace torpedoes from the bombers). This is going to be a big one, and I as the Black Dragon player really only have one chance at it. Playing with carriers in Darkstar is tricky, an attack can take up to four turns to set up and execute, but you have to watch distance, timing, and angles VERY closely. If it comes together, though ... watch out.
 ![It comes together. The Black Dragon heavy cruiser Zharazyev turns to port to try to set up broadside against the incoming British cruisers. Damon hits the gas, HARD, accelerating to 33 kilometers per second and diving down with the Agamemnon and Sheffield to cross Zharazyev’s stern with broadsides instead. It’s a distant broadside, but given British targeting electronics, it should still be a good move. Unfortunately, it also allows the Black Dragon cruiser Vahlkhin to S-turn behind the Agamemnon in turn, putting a far more dangerous broadside right into Agamemnon’s engines. Perhaps making matters worse, the Retribution breaks off Agamemnon’s starboard beam, hoping for a cross of Valhkhin’s stern. A sound maneuver, except now British aerospace mass driver defense is split JUST at the time the combined torpedoes of all three Black Dragon capital ships and the complete aerospace strike of the Kalzhinkova makes its terminal approach. The British mass drivers open fire and knock down almost all the bombers’ torpedoes, but this just lets the fighter missiles and the P500s of the capital ships come in. Agamemnon is positively torn apart astern, especially once Vahlkhin opens fire point-blank with a full broadside 10-gigawatt rail guns and 30-kilogram plasma pulse projectors. Never mind “crippled,” the Agamemnon should have exploded here. In game terms she had an 80% chance of exploding across the stars in a miniature supernova [(18 critical boxes hit) - (heavy cruiser’s cripple target of 14+) x (20% for heavy cruiser)] = 80%). But an 83 is rolled on percentile dice. By some MIRACLE, the Agamemnon’s engineers eject the reactor core BEFORE it explodes. The ship is crippled straight off in her first battle, but at least she will PROBABLY survive and after six months in dry dock, perhaps see action again. But yeah ... THAT’S how you do a carrier strike. It seems the British losing streak isn’t over yet.](https://images.beastsofwar.com/2019/09/33532308-DS-Game-21_03-636.jpg) It comes together. The Black Dragon heavy cruiser Zharazyev turns to port to try to set up broadside against the incoming British cruisers. Damon hits the gas, HARD, accelerating to 33 kilometers per second and diving down with the Agamemnon and Sheffield to cross Zharazyev’s stern with broadsides instead. It’s a distant broadside, but given British targeting electronics, it should still be a good move. Unfortunately, it also allows the Black Dragon cruiser Vahlkhin to S-turn behind the Agamemnon in turn, putting a far more dangerous broadside right into Agamemnon’s engines. Perhaps making matters worse, the Retribution breaks off Agamemnon’s starboard beam, hoping for a cross of Valhkhin’s stern. A sound maneuver, except now British aerospace mass driver defense is split JUST at the time the combined torpedoes of all three Black Dragon capital ships and the complete aerospace strike of the Kalzhinkova makes its terminal approach. The British mass drivers open fire and knock down almost all the bombers’ torpedoes, but this just lets the fighter missiles and the P500s of the capital ships come in. Agamemnon is positively torn apart astern, especially once Vahlkhin opens fire point-blank with a full broadside 10-gigawatt rail guns and 30-kilogram plasma pulse projectors. Never mind “crippled,” the Agamemnon should have exploded here. In game terms she had an 80% chance of exploding across the stars in a miniature supernova [(18 critical boxes hit) - (heavy cruiser’s cripple target of 14+) x (20% for heavy cruiser)] = 80%). But an 83 is rolled on percentile dice. By some MIRACLE, the Agamemnon’s engineers eject the reactor core BEFORE it explodes. The ship is crippled straight off in her first battle, but at least she will PROBABLY survive and after six months in dry dock, perhaps see action again. But yeah ... THAT’S how you do a carrier strike. It seems the British losing streak isn’t over yet.
It comes together. The Black Dragon heavy cruiser Zharazyev turns to port to try to set up broadside against the incoming British cruisers. Damon hits the gas, HARD, accelerating to 33 kilometers per second and diving down with the Agamemnon and Sheffield to cross Zharazyev’s stern with broadsides instead. It’s a distant broadside, but given British targeting electronics, it should still be a good move. Unfortunately, it also allows the Black Dragon cruiser Vahlkhin to S-turn behind the Agamemnon in turn, putting a far more dangerous broadside right into Agamemnon’s engines. Perhaps making matters worse, the Retribution breaks off Agamemnon’s starboard beam, hoping for a cross of Valhkhin’s stern. A sound maneuver, except now British aerospace mass driver defense is split JUST at the time the combined torpedoes of all three Black Dragon capital ships and the complete aerospace strike of the Kalzhinkova makes its terminal approach. The British mass drivers open fire and knock down almost all the bombers’ torpedoes, but this just lets the fighter missiles and the P500s of the capital ships come in. Agamemnon is positively torn apart astern, especially once Vahlkhin opens fire point-blank with a full broadside 10-gigawatt rail guns and 30-kilogram plasma pulse projectors. Never mind “crippled,” the Agamemnon should have exploded here. In game terms she had an 80% chance of exploding across the stars in a miniature supernova [(18 critical boxes hit) - (heavy cruiser’s cripple target of 14+) x (20% for heavy cruiser)] = 80%). But an 83 is rolled on percentile dice. By some MIRACLE, the Agamemnon’s engineers eject the reactor core BEFORE it explodes. The ship is crippled straight off in her first battle, but at least she will PROBABLY survive and after six months in dry dock, perhaps see action again. But yeah ... THAT’S how you do a carrier strike. It seems the British losing streak isn’t over yet.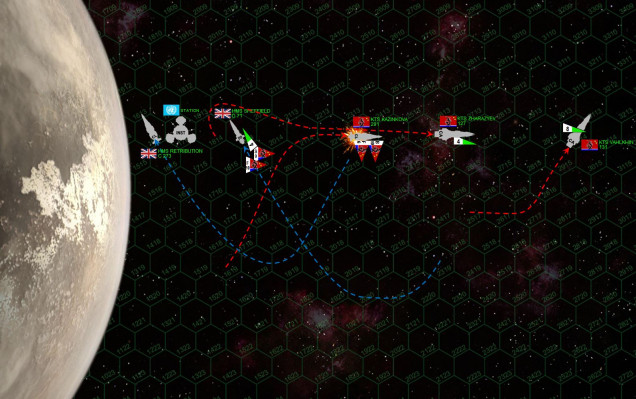 The British fleet is down to half strength, having lost its biggest warship to a deadly carrier strike and close range broadside. Now the British have to rally ... if they can. The Black Dragons, meanwhile, have to reorganize their fleet. Last turn’s maneuvers scattered them everywhere, and their aerospace strike wing has shot its bolt. Accordingly the carrier Kazhinkova maneuvers to get close enough for her bombers to land THIS TURN, beginning he process to rearm and re-launch for a second strike. Meanwhile, the ponderous Slava cruisers, both damaged in last turn’s gunnery but nowhere near in danger yet, try to slow down and turn toward each other. The Sheffield and the Retribution fire double broadsides into the stern of the Kazhinkova to cripple her, hopefully while her bays are still loaded with those bombers and some fighters. While they do appreciable damage, Damon JUST MISSES the roll the cripple her (the roll was a 5+, he rolled a 4). All British scouts are also lost.
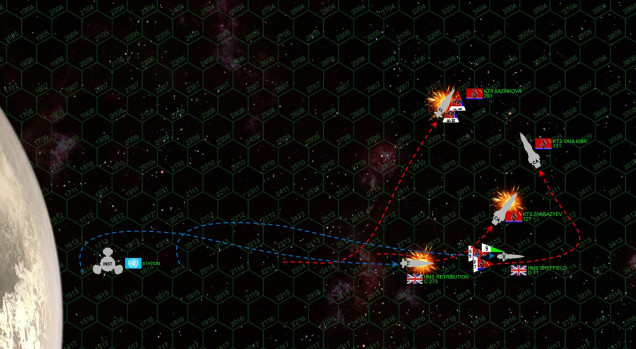 The Black Dragon advantage is firepower comes at a cost ... they’re much slower than the British ships, and this has a big impact on initiative. In summary, the Black Dragons LOSE initiative on Turn 5, hard. Then again, they totally have this game in the bag. Remember this is a RAID, so ships that are destroyed are counted for victory points (as opposed to ship remaining in the battle area at the end of the game). This means RETREAT IS AN OPTION. Having crippled (damned near destroyed) a 142-point British heavy cruiser, if the Black Dragons can just break off now, they win the game ... SIGNIFICANTLY. But again, these big Slava class heavy cruisers aren’t exactly Ferraris, and as they power up to get off the table, the Retribution and Sheffield cut in behind them for broadsides across their sterns. The Retribution fires first, putting her aft turret of 7-gigawatt rail guns and 8-megakelvin lasers into the stern of the Kazhinkova. This second broadside finishes the job started on Turn 4, and the Black Dragon carrier is crippled just as she’s getting ready to re-launch those fighters and bombers. Forward turrets are put into the stern of the Zharazyev , but the Vahlkhin’s broadside smashes open the Retribution’s fo’c’sle and port bow, putting a 10 GW rail gun bolt straight through the Retribution’s bridge. Torpedoes and fighters tear into the Sheffield’s stern, but with mass driver defense and enhanced ECM and gravitic shielding, the scrappy little destroyer survives. The Sheffield is right behind the Zharazyev, and releases point-blank laser and syglex (synchronized gravitically-lenses x-rays, 60 eHz band) into the Zharazyev’s stern. The Zharazyev ALMOST survives. After all damage is assessed, Damon had to roll a 2+ to cripple her ... and rolled exactly that, a 2.
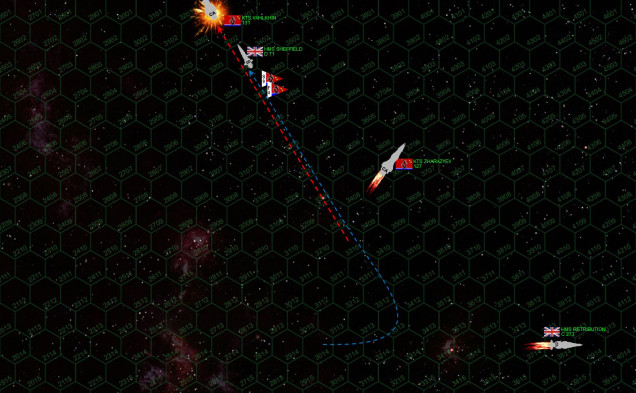 Just that fast, the battle is wrapping up, and the British have a slender chance of actually stealing back a victory. All ships are crippled except the damaged 160,000 ton Vahlkhin and the 39,900 ton Sheffield. The Vahlkhin is just trying to break off, IF SHE MAKES IT OFF the top of the table, the Black Dragons win (having crippled 244 points of British shipping vs. the British score of 177). If the Sheffield can cripple Vahlkhin before she escapes, the British win ... BUT ... the Vahlkhin outweighs the Sheffield by 4:1, and Vahlkhin is powering up to escape, the Sheffield is damaged herself, and has Black Dragon fighters and torpedoes still on her ass. If the Sheffield is crippled as well, the game is again a Black Dragon victory (by virtue of remaining fighters and scouts). So the Sheffield has to cripple a ship four times her size, THIS TURN, all while not being critically damaged herself. The Vahlkhin dumps everything she can into her engines, and accelerates to 27 kps. She literally makes it to the LAST HEX of the map, but doesn’t quite escape. One more hex, and this game ends right here as a Black Dragon win. The Sheffield makes the hardest turn to port she can, moving at 33 kps right behind Vahlkhin in a desperate stern chase. From this position, only forward guns could hit, but it was the best option. The Sheffield shot down enemy torpedoes and the Black Dragon fighters missed, but the Vahlkhin’s aft batteries positively mauled the Sheffield’s bow. But she survived. So now the Sheffield had cleared the first two obstacles to victory, the Valkhin didn’t escape this turn and the Sheffield survived Black Dragon defenses. Finally the Sheffield fired, but even now chances of victory were slim at best. Sheffield had to hit with almost everything, but she did. Then those weapons had to hit the huge cruiser in the right PLACES, and they did ... mostly. Even with all this, however, the Vahlkhin had lost only 8 critical boxes. Heavy cruisers start on a “cripple roll” of 14+, minus one for each crit box hit. 14-8=6, giving Damon a 6+ chance to cripple Vahlkhin and win the game. HE ROLLS IT. The Valkhin is crippled and the Sheffield is not, ending this epic “David vs. Goliath” story with an unlikely but well-deserved British win.
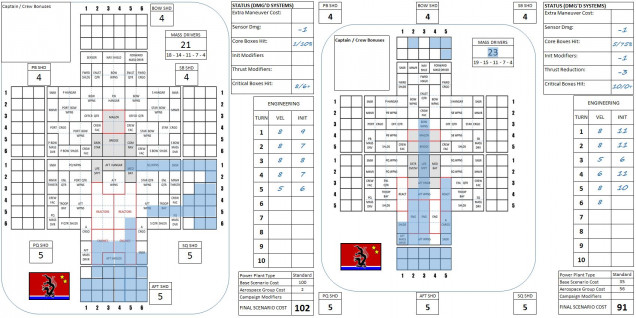 The Warship Record Sheets of the Vahlkhin (left) and the Kazhinkova (right). You can see where the Vahlkhin took eight boxes of critical engine and reactor damage, and where the Retribution’s rail guns and lasers cored all the way through Kazhinkova’s engineering plant to hit the ships core, bridge, and even set off the forward magazine.
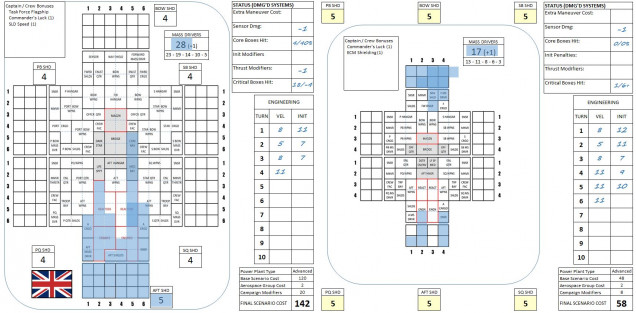 The WRS of the Agamemnon (left), who really SHOULD have died here. Maybe this is a charmed ship. Be wary of carrier strikes, and also of Russian or Chinese-built warships once they get too close. At ranges less than 500 kilometers (three hexes roughly) plasma projectors are terrifying. We also see the brave little Sheffield, including the terrible damage suffered in her valiant stern chase of the Vahlkhin.
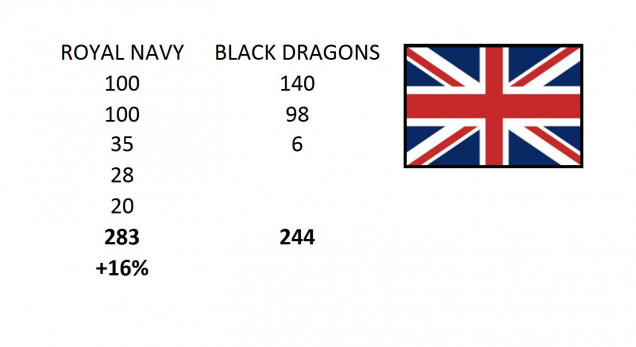 The final score. The British lost a heavy cruiser, a light cruiser, and six scouts. The Black Dragons lost two heavy cruisers, a light fleet carrier, ten bombers, and fourteen fighters. Furthermore, in the post-battle resolution, we found that carrier Kazhinkova was actually scuttled when British Marines moved to board her. The die rolls indicate the Black Dragon captain did not survive, either killed when Retribution hit the bridge or opting to stay aboard the ship when she was detonated. “Character death” in Darkstar is pretty rare, but it does happen.


![TerrainFest 2024 Begins! Build Terrain With OnTableTop & Win A £300 Prize! [Extended!]](https://images.beastsofwar.com/2024/10/TerrainFEST-2024-Social-Media-Post-Square-225-127.jpg)










I really enjoy reading about events in the DARKSTAR Universe.
I’ll be printing all these accounts and adding them to my DARKSTAR rulebook. (affectionately known as the book of Jim). ??
Thanks very much, @templar007 . I think the main background for the Xi Scorpio, Scorpiom’s Tail, and Duchess Annabel’s Wars are all on PDF and posted. If you like this stuff I can send them over. 😀
That would be fantastic! Thanks very much. ?
No worries, @templar007 – e-mail sent to the gmail addresses I have on file. 😀
Down to the wire… And a lucky six… I really thought my losing streak was continuing when both cruisers went down, but the scrappy little destroyer saved the day, the little ship that could! After the game I diced out the other option for the manoeuvre on the last turn with firing the full broadside but further away; it didn’t work, only did six points of damage total and the Vahlkhin would have escaped. Another close and enjoyable game. The timing of the Alpha strike with torpedoes, missiles and a stern rake was perfect and should have been a game… Read more »
Thanks, @damon , and glad you liked it! Indeed at the end of Turn 3 I was sure we were looking at another British defeat. And again, it’s not just you. It’s been the BRITISH in general. Other players have been getting hammered with the British as well. I would have suspected something was wrong with the math of the faction except they just came off a WINNING streak just as long and unbroken. Anyway, glad the Agamemnon task force is off to a good start. Re: carriers … well, yeah. Admittedly my two favorite factions are the Americans and… Read more »
Haven’t been able to read up on darkstar stuff in an age. It’s good to see it’s still going strong.
Thanks @muakhah – it speeds up and slows down, but never really stops. 🙂 Good to hear from you again! 🙂
I hate to miss a good fight – and this does seem like one of those
This was definitely a knuckle-buster. 😀 At the end of Turn 3 I was so sure I was winning so heavily I actually felt bad. A big cruiser-size carrier strike hits so hard … ONCE. But @Damon was able to turn it around. 😀