
DARKSTAR CAMPAIGN UPDATE: DUCHESS ANNABEL’S WAR IS OVER
Desperate Rescue Mission in Gas Giant Atmosphere!
I had a great game of Darkstar on Sunday with my friend @damon, who’s been playing his British heavy cruiser-based battlegroup for a while now and building it up to where he’s actually making some progress and buying some upgrades for his commanders and warships.
Accordingly, I “judged him ready” for a battle in a gas giant, and just for good measure, decided to put him up against some of my “core” campaign commanders. In this game, his battlegroup (Trafalgar-class heavy cruiser Bellephoron and Falklands-class destroyer Terpsichore) was reinforced by the older Indomitable class light cruiser Indefatigable, would meet up with my New Roman Alliance commanders (in this case, French), of the Leclerc battlegroup (Foch-Hispaniola class light cruiser Leclerc escorted by the two Milan-II class destroyers Corsica and Calais).
The battle would take place in the violent maelstrom of a gas giant’s atmosphere. Gravity is beyond deadly in these games, to say nothing of the winds, the lightning, the atmospheric pressure, and so on.
BACKGROUND:
The Malvinas Sigma gas giant has long been a valuable source of H₃ “heavy hydrogen”, a magnetically-charged isotope useful in the deuterium-tritium reactors of most starships. Normally this has to be manufactured in expensive facilities capable of generating the high levels of heat and pressure required for this H₃ bonding process. When a natural source of “heavy hydrogen” is found, however, it represents a valuable commercial and cost-saving resource.
An unknown criminal or terrorist organization has carried out a successful cyber attack on three United Nations H₃ harvesting stations deep within the turbulent atmosphere of the Malvinas Sigma gas giant. The virus caused a cascading systems failure throughout the stations, notably to their antigravity station keeping systems. They are now sinking into the atmosphere and are requesting immediate assistance.
Unfortunately, the stations are getting too much help, if anything. Task forces of both the British Royal Navy and the New Roman Alliance, have responded. Both governments have ignored each other’s warnings to stay clear, and have now given permission to their battlegroups to open fire on enemy ships.
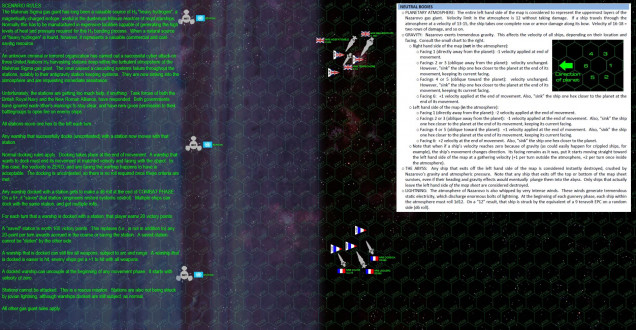 Special rules and scenario set up are listed here. In summary: both Damon’s British warships and my French warships have to rush in, try to dock with these sinking atmospheric processing stations, save them if they can, or at least stay docked with them for as long as possible to rescue as many people, as much data, and as much resources / equipment as possible. All the while, of course, there’s a full-blown shooting war between the two battlegroups, and of course the planet itself is trying to kill them, as the stations themselves are over 1,400 kilometers deep in the gas giant’s atmosphere. This is a planet that is, no kidding I have done the geometry on this, so large that even at the scale of 180km / hex, the CURVATURE of the planet barely registers (using Jupiter as an example). Gravity, needless to say, is everyone’s enemy here.
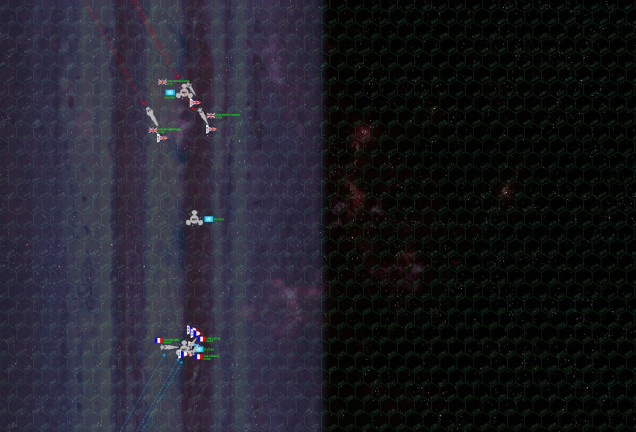 So here the British and French make their approaches, my French from the bottom of the map and Damon’s British from the top. Note we both decided to start INSIDE the planet’s atmosphere (left half of the map). There’s a speed limit here, if a ship is ever moving faster than 12 hexes a turn, armor plating starts melting off the bow.
 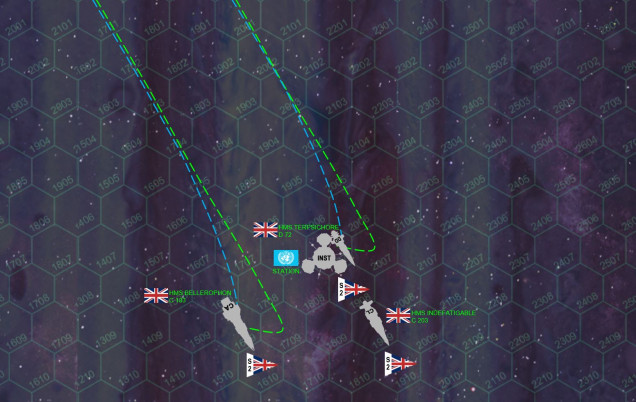 Note that gravity in these games is much, much stronger than in other Darkstar games. Depending on your speed and direction, it can not only pull your ship “down” at the end of your movement (and more than one hex too, in some cases), but also affect the ship’s velocity. If your ship’s velocity ever gets too low, it can actually change your direction. Here we see Damon’s ships come on the map. The green dotted line shows how the ships move in game terms, given conditions set by their depth in the atmosphere, direction, and speed. In short terms, at the end of their movement they are pulled one hex left, or “down” in this case, and the velocity reduced by one. Of course, gravity is effecting the ship’s course the whole time, so the blue tracks show what’s “really” happening. Note the destroyer Terpsichore, which Damon navigated perfectly, using the planet’s gravity to actually put him into position to dock with the first station on Turn 1. He He enters at velocity of 7, travels 7 hexes, he puts all 6 thrust into deceleration, thus reducing velocity to 1, gravity pulls him down one hex, AND reduces his speed from1 to zero, a perfect slingshot that puts his 45,000 ton destroyer into position to dock with the first installation (ends movement in the hex at velocity zero). Cruisers Bellerophon and Indefatigable power forward to cover the rescue attempt from French knavery. Well done! Even so, opening barrages from French lasers (very long ranged and pin-point accurate) slash into Indefatigable’s starboard bow.
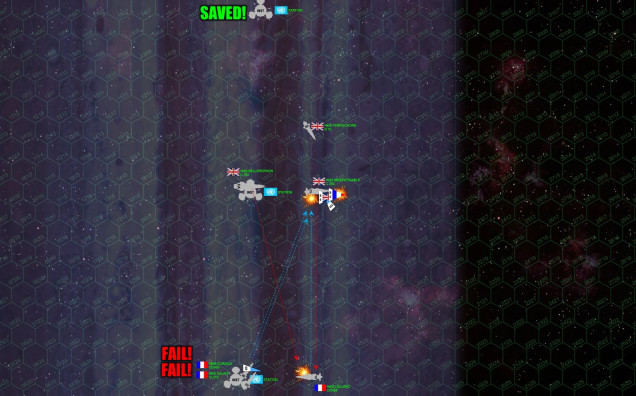 Meanwhile, my two French destroyers Corsica and Calais have also docked with the first station. The reason I’m docked with two ships is that at the end of each combat phase, each docked ships gets a 5+ roll attempt to save the station. Basically, we’re dropping in new software to purge to cyberterrorist virus, our engineers are trying to repair the station’s antigravity generators, our reactors are hooked up to jump-start the station’s powerplant, etc. You are vulnerable while docked, however. Yet Damon makes his first roll with the Terpichore, while my TWO destroyers both miss. So my destroyers choose to remain docked while Terpsichore uncouples and powers back up to maneuvering speed, back into the fight. Meanwhile, my light cruiser Leclerc fish-hooks a risky turn STRAIGHT DOWN into the planet’s atmosphere to get a broadside on HMS Indefatigable, which is getting aggressive along with Bellerophon at that center station. Frontal 8-megakelvin laser arrays of my two destroyers take issue with that, opening the argument at 1600 km range, while the broadside of the light cruiser Leclerc absolutely burns away Indefatigable’s starboard side. Class IV torpedoes rush in to finish the job, and even though Indefatigable largely misses these with her point-defense guns, the scrappy little Terpsischore shoots them down. This leaves the Bellerophon’s point-defense guns free to shoot up my scouts, which are all lost in a hail of British fire.
 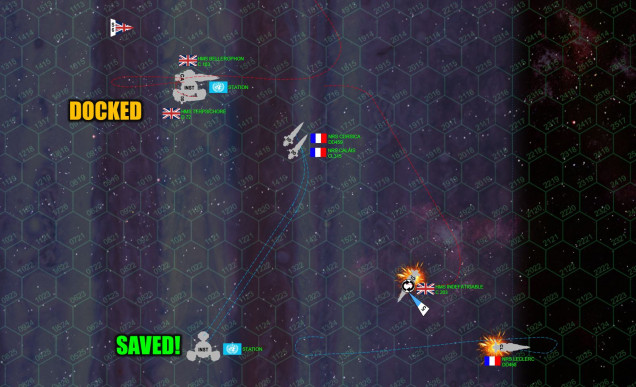 Things start to turn around for my French. Although the Bellerophon was in the same hex as the center station last turn, she was moving at 2, basically sailing PAST the station too fast to dock with it (6 kilometers per second, to be exact). Meanwhile, my two destroyers finally saved the first station, uncoupled, and are now pushing forward. The Indefatigable is now turning into us, rolling over on her back in an attempt to protect her wounded starboard side, especially the starboard bow which now has NO SHIELDS. No good, the nimble Leclerc AGAIN pivots around in a fishhook and powers up out of the planet’s atmosphere, ready to put aft guns against the Indefatigable’s starboard bow. This is an incredibly risky move, note is also exposes my fantail (and all my engines and reactors) to the Indefatigable’s broadside at just 720 kilometers (spitting distance in this game). Nor do my two destroyers actually have the best options, this is the only position that their previous location, facing, thrust limitations, and planet’s gravity allow them to be WITHOUT beiong the broadside of the Terpsichore and especially the massive Bellerophon (which for the record outweighs ANYTHING else on the battle by at least 50%). But as you can see by the movement tracks, gravity is a killer here, always pulling mercilessly down in varying degrees depending on where you’re positioned and which direction you’re facing. Meanwhile, Bellerophon has powered back into position, and docked with the center station, along with the escort destroyer Terpsichore … SO THE REAL QUESTION – who lives and who dies in this turn? Well, my torpedoes from the Corsica and Calais get through the Indefatigable’s starboard bow, one warhead detonates in the forward magazine, another detonates in the bridge. That’s the end of that ship. The Leclerc pays a hideous price, however. She’s left with one whole reactor and one whole engine array down, with another engine damaged. Damon has to roll a 3+ on d6 to cripple her … thank God he rolls a 1. We did the math and calculated that Leclerc JUST had escape velocity to make it off the map if crippled … but I’m glad I didn’t have to cut it that close.
 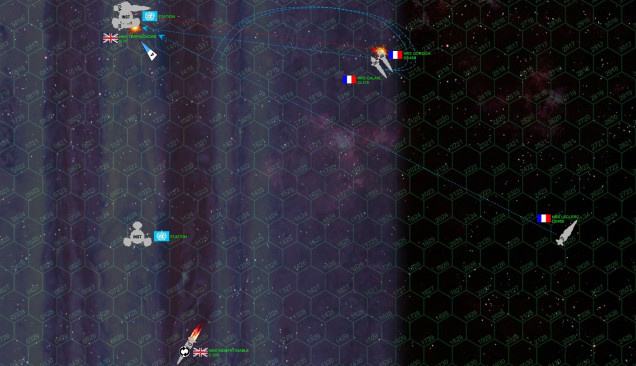 So the British are winning in stations, but so far the French were winning in ships. The Indefatigable, burning and adrift, careens off the bottom edge of the table – but because she did not technically leave off the left side of the map, she’s considered to have a “gravity slingshot” that hurls her wreck clear of the crushing, fiery grave awaiting at the core of the gas giant. Meanwhile, the British have saved the center station. Yet Damon chooses to remain docked for now. After all, if any ships are now crippled, they’re moored to the station, which is stabilized, so the ships won’t fall to their doom in a super-pressurized ocean of liquid, metallic hydrogen. My three French ships take advantage of this British kindness, with the damaged Leclerc and my two destroyers weaving back and forth from the relative safety above the cloud layers, pouring laser broadsides into the Terpsichore, who has now lost her forward shields. Hey, my French gunners get a bonus for firing at moored ships, and damn it, we still owe the British for that stunt they pulled at Mers el Kabir! Yeah, you Brits thought we FORGOT about that?
 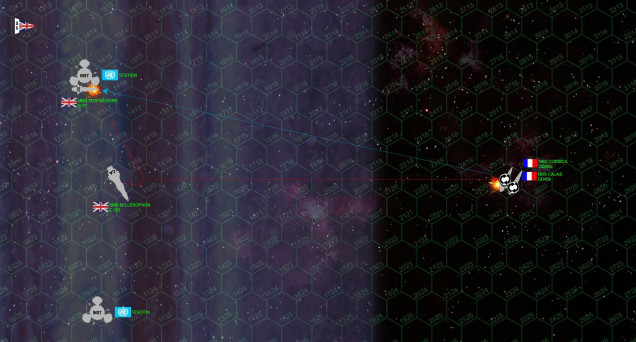 The light cruiser Leclerc finally decides that discretion is the better part of valor, and vectors off the bottom edge of the table. No, it’s not the most glorious decision. But it also denies Damon 112 victory points (yes, that light cruiser is very advanced and upgraded twice – she’s expensive!) Meanwhile, my destroyers Corsica (now quite heavily damaged as well) and Calais have finally drilled their way out of the atmosphere but continue to pour long-ranged laser fire down into the Terpsichore. Yes, the range is long, 2900 km at this point, but I have +2 targeting and enhanced CIC suites, the Terpsichore has NO forward shields, and I get another +1 for firing at a moored ship. I have to inflict a lot of collateral damage on the Royal Navy here to make up for the fact that Damon has claimed two stations while I only have one. I hit the Terpsichore’s forward magazines, which forces her to make a power check. I fail that roll, though, and she is NOT crippled. Her crew does “bail out” of the ship, however, probably heading to the station’s pub after I knock out a SECOND “crew facilities” compartment (both port AND starboard pubs have been knocked out!) and officer’s quarters (we lost all our gin!)
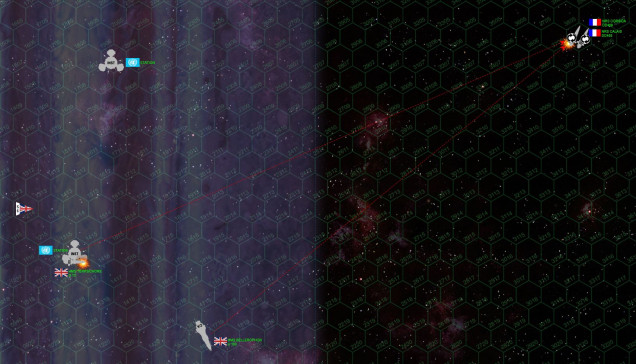 Now at a range of 4500 kilometers, I try for one more parting shot with my two destroyers aft turrets. I can’t hang around much longer, the Bellerophon has uncoupled from the station and is now thundering up out of that jovian atmosphere, she outweighs each of my destroyers by well over 3:1. I have damaged the Terpsichore’s bridge, I was hoping a lucky shot could just maybe hit that bridge again and leave her technically crippled for full victory points based on her scenario point value. But since I was only able to force her to evacuate, I get half value for her, and full value for the crippled Indefatigable. Meanwhile, none of my ships were crippled or FORCED to break off by crew casualties or core compartment damage (the Leclerc withdrew on her own volition and under her own power). But if I lose one of these destroyers now, and it would only take one solid broadside landing from the Bellerophon on the stern of the damaged Corsica … That’s 66 points to Damon and an easy win for the British. Better to play a smart, cool, measured, tactical game, and settle for the draw. BRITISH SCORE: 6 French scouts shot down plus two stations rescued = 6 + 100 + 100 = 206. French Score: 70 for crippling the Indefatigable, 100 for our one station, and 25 (half points) for forcing the Terpsichore to evacuate = 195. So Damon wins by 11, but in a campaign game you have to win by 5% or it’s considered by command “too close to call.” We each started with 244 points, and 5% = 12.2 … so the French steal a very sneaky, pretty cheesy draw.
 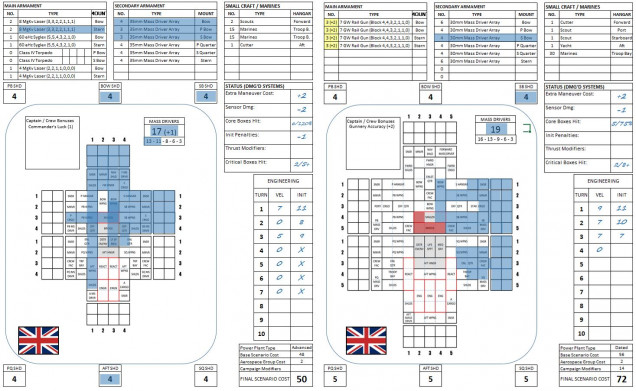 The damage charts for the HMS Terpsichore (left) and the HMS Indefatigable (right). You can see how badly French lasers cut Terpsichore to shreds, one more well-placed hit on the bridge and she’s no longer operational, resigned to weeks in dry dock. The Indefatigable wasn’t so lucky, shown in red is the torpedo that landed basically against the bulkhead of her bridge. She’ll actually fail her ship recovery check, but HMS Bellerophon uses her “Commander’s Luck” upgrade to re-roll the result, and saves her. In narrative terms, Bellerophon was able to launch a cutter and yacht loaded with damage control engineers, helped saved the Indefatigable, and tow her up and out of the gas giant’s atmosphere after the battle.
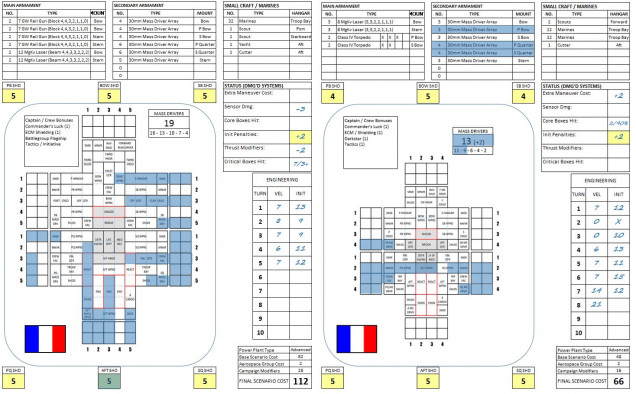 Some of the French ships after the battle. You can see where the Leclerc (left) had her portside reactor and centreline engine blown away, and suffered damage to her starboard reactors as well. She straight-out got lucky here, with 7 critical compartments hit and light cruisers starting on a 10+, Damon only needed a 3+ to cripple her JUST as she broke free of the planet’s atmosphere (10 starting number– 7 crit hits = 3+ target). But Damon rolled a 1, and Leclerc will return to port under her own power. Note the -3 for sensor damage, Leclerc lost THREE sensor suites in that fight, by the time she frinally powered off the table she was practically firing half-blind. One of her escorting destroyers, NRS Corsica, was hit twice by jovian lightning, and more than once by British guns. Three mass driver arrays are lost, as well as two maneuvering thrusters, never a good thing in a gas giant battle.


![TerrainFest 2024 Begins! Build Terrain With OnTableTop & Win A £300 Prize! [Extended!]](https://images.beastsofwar.com/2024/10/TerrainFEST-2024-Social-Media-Post-Square-225-127.jpg)







Great game @oriskany sorry I could not see it live but it was a weekend of Family stuff
This was a good one @rasmus , even if I managed to steal a draw by basically, well … just running away. 😀
I call it a tactical regrouping of forces 🙂
Sometimes that what the battle calls for, @yavasa . We saved one station (winning money for our political sponsors), kicked the hell out of the British, crippled one of their light cruisers, and managed to keep all ships in our battlegroup operational … sort of. 😀
This was a good game, having a mission besides ‘slap the enemy’ made it really interesting.
Figuring out the velocities and gravity effects for the docking manoeuvres was fun.
Of course, sending a few volleys at the French and watching them run away was right and proper in the best tradition of the Senior Service.?
@damon – I can’t deny that last part … when Corsica and Calais left the table, AWAY from the British, we were moving at 21 hexes a turn. That’s 63 kilometers a second. That’s some A-level, well-practiced skill at running away. 😀 😀 😀