Photography in Gaming
Lighting
Taking pictures of your miniatures can be an easy process once you’ve figured out your settings on your camera, however sometimes you wont get the best results with just that information.
The most common mistake people make when taking pictures of subjects whether it be miniatures, landscapes or people is always lighting. Lighting can make or break your image and if you don’t consider it during your photoshoot you will never have the best results possible without a good lighting set up.
Most of the time this can be simple for miniatures, sometimes taking them outside can help with the natural light however let’s imagine we don’t all live in LA and we need a home set up for those perfect shots.
Here are a few lighting products which are cheap and reliable for miniature photography:
Curated August 2018. Please read user reviews before purchase.
Optimal Lighting for your Miniatures
Having lights pointed at your models is great however you need to discover what’s best to achieve the best results with the least amount of exposure and shadows on your images.
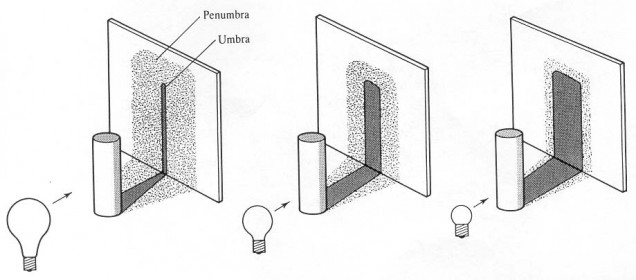
Here’s a handy detail of how light distances can affect your models when taking photographs.
The above image displays 3 distances which can drastically change your image during your lighting set up.
In diagram one, you see that the light is suitably distanced to reduce sharp shading and blur the Penumbra to create a soft shadow behind your subject. This is the optimal distance for using a single light on your model.
In diagram 3, the light distance is very close to the subject which affects the background shadow resulting in a very over exposed model in the foreground and a very destructive hard shadow behind with very little blur to blend into the background.
In the above image the model is in the centre of the table with 3 lights surrounding it to minimize hard shadows and good detail within your subject. Two lights if possible should be distributed at least 2 feet away and infront of the model at 45 degree angles to distribute natural soft lighting to each side of the subject.
A third light is placed behind the model to reduce any shadows hitting from the two infront.
If you do not have access to three lights, make sure that your single light is soft or bright enough with a suitable distance away to reduce the amount of hard shadows falling on your background.
You can also use natural light and bounce it by reflecting your light sources using white paper/card towards your subjects.
Something to note:
– Depending on your lights whether they be flourescent white or tungsten yellow in colour please make sure that your white balance on your camera is adjusted accordingly.
– If using Mobile phone cameras, you can use the HDR option on your UI to take 3 photographs simultaneously to capture the highest exposed area, darkest shadowed area and the midtones of the subject to merge together and craft a single image using the best of three.











Leave a Reply