Home › Forums › Painting in Tabletop Gaming › Texture and rolling pin basing
This topic contains 36 replies, has 13 voices, and was last updated by ![]() utherdracus 5 years, 2 months ago.
utherdracus 5 years, 2 months ago.
-
AuthorPosts
-
October 28, 2019 at 10:20 am #1451052
I want to use a green stuff world rolling pin to make some bases for my Star Wars legion droids and have been doing a test here and there. I tried DAS clay which held the pattern well but shrank slightly (to be expected). The most annoying thing about the process is the increase in the overall base size height.
What do people recommend as the best material to use? (I’ve seen the videos by gerry)
Would you make the whole base out of it or just the detail topper?
October 28, 2019 at 10:25 am #1451053Can you throw up a few pics @collins mate?
I like to put it on top of the base (I don’t mind the height increase you see)
If you use miliput for the rolling pin part you can sand it down if you want less height
October 28, 2019 at 10:35 am #1451060For that kind of thing, you can use mdf bases and put Sculpy, Femo, or whatever brand of polymer clay, on top.
Roll the pattern into the clay and trim around the base to get rid of the excess.
The wood bases won’t burn in the oven when you bake the clay, and there’s not much height increase either.Greenstuff World sells the mdf bases as well.
FYI, don’t try this with plastic. 😉
October 28, 2019 at 10:38 am #1451061I find it works better on top of bases but then I use DAS and cley. With it being on top of a base you can pin the model though the top into the base.
My experiments with the rolling pins can be found here :- https://www.beastsofwar.com/project/1238037/
October 28, 2019 at 10:56 am #1451083You can mix PVA glue into the Das to give it elasticity and stop shrinkage.
October 28, 2019 at 12:13 pm #1451109I’ve used millput white and greenstuff as base toppers – stuck to 2mm high mdf laser cut bases; the extra 1mm or so in height isn’t such an issue with the slightly thinner base discs.
Acrylic is usually 3mm or 5mm thick – but mdf and clear perspex can be got in 2mm thicknesses, which – when you’ve added your base topping sculpt – bulk out to about the same thickness as “regular” GW-style bases (but with the extra detail goodness!). I’ve a couple of rollers on order (from the OTT store of course) so as soon as they arrive, I’ll cut some discs and post a few photos as an example.
October 28, 2019 at 1:11 pm #1451124I use the rollers heavily for about 6 years now. At first I was discouraged by the effects for very similar reasons as you describe. I couldn’t stand wobbly surface and bevelled edges on overly thick bases. So my process evolved in years to something like this (I have no pictures illustrating making of the bases themselves, but hope to describe it clearly enough):
1. Material: I use 50/50 mixture of plasticine (bought by kilos at artists shop) and Miliput (yellow) – this is what GSW recommend and I stand by this recommendation, material is soft enough when rolling and hardens just as any other Miliput, you can roll it very thin and it is not overly sticky.
2. Before rolling actual texture I prepare amount of material enough to create 30-40 25mm bases.
3. It is extremely important to always use either vaseline or as I do baby powder at each stage of using pins, otherwise you either mess pin or pattern (or both).
4. To achieve smooth, flat surface I pin out the paste using this machine:
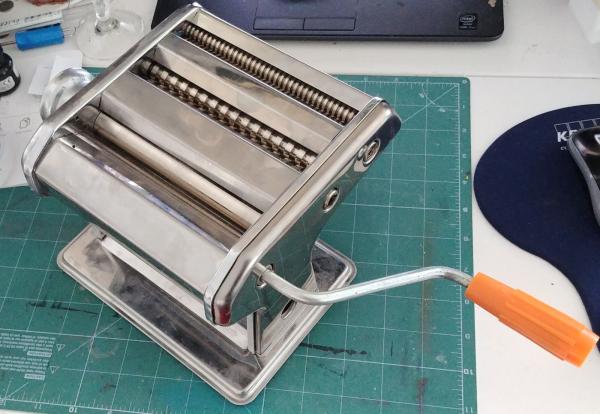
This is macaroni machine, I bought it of e-bay or similar for some 10 Euro, PP included. It is brilliant as you can set thickness of the resulting paste (I usually do either 1 or 2 mm). When I bought it GSW had no silicon ring on offer, but now having both I wouldn’t use the rings instead of this machine (it is just too cool).

Above you can see difference between 1 (black primed bases) and 2 (painted bases) mm thicknesses.
5. Then I put the paste on flat piece of tin-foil (and let it stick to the bottom) and cover all the surface with baby powder and roll the pattern on. I usually put rubber rings on the pin (high of the paste thickness).
6. After the pattern is on the paste I cut the rings to create base toppers and then pick reaming paste cut-offs to reuse (make a ball put it back to the machine and repeat all the steps).
7. After I roll all the patterns I want I wait for an hour or two for the miliput to start harden but before it cures completely and then stick the toppers to the bases.
8. Before painting you need to wash the powder off the bases.
One last photo showing a topper made with the method above but put on a plastic disc (25mm) instead of a base.
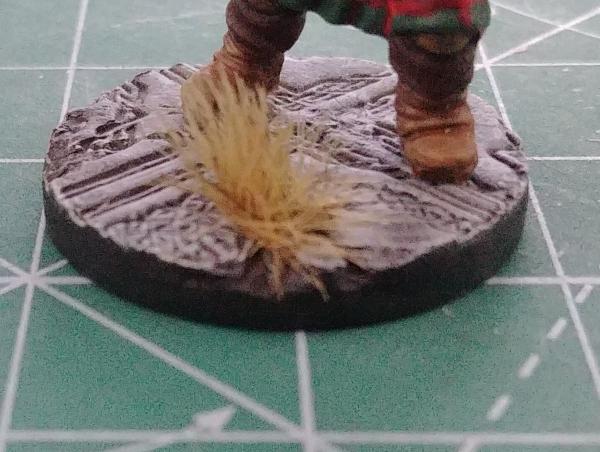
I can’t say if above is best way to do it, but I’m happy with my results. Hope this may be of any use to you.
October 28, 2019 at 1:45 pm #1451129No matter what you do, and I would replace the base completely with mdf and milliputt or super sculpty, remember that the star wars bases are a ridiculous 27mm. So either custom cut or if you’re not tournament play then rock 25mm
October 28, 2019 at 2:04 pm #1451140@shingen thanks! a very informative post, I shall look into this method!
@avernos im not a tourney player for this game, but I am worried that somebody will moan about base size, FFG specifically state in their rule book ‘do anything to make the models look cool but if you touch the base size/shape thou shalt be struck by the mouseman… in the face’. Could make them harder to move on when I get bored of them and need money for other cool stuff.
That and it causes issues with the larger base sizes having notches for the movement tools
October 28, 2019 at 5:09 pm #1451212@warzan here is my test piece on top of a legion base.
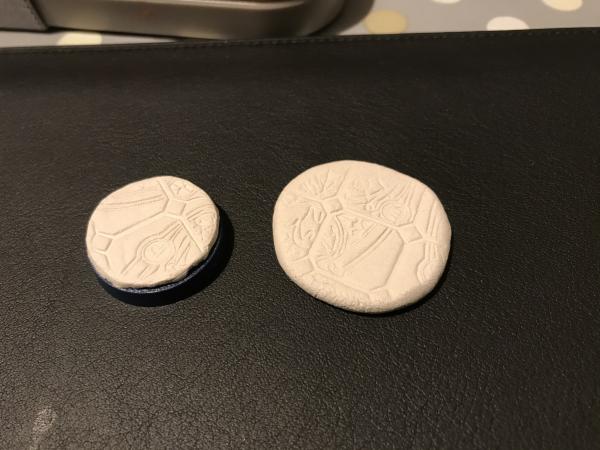
As you can see for the test the detail came out fine but it has shrunk back from the base edge. Also take an already large base from large to overly large (tall). It’s almost plinth level height (minor exaggeration)
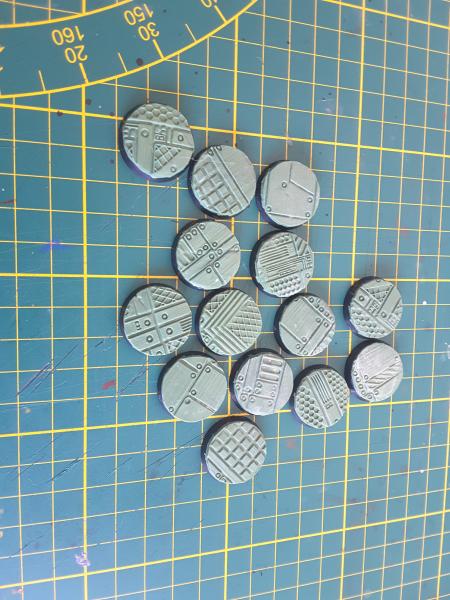
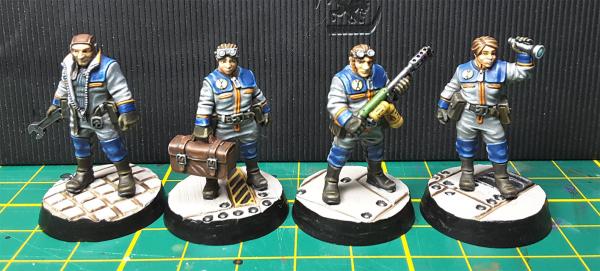
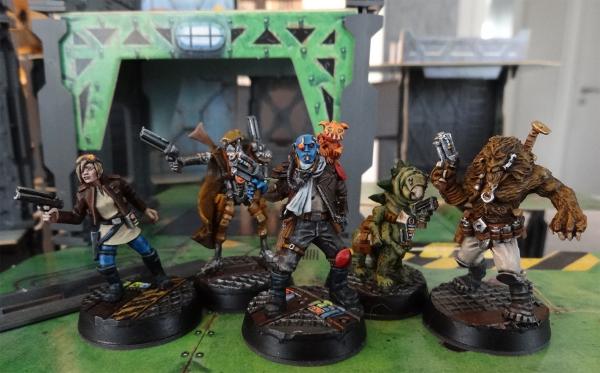
October 29, 2019 at 7:59 am #1451328I use Green Stuff. Plain and Simple GS…
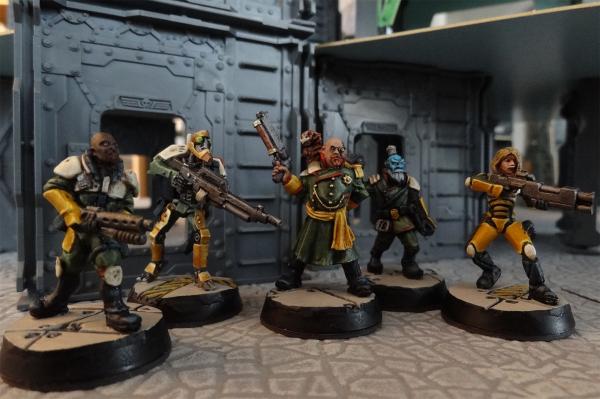 October 29, 2019 at 12:34 pm #1451641
I recently used one of the rollers on my project, I too started with das but i didn’t like the result and it didnt stick that well to the wall. I then used milliput and it worked like a dream, presume any of the putties will work well enough (greenstuff etc) its just I got a load of milliput ages ago when it was on sale so had a tonne laying around.
October 29, 2019 at 8:44 pm #1451873Ordered some rolling pins from GSW and got them last week.
@shingen thank you for the tutorial.
October 30, 2019 at 5:47 pm #1452294Also when you make the bases you can create them without the base and add it later, that is what I do. Basically I create a large sheet with the rolling pin and then cut out squares, that get glued to the bases and remove everything that sticks out with a knife once the gule is dry. Works like a charm. No problem with shrinkage, non uniform thickness and the borders are nice and clean.
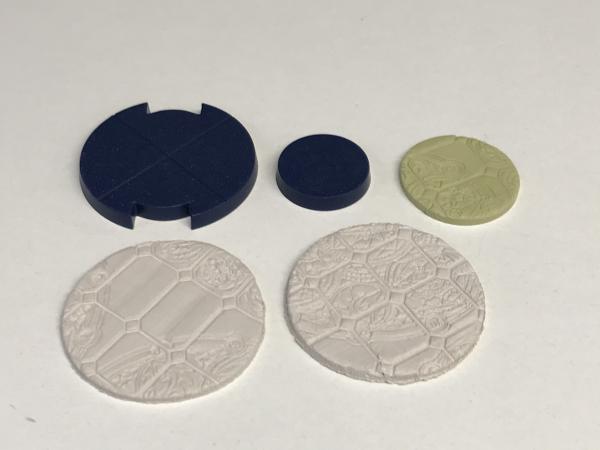
November 5, 2019 at 10:21 am #1454258Here is an image of my first ‘semi-serious’ tests following Gerry’s vaseline nonstick method. The material is raw DAS and milliput yellow.
i have to say that i found the milliput to be super sticky to the point that it was sticking to the rollers even after ‘lubing’. The next thing for me to try is to actually follow singin’s advice and mix in plastercine, which should arrive tomorrow in the post. Currently the DAS is the preferable material and I’m yet to add PVA to it. I have got the pasta maker and tried putting the materials through the rollers on that, interesting results, DAS was not happy and the milliput was too sticky, did make it nice and thin but that had its own problem.
Both of the rolls are about 2mm thick which gives a 7mm high base. I found that if i went down to 1mm i risked punching right through the material. So 7mm height is too much for me, i much prefer slimline bases.
The learning curve continues…
-
AuthorPosts
You must be logged in to reply to this topic.






![TerrainFest 2024! Build Terrain With OnTableTop & Win A £300 Prize [Extended!]](https://images.beastsofwar.com/2024/10/TerrainFEST-2024-Social-Media-Post-Square-225-127.jpg)


