Hobby Blag: Building Your Own Paint Rack
October 23, 2017 by crew
What is a hobby blag?
A hobby blag is a hack or alternative way of achieving the same end result without paying the “hobby tax”, the universal constant which adds pounds to the cost of anything with the addition of the word hobby.
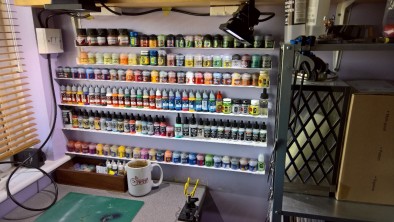
In this article, I will show you how you can build storage for at least 160 paints for under £10. While laser cut MDF paint racks are great they are pretty expensive if you want all of your paint stored in them. I actually have a caddy I put the paints I’m using within, and use these shelves for long-term storage (the also work great for putting work in progress miniatures on).
Like most hobby blags it’s a case of re-purposing materials from what they are originally intended for. For paint racks we will be using UPVC angle commonly used for sealing edges in shower cubicles and windows, it comes in three-metre lengths in a variety of dimensions and mouldings.
You want a plain 90o angle which has a side at least 35mm deep. The stuff I’m using here has a long and a short side, one side is 50mm deep and the other 30mm, which allows me to store a variety of bottle sizes comfortably, everything from Tamiya size jars to dropper bottles.
(All measurements will be presented in mm)
Materials & Tools
So what are you going to need?
- UPVC Angle
- Grab Adhesive (No More Nails)
- Razor Saw/Jnr. Hacksaw
- Tape Measure
- Spirit Level
- Clamp/Bulldog Clip
...and with that, we get stuck into the project!
Crafting Your DIY Paint Rack
The first thing to do is work out the width of the shelf you want. I recommend that you use the width of bottle style you have the most of, for working out the width you want.
Decide where you are going to mount your shelf; I just attached mine directly to the wall, so it was simply a case of measuring the available width then dividing it by the width of a paint bottle and rounding the width down to the nearest whole number of bottles.
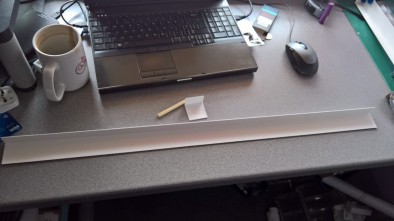
With the width decided simply measure and cut to length the angle, with the first piece cut you can then use it as a template to quickly mark and cut the rest of the angle to length if all your shelves are the same length.
Having cut the angle to length you should have some off-cuts left over. Don’t throw them away as you need them for the next step!
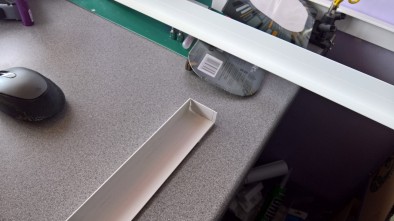
Next, we shall cut the off-cuts to length to create end cheeks for the shelf. This stops bottles getting pushed off the end when you put a paint back.
To create the end cheek, you just need to cut a piece of off-cut to the width of the long side of the angle, so when you mount it perpendicular to the shelf it closes one end.
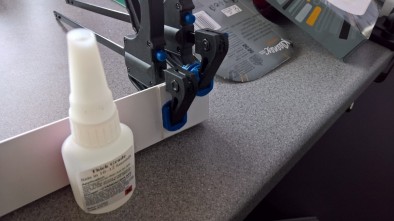
Flip the shelf over then either dab some super glue or grab adhesive on the underside of the shelf, then position the end cheek and clamp in place until the glue has cured. Repeat this step until all your shelves have end cheeks.
Now your shelves have end cheeks it’s time to fix them to the wall. You have two choices here as you can either get a sheet of MDF, plywood, or acrylic and glue the shelves to that then mount to the wall, or just glue them directly to the wall. I opted to mount directly to the wall, but you may prefer to have a less permanent/damaging solution.
Your next job is to work out the spacing between shelves you want; to work this out I found the largest paint bottle I had that I wanted on the rack (Vallejo Surface Primer) and rounded its height to the closest whole centimetre.
This gave me the basic spacing I needed, so I simply marked the bottom height I wanted and measured the gap up from there. For the top shelves, I wanted a smaller gap so I could increase the storage density as I was planning on mainly having Citadel paints and similarly sized bottles at the top of my rack.
The exact dimensions of my shelves are as follows (measurements in mm)...
- Long shelves: 810mm (32” approx.)
- Short Shelves: 700mm (27.5” approx.)
I use two spacings between my shelves as the bottom three are 100mm (4” approx.) apart, and the top 3 are 60mm (2.5” approx.) apart. The 100mm spacing is ideal for dropper bottles and can fit 60ml bottles of primer etc comfortably, while the 60mm gap shelves work great with Citadel’s bottles as you can just squeeze an XL size shade bottle between them.
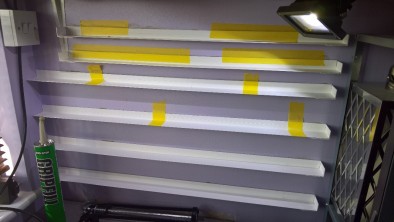
To mount the shelves I simply applied a bead of grab adhesive to the back of the shelf and pressed into place, then used a spirit level to tweak the shelves. I then taped them in place with masking tape so they didn’t droop as the glue cured.
After letting the glue cure for twenty-four hours I was then ready to stock the shelves. Six months later on I have yet to have searched for a missing paint, and the shelves work as well as the day I made them!
There are dozens of other uses for this style of shelf as they work great for storing work in progress miniatures and comfortably hold up to a 40mm base so could also be made into a display rack quite easily with the addition of a sheet of acrylic and some simple joinery to make a frame.
They also have a high “Spouse Approval Rating”. As soon as I had made these for myself, my partner asked me to make her a spice rack in the same fashion for the kitchen and one for her hobby space to store threads and bits and bobs she uses for her hobbies.
You could also mount these shelves into a dartboard cupboard for display or paint storage, or even on the back side of a cupboard door if you have re-purposed old kitchen cabinets in your hobby space…
Tim Chubb (@nakchak)
If you would like to write an article for Beasts of War then please contact us at [email protected] for more information!
"A hobby blag is a hack or alternative way of achieving the same end result without paying the “hobby tax”..."
Supported by (Turn Off)
Supported by (Turn Off)
"There are dozens of other uses for this style of shelf as they work great for storing work in progress miniatures..."
Supported by (Turn Off)


![TerrainFest 2024 Begins! Build Terrain With OnTableTop & Win A £300 Prize! [Extended!]](https://images.beastsofwar.com/2024/10/TerrainFEST-2024-Social-Media-Post-Square-225-127.jpg)




Amazing work Natchak, so much cheaper than the wooden one I build 🙂
Looks excellent too Id never have guessed how it was made without reading it, it looks top notch
@jjgrub Thanks, they are really versatile, i would love the space for a nice wooden rack but in my hobby space, desk surface is at a premium whilst the walls are quite bare, plus im a cheap so and so, and would rather spend my money on more paint rather than organisation systems 😉
Good blag. And surprisingly nice looking. Without the pictures I’d have pictured something a lot more rough. I’d also have assumed you’d get some bend in them once loaded with paints, but there’s none obvious from the pictures. And it’s versatile enough to mix up as required by putting dividers etc in to separate out paint types/colours as wanted. Good work!
Cheers 🙂 Its quite thick material (1.5 – 2mm approx) on a solid 90 degree angle, anchored with a bead of no more nails the length of the shelf, so stands up well. Dividers would work well, although personally im yet to find a need for it, as i rounded the lengths up to nearest whole numbers, which means im left with fractions of a bottle left at an end, so i can just leave a little gap between types, or just use a destinctive bottle (2nd shelf up, the liquid mask separates my air brush colours from my vallejo… Read more »
Sweet, always thought this was cool @nakchak – I will be stealing this idea at some point 🙂 thanks for sharing.
But I think I’ll stick them to a backing board and screw that to the wall. That way if I want to move it it’s just a matter of unscrewing.
Great stuff might give it a try
@rasmus Well worth it in my opinion, took all of 30 mins to do, once id worked out what spacing i wanted, have spent far more time organizing paints than i have making the shelves 😀
It’s really funny timing with this article, as I’ve been working on a paint rack storage solution of my own recently. Just ended up with too many of then so that sorting through a box or two just wouldn’t work any more. This really is a great idea and if I’d been looking for a permanent solution it’d be the way to go.
great stuff a fabulous looking paint store.
Very nice!
I like the inside the cupboard idea too. That’s a great use of space. Thanks for sharing.
Nice! I love projects that repurpose materials in novel ways. A non-destructive attachment method may be to use those 3m command strips. Not sure how many you’d need to support the weight but I’ve had luck put all sorts of junk on my walls with them. The downside is that it doesn’t look quite as nice with all the tabs hanging down visible.
@inu53 thats not a bad idea, the other option as mentioned is to mount the “shelves” on some board and mount that to the wall instead, or if your wood working skills are up to it, make it free standing….