Anatomy Of An Air Compressor Part Two – The Importance Of A Receiver
February 17, 2016 by crew
Greetings, fellow Beast of War subscribers. In Part One of this series we discussed the sorts of compressor available to the hobbyist and took a high level overview of the operation of a compressor.
Today we’ll look at why a receiver is a highly desirable feature of a compressor and why pressure stabilisation and regulation is important to miniature painters.
The Receiver
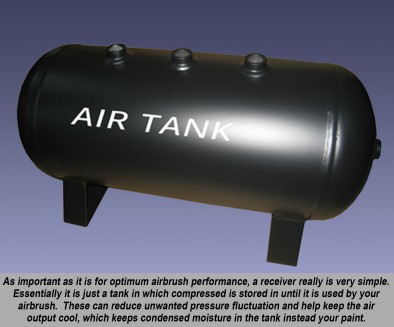
The receiver or air tank’s purpose is to receive and store the compressed air from the compressor, whilst not strictly necessary it is a highly desirable feature to have as I shall try to explain.
The receiver has several purposes, firstly it allows your compressor to work in a stop start manner rather than continuously whilst air is required, as the compressor runs until a preset pressure is reached inside the receiver then cuts off. Once the pressure drops below a preset minimum pressure, the compressor is switched back on.
This is advantageous as your compressor only runs to maintain pressure inside the receiver, which gives the compressor a greater duty cycle by only running when needed, and when not running allows it to cool down. The next major advantage is that it removes ‘pulsation’ from the output pressure and increases the stability of pressure.
What Is "Pulsation"?
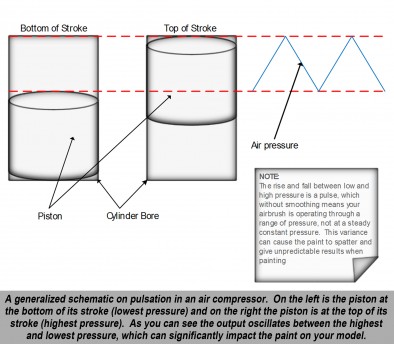
Pulsation is inherent from the compression mechanism of a compressor, either piston or bellows based compressors suffer from this phenomenon. It is probably best explained with an analogy to a balloon.
When you inflate a balloon, your lungs are acting as an air compressor, and the balloon as a receiver. When you exhale you start off at the highest pressure you can generate and trail off to a lower pressure as you run out of puff, the transition from high to lower pressure is the pulse.
If you connect directly to output from a compressor, then the transitions from high to low pressure are present at the output of the air brush. This leads to inconsistent delivery of paint to your mini, while less of a problem when painting larger surface’s, it can be really noticeable on the small scales we deal with.
Just as it takes several puffs to inflate a balloon, a compressor takes some time to reach a working pressure, the higher the pressure the greater the number of strokes the piston takes to reach this pressure, being entirely possible that its unable to maintain that pressure with the air brushes valve fully open.
Without a receiver your compressor has to work harder to maintain this pressure which leads to increased wear and tear and the limits of the duty cycle being met sooner. You also can have dramatic drops in pressure when the airbrushes valve is opened vs. when its closed as you have nothing kept in reserve to meet demand.
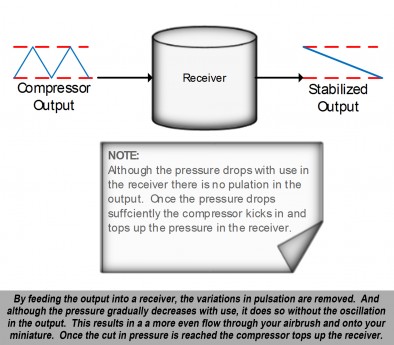
By feeding your compressors output into a receiver it helps remove the pulsations present and increases the stability of the generated pressure. The pulsations are lost as each stroke of the compressor’s piston just tops up the pressure present the receiver. Which ensures a consistent pressure (between the cut in and out pressures) is always present at the regulator.
Finally, it can act as a water trap and helps in drying the compressed air, which due to the heat generated during compression, can lead to water condensing in the output. Most receivers have a drain plug for this reason, and should be regularly drained, as the last thing you want when spraying is water in the airline as it ruins any paint job.
If you already have a compressor without a receiver, there are aftermarket options available to hobbyists such as the ones made by Sparmax. There are also various examples of people using empty drinks bottles (I use a 3-litre Coca-Cola bottle on my scratch built compressor) as a receiver.
Regulator
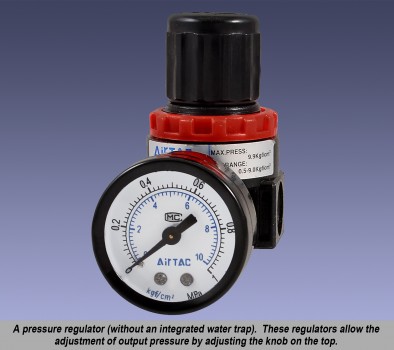
This is perhaps the most used part of any compressor, the regulator’s job is to regulate the output pressure and is an adjustable valve which lets you adjust the static (and working) pressure of the compressor. They often have a manometer (pressure gauge) to set precisely the output pressure.
It’s worth noting that regulators are directional, meaning that they have a high and low pressure side to them. This is usually marked with an arrow on the body, the direction of the arrow indicates the direction of airflow. You want to connect the airline to the side the arrow points to and the compressor to the other end.
When setting the pressure, it is vital to depress the trigger on your airbrush to check the working pressure as the static pressure will be higher than the working pressure, so if you set the pressure without opening the airbrushes air valve you will find that the manometer’s needle drops when you start using the airbrush, which can cause the paint to spatter.
Some regulators come with a bypass valve and some compressors come with a double regulator, this is really useful for cleaning, as it helps to clean with a higher pressure than you paint with as the added pressure can help dislodge grot and its quicker to spray a cupful of cleaner.
Pressure Switch
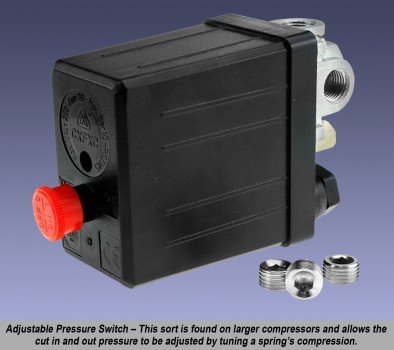
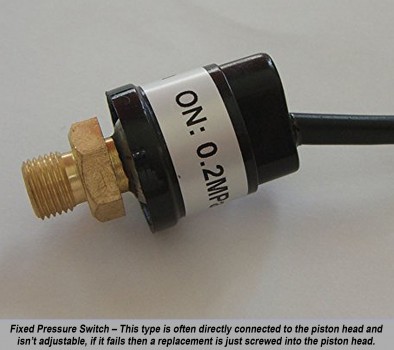
The pressure switch is the “brains” of the compressor, and simply turns the motor on and off based on the pressure in the receiver or piston head depending on compressor design. There are two sorts available, fixed and adjustable.
Fixed switches have a pre-set cut off and cut in pressure and are typically mounted directly to the receiver or to the piston head.
Adjustable switches allow you to adjust the maximum pressure before it cuts out, and on high end models also allow you to adjust the cut in pressure. This useful if you have a requirement for exact pressure, but is pretty much overkill for a hobbyist.
Safety Valve
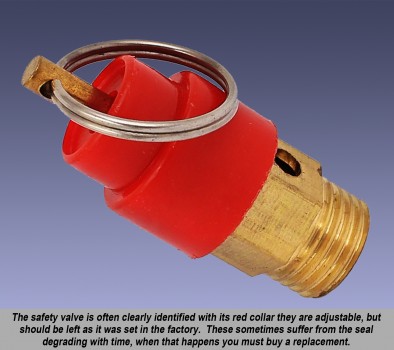
The safety or “pop off” valve is a safety critical device which is designed to pop open if for some reason the pressure switch didn’t engage. If you didn’t have one and your switch failed your compressor would in effect become a bomb, and could explode with dangerous consequences.
They often have a red collar on them with a split ring you can pull on to release pressure. It is a good idea to depressurise the receiver when you finish your painting session by pulling on the valve until you no longer hear a hiss.
Wrap Up
This concludes the discussion on why you should have a receiver on your compressor, and the main pressure effecting parts of your compressor. In the final part of this series we shall be looking at the various accessories and ancillary items you need to get the most out of your compressor and airbrush, as well as some routine maintenance advice.
If you would like to write an article for Beasts of War then please contact us on [email protected] for more information!
"Without a receiver your compressor has to work harder to maintain this pressure which leads to increased wear and tear and the limits of the duty cycle being met sooner..."
Supported by (Turn Off)
Supported by (Turn Off)
"If you didn’t have one and your switch failed your compressor would in effect become a bomb, and could explode with dangerous consequences..."
Supported by (Turn Off)





Again great piece of information. Just to add a little extra: When connecting a receiver to a compressor you can use a higher pressure around 90 psi (6 bar) to fill the receiver but be aware and use a different air hose then the one you use for the airbrush. The transparent air hose commonly used to connect your airbrush (so you can check if there is no water) is not made for this amount of pressure and you need to use a stronger air hose like a braided air hose to connect the compressor to the receiver. You will… Read more »
@ancientsound thanks, and again great points raised :), with regards to higher pressures not many compressors targeted at airbrush/hobbyist use (other than high end industrial/pro artist models) offer a pressure without modification above 80psi. But if you include workshop compressors then even entry level ones offer 120+ psi as standard. In those situations you are totally correct that a reinforced hose is necessary, although having a standalone receiver isn’t that common outside of industrial settings as most DIY orientated compressors come with an integrated receiver.
Airline choice is discussed in the final part of this series
Cheers to the BoW guys and @oriskany for the work on the images and layout of the article, looks great 🙂
No worries at all, @nakchak . Like I said in the last article, you did 95-99% of the work on these.
Another good article.
There it is! The Receiver! Now to part three, which should also have moisture traps… You should add an Outline or Table of Contents for Part 3 so people know to hold those questions.
Thanks @tomatovich part 3 does indeed have water traps, connectors, airlines and other bits and bobs found up to but not including the airbrush, and as mentioned in this article the receiver is the primary water trap.
oh dear with a title like that I could get into all sorts of naughtiness, Fortunately I have been saved by a very informative and useful article… and a slap on the wrist for me being crude 😉
@tresilliian Lol thanks, always better to be a giver than a receiver 😉
…boom-boom!
I have all this stuff and now I know what it does! Brilliant article and very well written.
I promise to use my airbrush very soon.
@unclejimmy thanks, looking forward to seeing the results 🙂
great stuff @nakchak if people are worried about things going boom they could use an old fire extinguisher for an air tank?
@zorg as long as you have a safety valve things shouldn’t go boom. But yes have seen people use fire extinguishers and gas canisters as receivers only hassle is getting threads to fit as they use a different thread to compressors.
true but if you know the thread size or failing that then take the part from the tank to a auto store they will probably have the parts to use the tank.
Really well put and everything worth knowing. This has been one of the best written on the subject of everything except and up to the Airbrush. I hope we are going to get a follow up on airbrushes as this has taught me so much I had not thought of as important. Again Tim, great and well done as always (Jim) Oriskany. Looking forwards to the next and last in the series should have been longer.
Thanks @chrisg always a balancing act about getting enough covered and too much info, as for anatomy of an airbrush maybe, have a few things up my sleeve id like to cover first.
Hi @nakchak, really enjoyable read mate. You have covered everything and it’s good to read something that consolidates all the info I’d gathered when I started air brushing. Many thanks to you and Jim for taking the time to write this up.
Thanks @brucelea that was pretty much my main motivation when writing this was to have a handy reference and to try and give people an understanding of the how and why, not just the usual buy, plugin, spray treatment a compressor gets. At the end of a day no matter how much you spend on the air brush, if the compressor isn’t providing enough puff your not going to get good results 🙂
Got an airbrush for Christmas, but no compressor yet. Looking at ones that have their own integral receivers and moisture traps, next I want to make sure I’m looking at the right size connectors, threads, etc. The ones I’m finding are quiet, and running about $100 USD. Sound about right?
@oriskany Yup sounds about right, if you can try and hear one in person before you buy, it really depends on when you find your hobby time is, as to how much of an issue the noise is, if you mainly paint in the daytime then it shouldn’t matter, if on the other hand you paint when people are asleep you may find that the noise is an issue. Failing hearing one in person there are some good reviews on YouTube, an airbrush specific compressor should be using 1/8″ threads through out, or come with a 1/4″ to 1/8″ adapter… Read more »
I got my airbrush and compressor a few weeks before the first article but thankfully it’s ticked all the boxes so far. I went for an Iwata IS 875-HT. It was pricey enough but I don’t mind shelling out on something I view as an investment. I’ve been working on my Sector Imperialis board with it for the last couple of days; nice large flat surfaces for me to practice on!
@irredeemable Nice compressor :), it is true you get what you pay for iwata makes very nice kit across the board.
OK, I’m jumping into the airbrush thing but I’m a bit confused. In the previous article you mentioned that some compressors shouldn’t be used for more than 30mins continuously without risking damaging the piston.
Is that 30mins with the compressor running all the time?
Or 30mins with the compressor running on and off while it regulates the pressure?
Brother G
@goochman70 Good question I will try and clarify this point for you: if your compressor is rated with 50:50 duty cycle with a 30 min cool down period specified it would mean you could run the compressor non stop for 30 mins before you have to let it cool down for 30 mins. It may not be 30 minutes, its what ever is printed in the manual that comes with your compressor, so look out for cool down time and duty cycle entries on the spec page. If you have a receiver of sufficient volume to ensure that you have… Read more »
@nakchak, thanks man. I’ll re-read the spec-page to check what it says. I didn’t quite got the timing when I read it the first time.
Also, if I use my airbrush indoors, do I need to use a mask?
Brother G
@goochman70 you should always wear some sort of mask when using an airbrush other wise you will breath in the atomised paint, at a minimum a decorators dust mask will do for light use, but investing in a decent respirator will be an investment in your lungs and health if you do a lot of airbrushing. Plus you can wind everyone up doing impressions of bane from dark knight rises….
@nakchak, thanks again for the info.
Bane is the man
Brother G