


In a galaxy even further away... back to Star Wars miniature gaming


More change - or how is it called? Development?
I’m at a point now where I’ve identified some elements through test “games” (very short simulations of typical and some unusual game situations) that were unnecessarily complicated and could be implemented more simply. I had some ideas that sounded cool on paper, but proved too elaborate in game for the tiny nuances they would contribute. Example:
The action dice are a central game resource for actions, “modifiers” and strategic decisions such as “do I go for offense or defense?”. At some point I had the idea that I could also use the color codes of the dice to implement different movement ranges and add the action die used to the attack pool when attacking. It boiled down to the fact that action dice are all gray by default (4+ success, 10cm movement), but you could also convert a gray one to a black one (3+ success, 15cm movement), but only if you have an action die left over that you can convert to a white one as compensation (5+ success, 5cm movement range). Sounds cool, but in the game the effect is simply too puny compared to the effort involved, and it also inhibits the flow of the game again and you start to ponder over 5cm or a success at 4+ or 3+, which is simply not exciting. And so you discard such ideas again. But it was still an interesting experiment.
Another example are upgrades to units – at some point I had unit upgrades in addition to the unit cards, plus event cards and faction cards. And then I thought to myself: “What are you actually doing? I want as few game materials as possible apart from minis and terrain, and practical game aids like unit cards, but now I’m making 3 or 4 additional card types that all work and are used differently?” So I ditched that idea without crying over it and decided to bring additional effects, options and flair elements into the game through a single card type that will also be a docking point for the narrative, asymmetric scenario concept. At the moment, I’m calling it “Deployment Cards” because they are set up or brought into play with the units at the start of the game. The main purpose of these is to add unique effects that allow different play styles and possibilities in conjunction with the same unit.
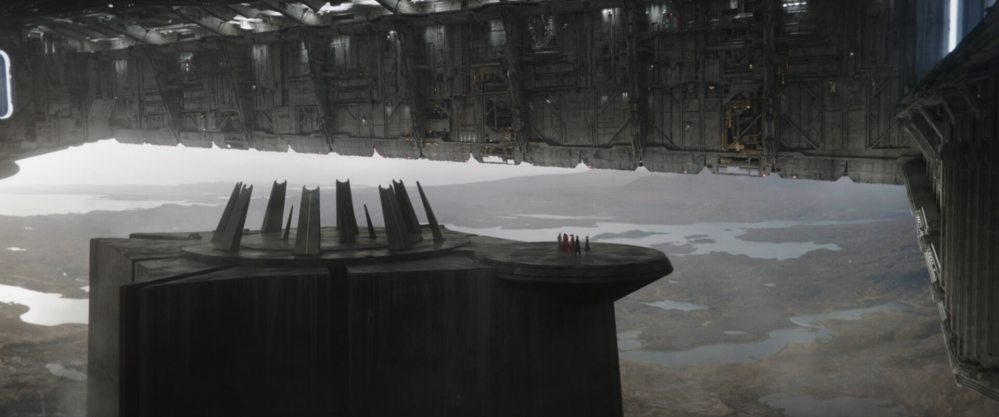
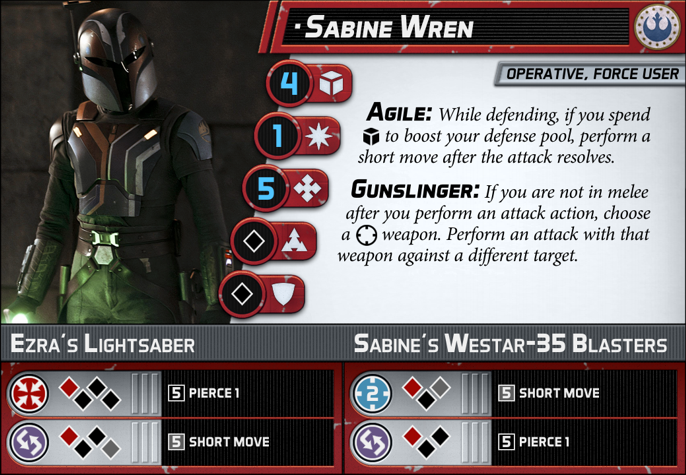
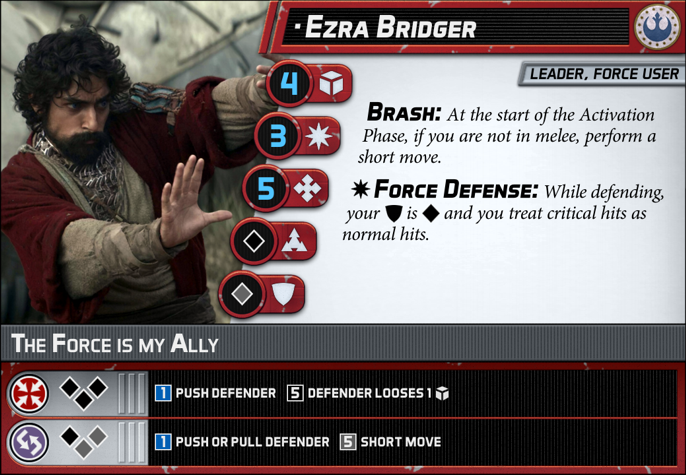
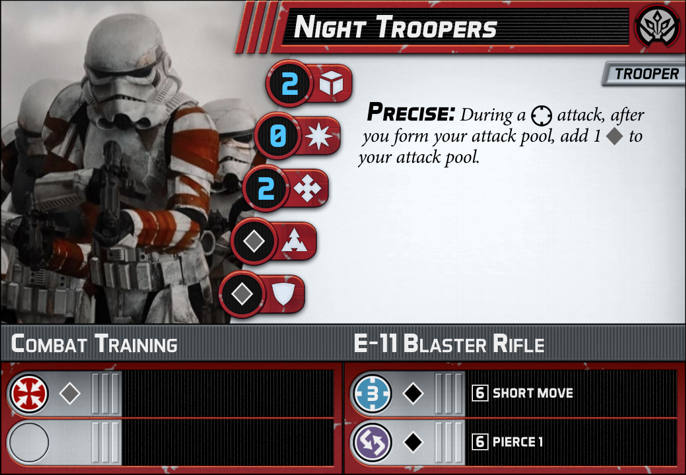
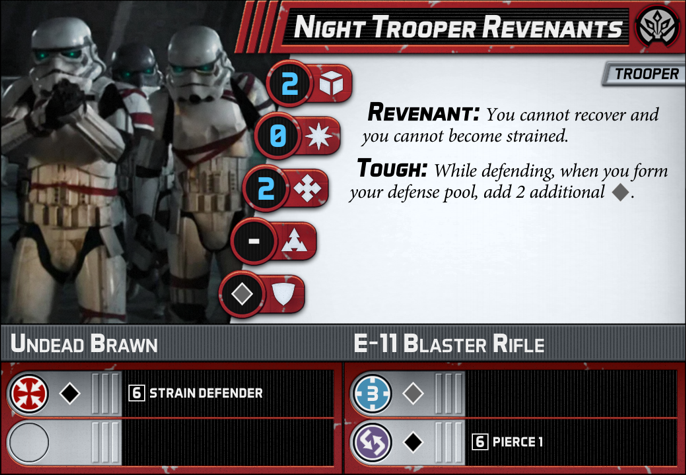
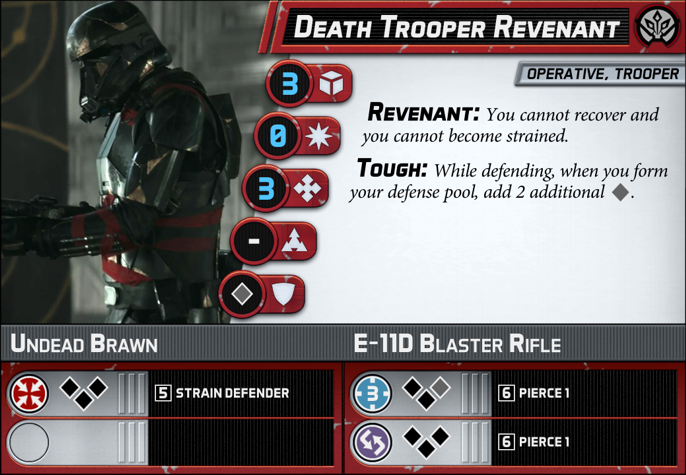
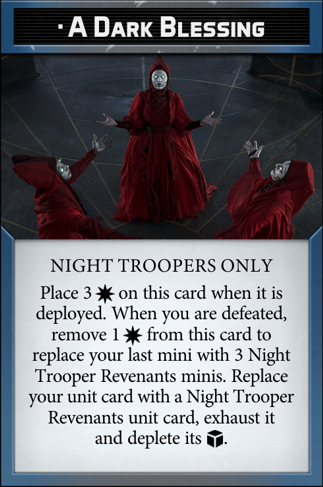
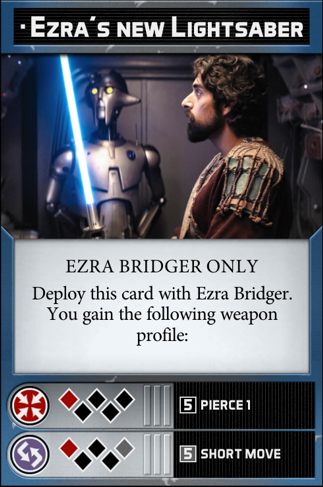
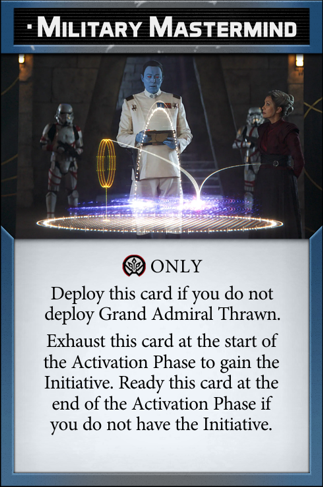
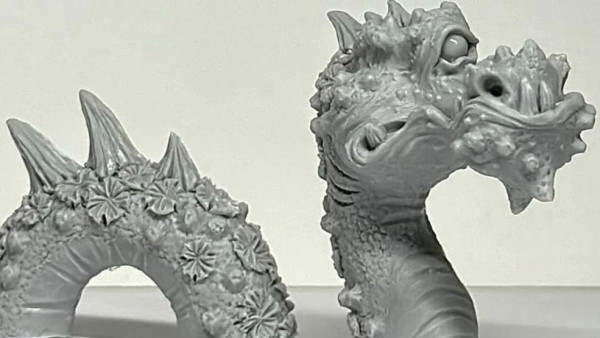
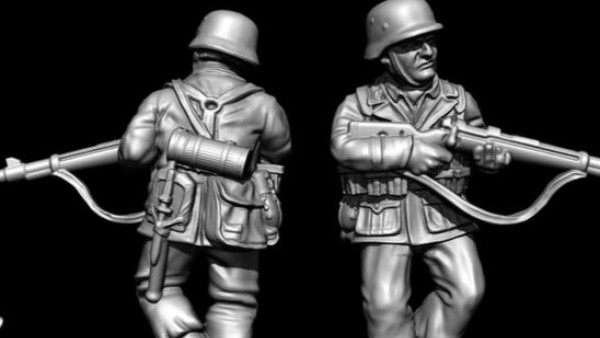
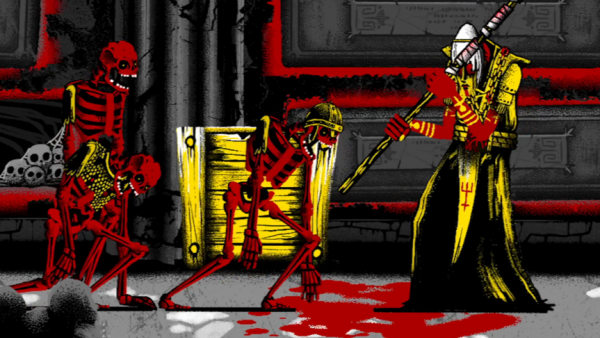
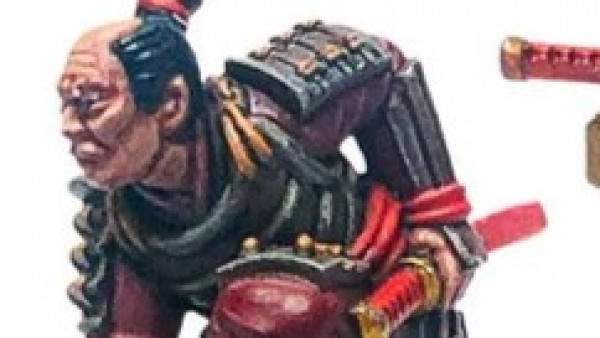
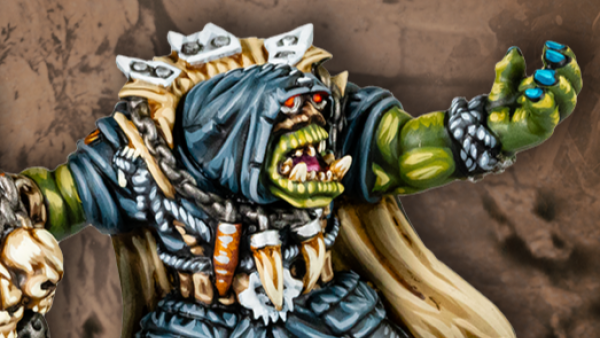
And this brings us to the third point, which also concerns the progress of this project: I want to work towards a ready-to-play scenario first – in other words, to develop the units for it, the deployment cards, mission cards, and above all the minis and terrain required for it. terrain for an entire 90×90 gaming table. My goal will be to be finished by the Advent painting meeting at the end of this year. Ambitious? Yes. Feasible? Yes, probably. For this scenario, I’ve chosen the finale of AHSOKA, in which our 3 heroes (Ahsoka, Sabine and Ezra) storm the Nightsisters’ citadel on Peridea and have to deal with Thrawn’s Night Troopers, then Night Troopers resurrected by the Great Mothers, Morgan Elsbeth and two tough undead Death Troopers. Thrawn’s troop has to stop the 3 heroes for a certain amount of time…
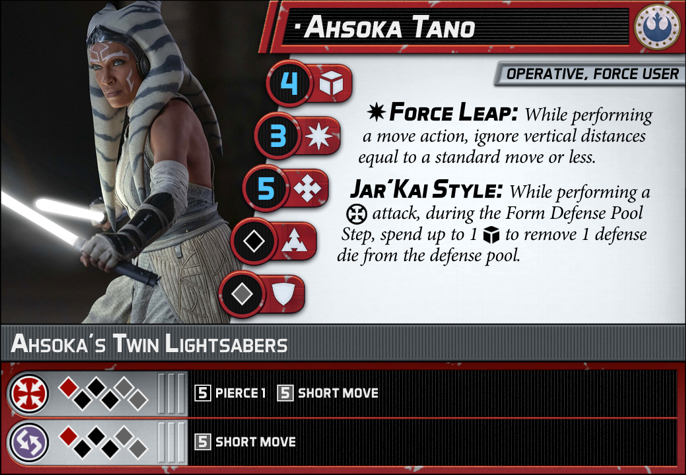
I’ve collected some useful images and edited some of them, and the graphics for the two card types and game-relevant symbols in the texts are already finished. Here are all the unit cards and the first deployment cards for the first scenario:


The Playtest rules-set so far (and far from finalized!)
B A S I C C O N C E P T S
.
.
.
DICE
.
The game uses 6-sided dice which are used to form dice pools. Dice pools include one or multiple dice, which are rolled to determine the outcome of actions and events. When you roll dice, each die rolled produces either a success or a failure. The minimum die roll required to produce a success is indicated by the color of the die:
.
– Red: 2+ (extremely high chance of success; only red dice can produce critical hits))
– Black: 3+ (very good chance of success)
– Grey: 4+ (perfectly average chance of success)
– White: 5+ (poor chance of success)
.
.
.
ACTION DICE
.
Action Dice are used for a variety of things during the game. They are used to determine Initiative, to activate units, or are spent when a unit wants to perform actions. Additionally, you can boost attack or defense pools by spending one or more Action Dice when you form the dice pool.
.
At the start of the Activation Phase, before units are activated, all units refresh their Action Dice up to the their current printed limit.
.
When a unit boosts an attack or defense pool, it spends 1 or more of its remaining Action Dice. Each Action Die spent adds either a black, a grey or a white die to the dice pool (player’s choice).
.
When a unit ends up with a number of Action Dice exceeding its current printed limit, immediately remove Action Dice from the unit until it no longer exceeds its current printed limit. If a unit runs out of Action Dice during another unit’s activation, the player controlling the unit which ran out of Action Dice may choose to exhaust that unit when the last Action Die is removed.
.
.
.
FORCE DICE
.
Force Dice are a representation of the Force in the game and are used both actively and passively in a variety of ways. Force Dice are blue.
.
Some units start the game with a number of Force dice equal to their Force Aptitude. During the game, a unit can never have more Force Dice than its Force Aptitude. Note that some units have a Force Aptitude and therefore Force Dice, but are not Force Users. An example are some units which are Nightsisters. These units cannot spend Force Dice to boost dice pools like Force Users (see below), but have other ways to use their Force Dice as described by Abilities and card effects.
.
Force Users can spend Force Dice to boost a dice pool, similar to Action Dice, however, only 1 Force Die can be spent per dice pool. A Force Die does not convert into a black, grey or white die, though, and it also does not roll successes or failures. A Force Die spend to boost a dice pool is rolled with the dice pool. After the roll, before you remove failures, you may modify the roll of any 1 non-Force Die by the result rolled on the Force Die.
.
Some card effects require a unit to spend 1 Force Die in order to use or trigger that effect. In addition, some Force Users have abilities preceeded by the Force-symbol. Such abilities are in effect as long as the unit has at least 1 Force Die.
.
.
.
CARD STATUS: READY AND EXHAUSTED
.
A card always is in one of two states: Ready or exhausted.
.
A ready card is ready for action, which is indicated by the card being aligned so that its card text is parallel to its controlling player’s table edge.
.
An exhausted card is no longer ready for action, which is indicated by the card being turned 90° on its side so that its card text is vertical to its controlling player’s table edge.
.
Unit cards are exhausted to indicate that a unit has completed its activation and cannot be activated until it is readied again. Some cards like certain upgrade cards must be exhausted in order to trigger their effect. Such cards always explain how they can be readied for further use.
.
.
.
UNIT STATUS: EAGER AND STRAINED
.
A unit always is in one of two states: Eager or strained. An eager unit is in high spirits, motivated or cool-headed. This state represents the unit at its most effective. A strained unit suffers from stress, injury, or has lost its footing or cool and no longer is at its most effective.
.
A strained unit is indicated by placing a strained token on its deployment card. The following restrictions apply to a strained unit:
.
– A strained unit can only perform 1 action during its activation.
– A strained unit cannot boost attack pools.
– A strained unit cannot perform interact actions and does not count towards victory conditions for its controlling player.
.
.
.
“AT XY DISTANCE” OR “AT RANGE X”
.
A
.
.
.
.
.
.
I N I T I A T I V E P H A S E
.
.
.
At the start of the first round of the game, players count all their Leader units. The player with the most Leader units gains the Initiative during the first round of the game. In the case of a tie, randomize which player gains the Initiative during the first round of the game.
.
At the start of each subsequent round, the Initiative goes clockwise to the next player. Then – going clockwise – each player gets a chance to steal the Initiative or pass. To steal the Initiative, the total number of Action Dice remaining on units controlled by that player must exceed the total number of Action Dice remaining on units controlled by the player who currently has the Initiative. Once each player had a chance to steal the Initiative or has passed, this step ends.
.
The player with the Initiative always goes first in each step of all subsequent phases until another player gains the Initiative.
.
.
.
.
.
.
A C T I V A T I O N P H A S E
.
.
.
START OF THE ACTIVATION PHASE
.
– Ready all exhausted unit cards.
– Refresh Action Dice
– Alternate using effects triggered during this step.
.
.
.
ACTIVATING UNITS
.
Players alternate activating units during this phase. When it is a player’s turn to activate a unit, that player becomes the active player. The active player must choose one of the following options:
.
– Activate a unit.
– If the active player has fewer remaining ready units than the opposing player, choose to pass.
– Heroic Effort: If an active player has no ready units left and currently has fewer Victory Points than the opposing player, the active player may strain a unit to ready and activate it. If the unit has no remaining Action Dice, it gains 1 Action Die.
.
When a unit is activated, it may perform actions and is the acting unit until its activation ends. When a unit has completed its activation, that unit’s player’s turn ends and it is now the opposing player’s turn to activate a unit. When no ready units are left on the battlefield, the Activation Phase ends.
.
.
.
ACTIONS
.
During its activation, a unit can perform up to 2 actions from the following list:
.
– Move
– Attack
– Recover
– Interact
– Special
.
During a unit’s activation, a unit can perform the same action no more than once, with the only exception being the move action, which can be performed up to twice.
.
In order to perform an action, a unit must spend one of its Action Dice. If a unit has no Action Dice, it cannot perform an action other than a free action. Free actions are typically part of another action as described by certain Abilities and card effects. A free action does not count towards a unit’s limit of 2 actions per activation, but it is considered as an action for the purpose of game effects and therefore does not allow a unit to perform the same non-move action more than once during its activation.
.
Many game effects allow a unit to perform a move, an attack, use a recover etc. without designating them as actions. These effects are not actions, and as such they neither count towards a unit’s limit of 2 actions per activation, nor do they count towards the limit of performing no more than 1 of the same non-move action or no more than 2 move actions per activation.
.
.
.
.
.
.
M O V E
.
.
.
Units move around the battlefield by performing a move action, or by performing a move or short move as part of an ability or other effect, like a surge. The maximum distance a unit can move depends on what type of a move a unit is performing: A move action or move allows a unit to travel a distance up to 15cm. A short move allows a unit to travel a distance up to 5 cm.
.
When a unit performs a move or short move, you move the unit’s leader and then position the remaining minis in the unit within a radius equal to a short move (5cm) around the unit leader. This is called Unit Cohesion. It is possible for individual members of a unit to end up on different height levels. In that case, unit cohesion must be maintained also across vertical distances. Where in doubt, simply measure from base to base.
.
A unit can move around corners or along a snaking path in-between obstacles freely, as long as there is a path unobstructed by obstacles.
.
A unit cannot end it’s move in or on terrain pieces where you cannot safely place all minis of the unit without one or more minis being in danger of falling over or down.
.
.
.
CLIMBING
.
While moving, units may encounter terrain pieces in their path which may require units to climb over or onto them if they want to continue their move on or beyond the terrain piece. Units can freely move over or onto terrain pieces which are no higher than a small base (2,5 cm or half a short move). If a terrain piece is higher, units must climb over or onto the terrain piece in order to continue their move on or beyond it. In order to climb, the unit leader must be in base contact with the edge of the terrain piece. A climb can only be performed as part of a move action.
.
When climbing up or down, measure the vertical distance between the starting point where the unit leader is in base contact with the edge of the terrain piece and the point on the higher or lower edge of the terrain piece to which the unit wants to climb up or down. The unit must have enough move distance left to travel across the vertical distance between these two points. If it does, add the vertical distance to the distance the unit already travelled during its move action and place the unit leader on the end point of the vertical path you measured. The unit can then continue its move action from there.
.
.
.
JUMPING
.
Some heights or gaps are low or narrow enough for a unit to safely jump down or over. Units can freely move down from heights with a vertical distance no higher than a short move (5cm). The vertical distance does not count towards the move distance travelled by a unit. Units can freely move across gaps which are no wider than a short move (5cm), provided they have enough move distance left for their move to cover the gap. The distance of the gap does count towards the move distance travelled by a unit.
.
.
.
FALLING
.
Sometimes a unit can be moved by a player who does not control the unit, such as with the Push or Pull keywords. When a non-controlling player moves a unit over the high edge of a terrain piece, the move ends and the unit falls. Place the unit within a short move of a point on the terrain piece’s lower edge as close to the point from which the unit fell as possible. The fall performs an attack against the falling unit. Form the attack pool as follows: Add 1 white die for the first short move-increment on the vertical distance of the fall. Add 1 grey die for the second short move increment, 1 black die for the third short move increment and 1 red die for each short move increment beyond the third.The falling unit can defend against this attack as usual.
.
.
.
.
.
.
A T T A C K
.
.
.
During an attack, the attacker goes first in each step of the attack.
.
.
.
WEAPON TYPES
.
There are two types of weapons: Melee weapons and ranged weapons. Melee weapons always have a melee entry (>>melee icon<<) in their weapon profile, and ranged weapons always have a ranged entry (>>ranged icon<<) in their weapon profile. Both types of weapons may or may not have a close combat entry (>>close combat icon<<) in their weapon profile. When an effect allows you to make an attack with a melee weapon or a ranged weapon, choose the correct weapon type. If the chosen weapon type also has a close combat entry (>>close combat icon<<), then you may also perform a close combat attack with that weapon.
.
.
.
ATTACK TYPES
.
There are three types of attacks a unit can perform: Melee attacks, wich use the weapon profile indicated by (>>melee icon<<). Close combat attacks, wich use the weapon profile indicated by (>>close combat icon<<). Ranged attacks, wich use the weapon profile indicated by (>>ranged icon<<). Ranged attacks have a maximum range at which they can be performed, indicated by a number inside the ranged attack icon (>>ranged icon<<).
.
.
.
RANGED COMBAT
.
(>>ranged icon<<) Ranged combat happens at a distance where units fire blaster bolts at each other. A unit can perform a ranged attack against a target which is not in base contact with the attacking unit and at distance up to the range indicated by a number inside the ranged weapon’s ranged attack icon. Each range increment equals a distance of 15cm – range 1 is up to 15cm, range 2 up to 30cm, and so on.
.
.
Line of Sight:
.
To perform a ranged attack, the target must be visible via a line of sight which must be drawn from the attacking unit’s leader to any mini in the target unit. This is done by creating a cylinder rising from the mini’s base called a silhouette. A mini’s silhouette includes the base and the area above it up to a height of 5cm. When determining line of sight, between two minis, if an unobstructed line can be drawn from any part of one mini’s silhouette to any part of the other mini’s silhouette, those minis have line of sight to each other.
.
The silhouettes of minis do not block line of sight.
.
Terrain can block line of sight by preventing an unobstructed line of sight from being drawn. Terrain like this should be identified by players before the game begins.
.
.
Obscured:
.
To check whether the target unit is obscured, the attacking player draws a line of sight from the attacking unit’s leader to each mini in the defending unit. If a defending mini’s silhouette is partly or completely blocked by terrain other than terrain in base contact with the attacking unit’s leader, that mini is obscured. If at least half of a defending unit’s minis are obscured, the defending unit has cover.
.
.
Cover:
.
When a defending unit has cover, it adds defense dice to its defense pool. The game has two types of cover: Light cover and heavy cover. Light cover provides some protection but can hardly block shots from blasters and other ranged weapons. Heavy cover is much more solid and good at blocking blaster bolts and other ranged attacks. The maximum number of dice a defending unit can gain from cover is 2, and a unit can only gain dice from 1 type of cover – so a unit which is obscured by two instances of light cover still only gets to add 1 die to its defence pool for light cover.
.
– light cover: 1 (red)
– heavy cover: 2 (red)
.
.
.
CLOSE COMBAT
.
(>>close combat icon<<) Close combat represents units maneuvering and fighting each other at a very close distance. A unit can perform a close combat attack (>>close combat icon<<) against a target which is at a distance of a short move (5cm) or less, but not in base contact.
.
When using a ranged weapon at close combat range (5cm or less) – whether using a ranged weapon’s ranged combat profile or close combat profile – check line of sight, obscured minis and determine cover as for a ranged attack. In close combat, however, cover is less effective:
.
– light cover: 1 (white)
– heavy cover: 2 (white)
.
When using a melee weapon with a close combat profile to attack in close combat, you only need line of sight to the defending unit. Imagine the attacking unit lunging forward or striking around obstacles to hit their target, which is why most close combat profiles of melee weapons are less effective than their melee profiles.
.
.
.
MELEE
.
(>>melee icon<<) Melee represents intense up close and personal combat between units. Only units exclusively on small bases can enter melee with each other. To enter melee, move the unit leader into base contact with an enemy mini. Then move all or as many minis from both units as possible into base contact, starting with the unit leader.
.
Once a unit is in a melee, certain restrictions apply to it and other units which want to attack it:
.
– Units in melee with each other can only perform melee attacks (>>melee icon<<) against each other.
– A unit in melee cannot perform recover actions and interact actions.
– A unit in melee cannot perform ranged attacks (>>ranged icon<<) or be the target of a ranged attack (>>ranged icon<<).
– A unit in melee with at least 1 eager enemy unit must strain when it wants to perform a move action. If it does, it must move out of base contact with all enemy units it is in base contact with and cannot end its move in base contact with an enemy unit.
.
.
.
DECLARE TARGET
.
When a unit performs an attack, first declare the target of the attack, which must be a unit not controlled by the attacking unit’s player, as well as which weapon type and which attack type the attacking unit will use against the target. The target unit is also called the defending unit or defender. The attacking unit is also called the attacker. The defending unit must be a viable target for the attack as described above for each of the three attack types.
.
.
.
FORM ATTACK POOL
.
Each mini in the attacking unit contributes a number of attack dice to the attack pool as indicated by the chosen weapon type and attack type on the unit card. When you form the attack pool, you can boost it by spending the attacking unit’s Action Dice.
.
.
.
ROLL ATTACK POOL
.
Roll all dice in the attack pool. Remove all dice which did not roll a success. Each successful attack die is a hit. Each successful red die is a critical hit.
.
.
.
FORM DEFENSE POOL
.
The defender’s Defense Stat indicates the color of the dice which go into the defender’s defense pool. Add 1 defense die to the pool for each hit. Do not add defense dice for critical hits! When you form the defense pool, you can boost it by spending the defending unit’s Action Dice. Also add dice from cover to the defense pool during this step.
.
.
.
ROLL DEFENSE POOL
.
Roll all dice in the defense pool. Remove all dice which did not roll a success. Any defense die resulting in a success is a block.
.
.
.
APPLY SURGES
.
Many attack types have a surge chart which indicate the color and minimum result at least one attack die must have in order to trigger the associated surge effect. An attack die cannot trigger more than 1 surge effect at a time. The attacker may choose to apply any, all or no surge effects triggered by the attack roll.
.
.
.
MODIFY ATTACK ROLL
.
The defender now removes 1 hit for each block.
.
.
.
RESOLVE ATTACK
.
Each remaining hit adds 1 wound to the defending unit. For each number of wounds the defender gains equal to a unit’s Resilience score, remove 1 mini from the unit and then remove a number of wounds equal to the unit’s Resilience score. When the last mini in a unit is removed, the unit is defeated and removed from the game.
.
If the defending unit suffered at least 1 wound, it must make a Bravery Roll. Roll the unit’s Bravery Die. You may boost the Bravery Die by spending Action Dice as usual. If the roll does not yield at least 1 success, the defending unit either looses 1 Action Die or becomes strained (defending player’s choice).
.
When a unit has to make a Bravery Roll and a friendly Leader is at range 2, the unit may use the Leader’s Bravery Die instead of its own. A Leader may spend Action Dice to boost another friendly unit’s Bravery Roll if that unit is at range 2.
.
.
.
.
.
.
R E C O V E R
.
.
.
Units will suffer stress and injury during battle, or get caught on the back foot. Taking a breather or getting inspired can help alleviate the negative effects of stress and injury and allow a unit to continue performing at its peak or regain its footing. This is represented by a unit performing a recover action.
.
When an eager unit recovers, remove 1 wound token from the unit.
.
When a strained unit recovers, remove the strained token from the unit.
.
Note that some upgrade cards require the unit to perform a recover action to ready the upgrade card when it is exhausted. A recover action can only be used to trigger one effect. If a recover action is used to ready an exhausted Deployment Card for example, it cannot be used to remove a wound token or a strained token at the same time.
.


2024-01-30 Your project has been visited by the unofficial Hobby Hangout. Huzza!