The Bronzecast Ogrions & the Normalites of Vanillashire.
Concepts And Directions
Hi everyone,
In April next year, my club is going to host a Kings of War (KOW) narrative campaign between six players. Until then we are all preparing our armies for the coming clash.
I have a half painted metal Elf army, but I did not want to carry that weight around with me. So I decided to make a completely new plastic army.
After seeing Lloyd’s and Ben’s army projects I decided to embark on a completely original proxy army based on one of the existing KOW armies. I had bought two sets and several boxes of Stormcast Eternals on the very cheap, that had been sitting in a box for a couple of years; besides several boxes of 100 Year War Perry plastics that I was never really going to use anyway!
So I decided to paint them up as bronze animated statues as a proxy for an Ogre Kingdoms army. The Perry plastics will act as proxies for the goblins.
THE PLAN
I have decided to paint the models in the following way in order to finish them quickly as possible but keep them tabletop presentable.
THE COLOUR SCHEME
I have already finished up a test mini for the army. The whole process is divided into 10 quick steps. I will paint the units up as hordes of six models each. By the time I finish one step, the first model is dry. Otherwise I can speed up the drying time with a hair-dryer.
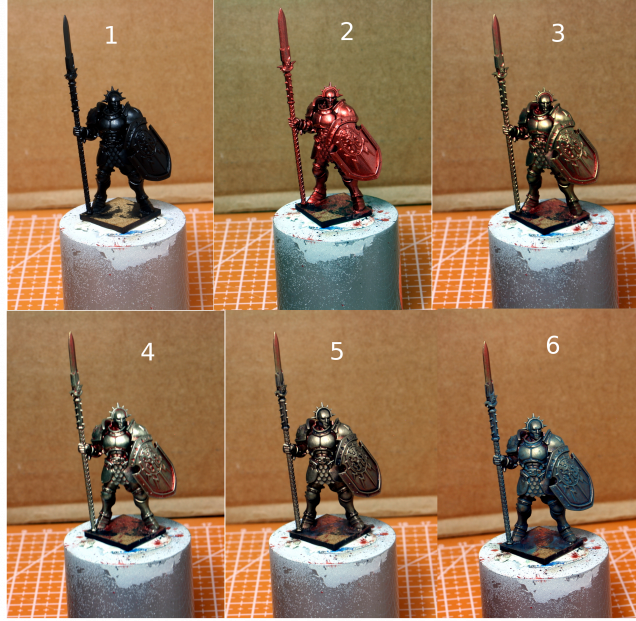
1 – The first step is putting the miniature together and giving it a black primer.
2 – Next is to give it a good cover of Screaming Bell from GW Paints.
3 – The fist dry-brushing is with Vallejo Bronze.
4 – A second dry-brushing is done lightly with Shining Gold from an old GW paint. You can just add some silver to a standard gold to achieve the same colour tone.
5 – When the drybrushing has dried properly, I gave it a first wash with 50% Agrax Earthshade and 50% water.
6 – I then gave it another diluted wash with Agrax Earthshade and some Blue Green from Vallejo.
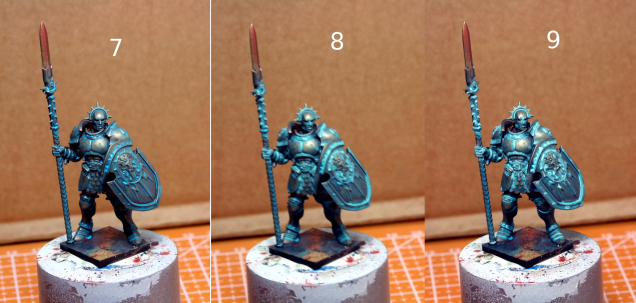
7 – When the washes have dried, I mix some GW Contrast medium with Blue Green from Vallejo till I get a milky consistency and with a fine brush I gave the model localized washes in the crevices of the model.
8 – I do the same as above, but with a Contrast medium and Verdigris mix from Vallejo. I just cover less than the first Blue Green wash. The consistency is also that of milk.
9 – The last localized wash is with Contrast medium and Verdigris Glaze only on the higher areas. This is effectively a highlight.
10 – The next and last step is not represented here, but is basically painting in red eyes and maybe a fire effect on the blade (if I can find a way to do it quickly).
Hopefully, by the end of next week I will have the first horde done (6 miniatures). I will try to do 1 or 2 steps a day and hopefully I can maintain a chain production until I paint up the army.
When I decide how to paint up the Normalites, I will do something similar like I did here.
Until then stay safe and have fun.
NR


Leave a Reply