


![How To Paint Moonstone’s Nanny | Goblin King Games [7 Days Early Access]](https://images.beastsofwar.com/2024/12/3CU-Gobin-King-Games-Moonstone-Shades-Nanny-coverimage-225-127.jpg)


Persei-Aries War Resumes


Oriskany's Russians v. Rasmus' Japanese: Battlecruiser Smackdown
Late last week, my friend Rasmus and I sat down for another game of Darkstar … which saw his Japanese battlecruiser IJN Nobunaga (Sengoku class) and her escort ships sortie forth in search of redemption. The last time this task force headed out to the stars … they were, frankly speaking, roundly defeated by a raiding American battleship and heavy cruiser at the Farukon Kosuto colonies (99 Herculis).
Can Rasmus’ Japanese redeem themselves and restore the honor of the Imperial chrysanthemum?
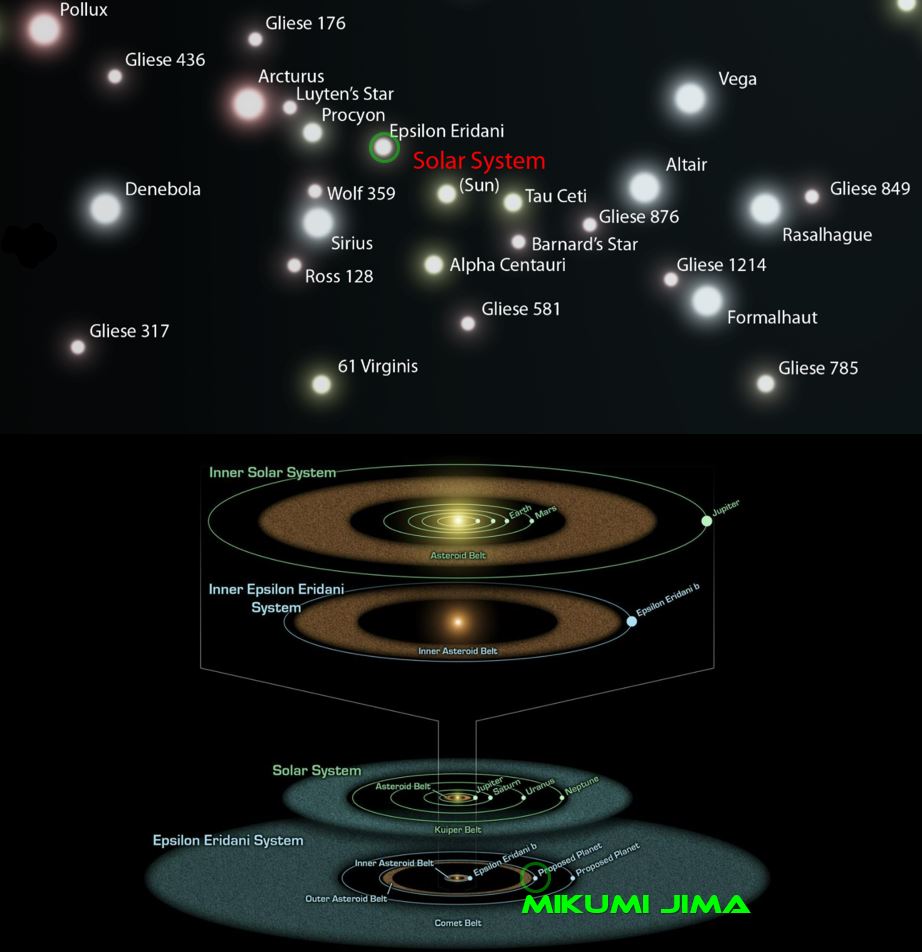 This time, Rasmus’ Japanese (sailing under the flag of Commodore Seizo Yamamoto) are called in to repel another raid, this time at a star system much closer to earth, the Mikumi Jima colonies at Epsilon Eridani. The aggressors today are not Americans, but a battlecruiser task force of the Holy Russian Empire
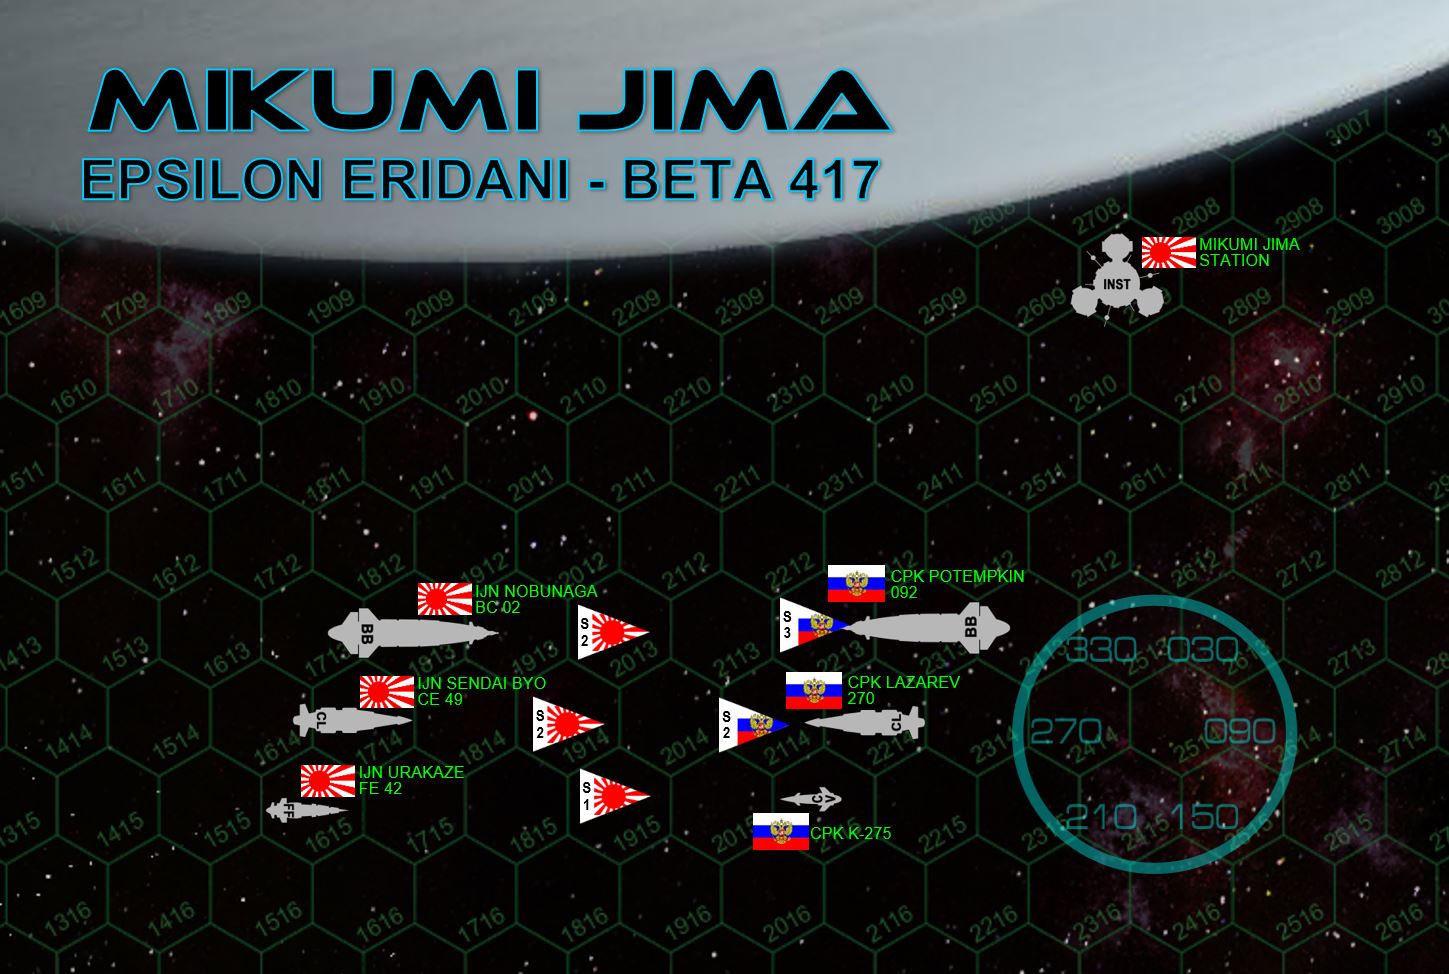 The Russian force is built around the Kirov-class battlecruiser CPK Potemkin, under the flag of Rear-Admiral Konstantin A. Zharyno, escorted by the infamous Kutuzov-class light cruiser CPK Admiral Lazarev (Captain Pyotr Fedorovich Myshaga). The small, stealthy, and deadly torpedo corvette K-275 screens the force as the Russians drop out of Darkstar wave and vector beneath the south pole of Mikumi Jima, a large moon orbiting the third gas giant of Epsilon Eridani. The Potemkin’s large Darkstar signature, however, has been detected and Yamamoto’s response force has enough time to set an intercept course. Escorting the Japanese flagship is the sleek, beautiful, and lethal Taihō-class light cruiser IJN Sendai Byo and the rugged, scrappy Akashi-class strike frigate IJN Urakaze.
 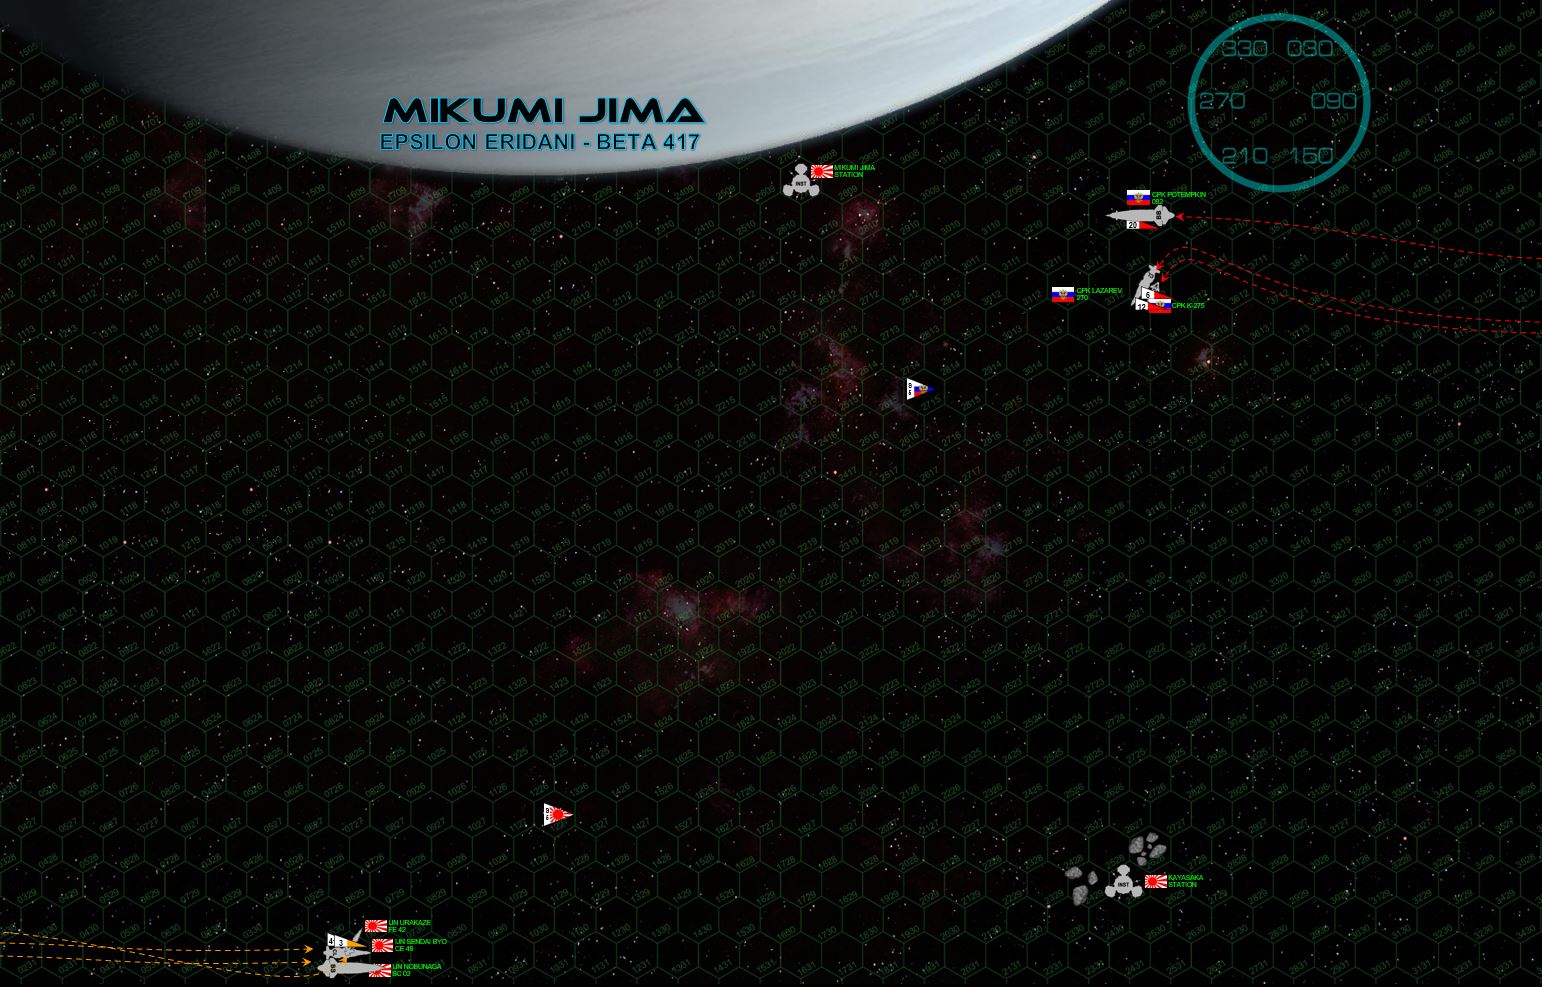 The two sides make their approach at 30 KPS, the Russians slowing and descending close to the polar atmosphere of Mikumi Jima. It’s a classic tactic, seizing the “gravity gauge” … using the planets gravity to make a fast initial approach, then as auxiliary brakes as they turn away from the moon to face the enemy. Perhaps most dangerous of all, it forces the enemy to turn TOWARDS the planet in order to engage them, a maneuver relished by few experienced starship commanders. The Japanese do not take the bait, however, maintain course and speed (and distance) from the Russians, hoping to make the most of the far-superior accuracy and longer-ranged hitting power.
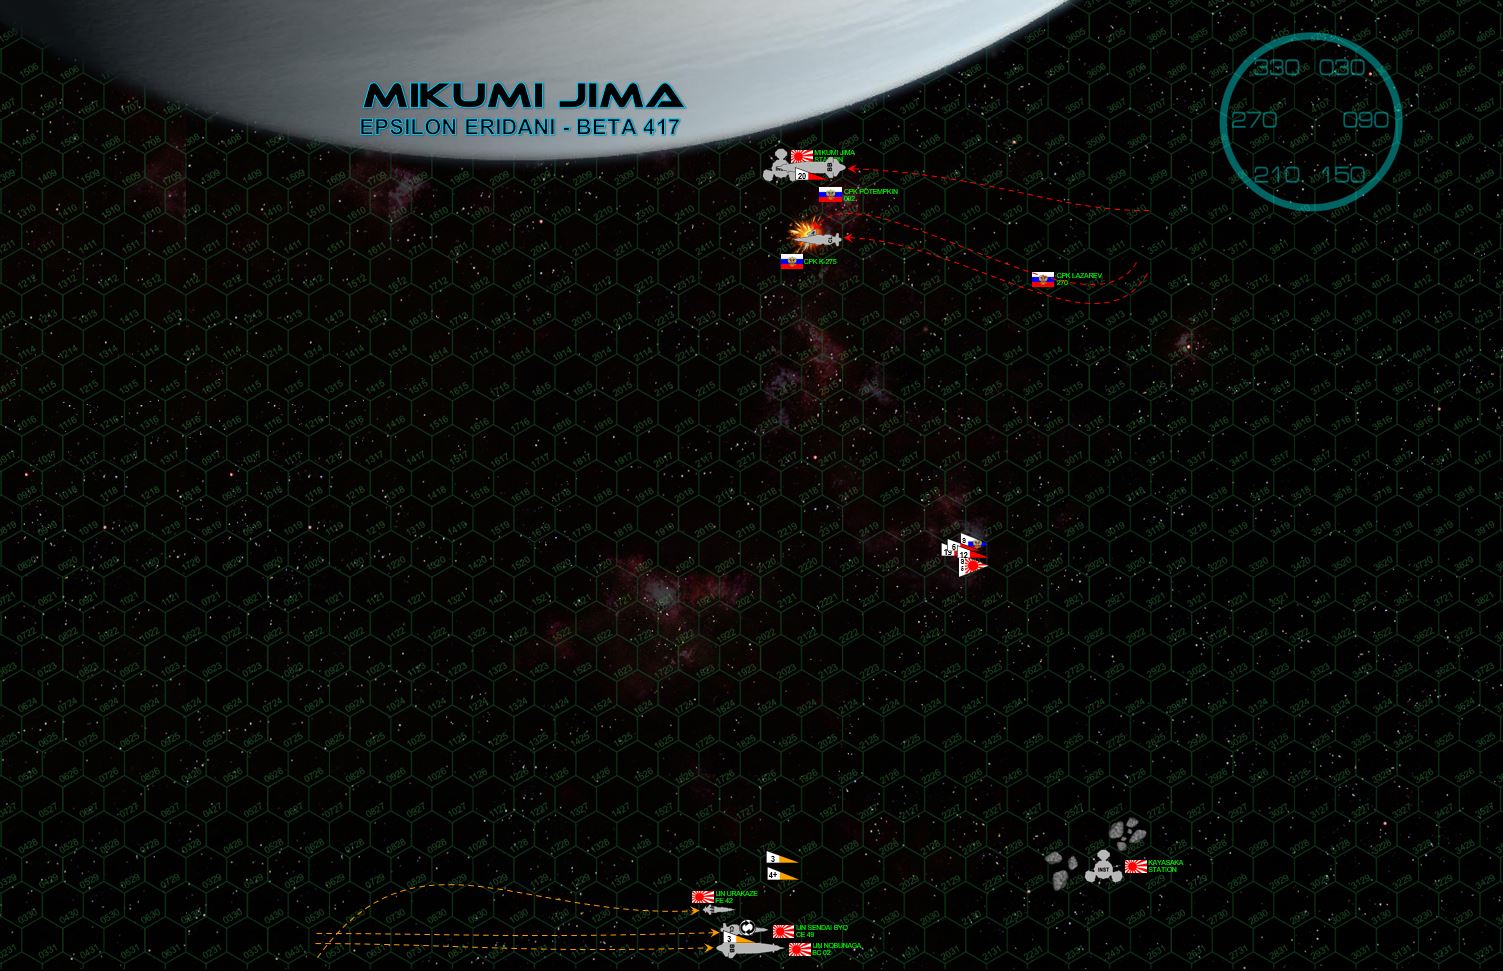 Both sides double down in their tactics, the Russians decelerating further, hoping to coax the Japanese to turn toward them. The Japanese refuse, happy to set up a broadside at 3600 kilometers, focusing their fire on the K-275. It’s a curious tactic, firing the full broadside of a 363,000 ton battlecruiser at 14,000 ton corvette. Russian torpedo corvettes are dangerous, however, almost impossible to lock on and hit and known to fling out waves of P-500 “Plamya” (Flame) Class III torpedoes at a ruthless pace. The corvette is finally crippled, but a staggering wave of 46 torpedoes is still incoming, launched from the Potemkin and Lazarev. Japanese Ki-202 "Hien" (Flying Swallow) scouts manage to shoot one of them down, while Russian Su-107 “Molniya” (Lightning) scouts counter-engage but fail to shoot any Japanese down.
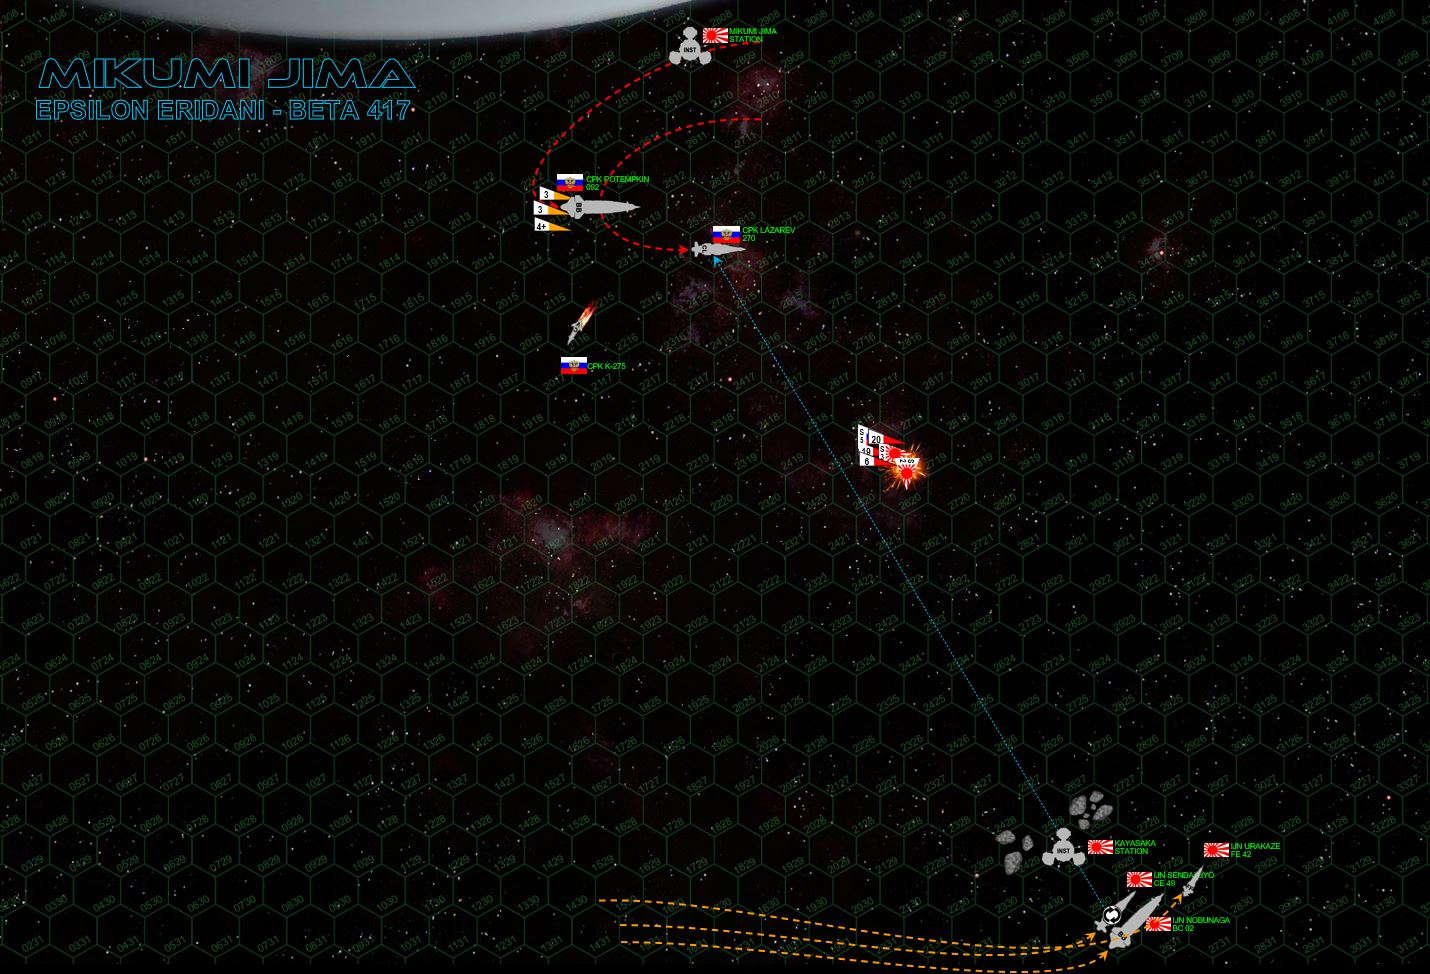 At last the Russians start to lose their patience. As the crippled K-275 careens out of orbit, the Potemkin and Lazarev come about in port standard turns, the Lazarev drilling forward guns into the reeling Urakaze (under sustained fire for three minutes), while Lazarev’s aft guns and the forward batteries of the Kirov switch to the Sendai Byo, smashing and burning holes in her port bow (the Sendai in inverted to bring new torpedoes to bear). Meanwhile, the Russians mass their huge wave of admittedly slow-moving P-500 torpedoes, the Japanese scouts again move to shoot them down but are in turn mauled by long-ranged mass driver fire from the Lazarev. Meanwhile, the wave of Japanese Ki-45 “Toryu” (Dragon Slayer) torpedoes targets the Potemkin, but none get through the battlecruisers withering hail of mass driver fire.
 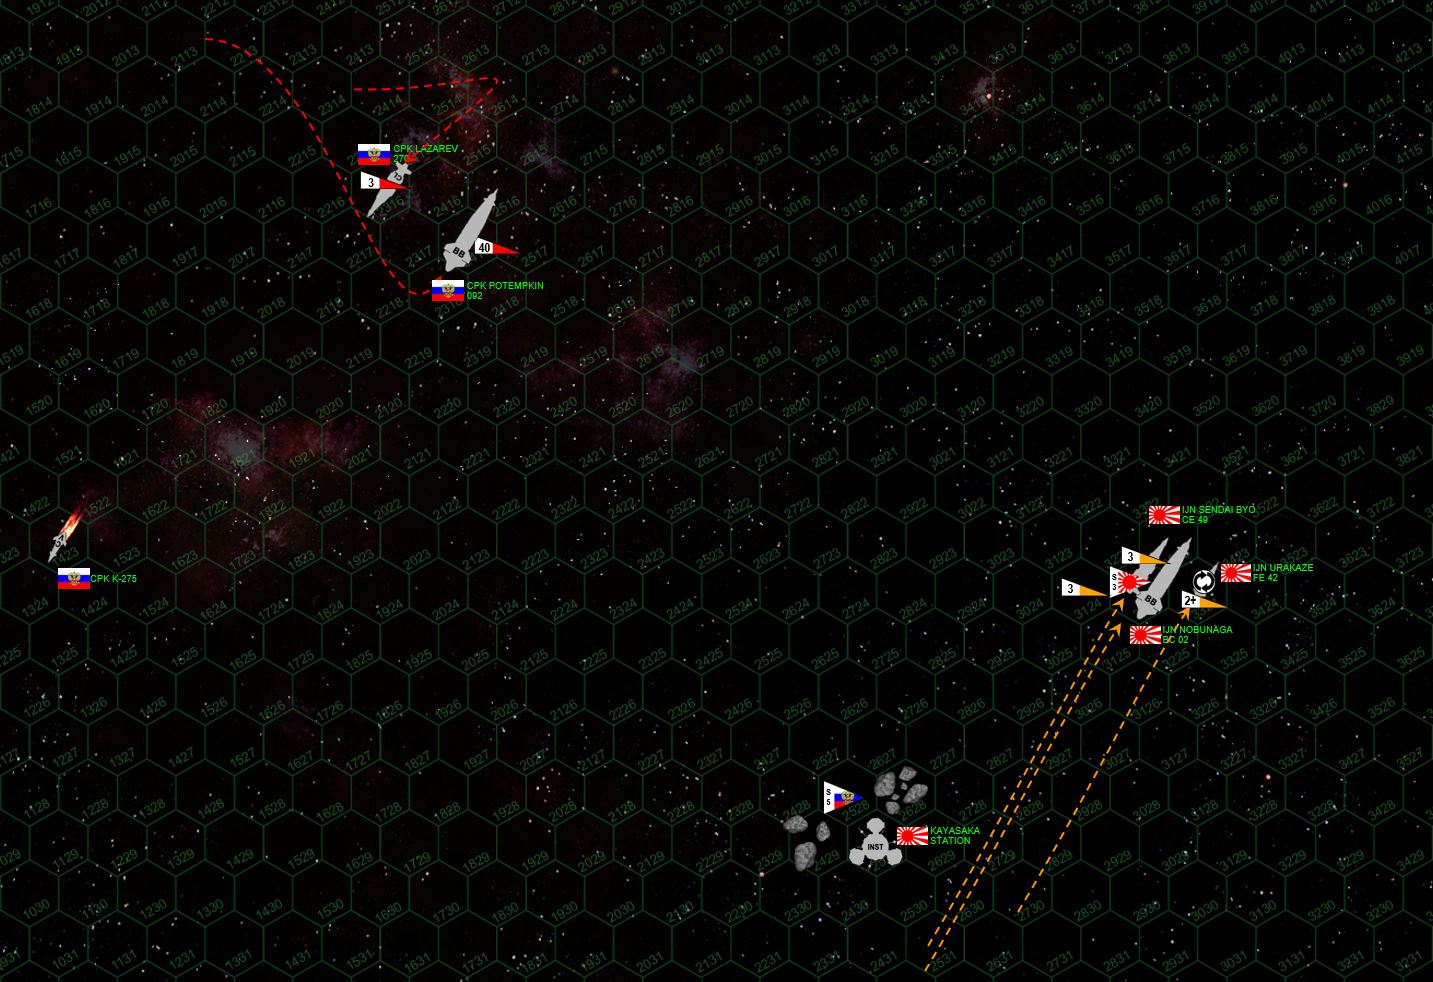 The Japanese task force powers out from behind the Kayasaka orbital mining installation, presenting a perfectly unified and aligned broadside against the Russian ships. The Lazarev and Potemkin crisscross against each other in a far less elegant maneuver, driven by the need to run close abeam for mutual mass driver support against the next wave of Toryu torpedoes, and also Myshaga’s maneuvering to keep his vulnerable port quarter out of Nobunaga’s broadside. The ploy doesn’t work but it’s a moot point, all Japanese ships have already opened fire on the Potemkin’s starboard bow. In a fateful twist, Potemkin’s sensor suite takes a hit JUST as her huge gun batteries are finally getting to some kind of decent engagement range. The massive Russian torpedo strike finally engages, but Japanese mass drivers and poor Russian targeting electronics means (and bad dice) mean NONE of the 45 warheads meet their mark.
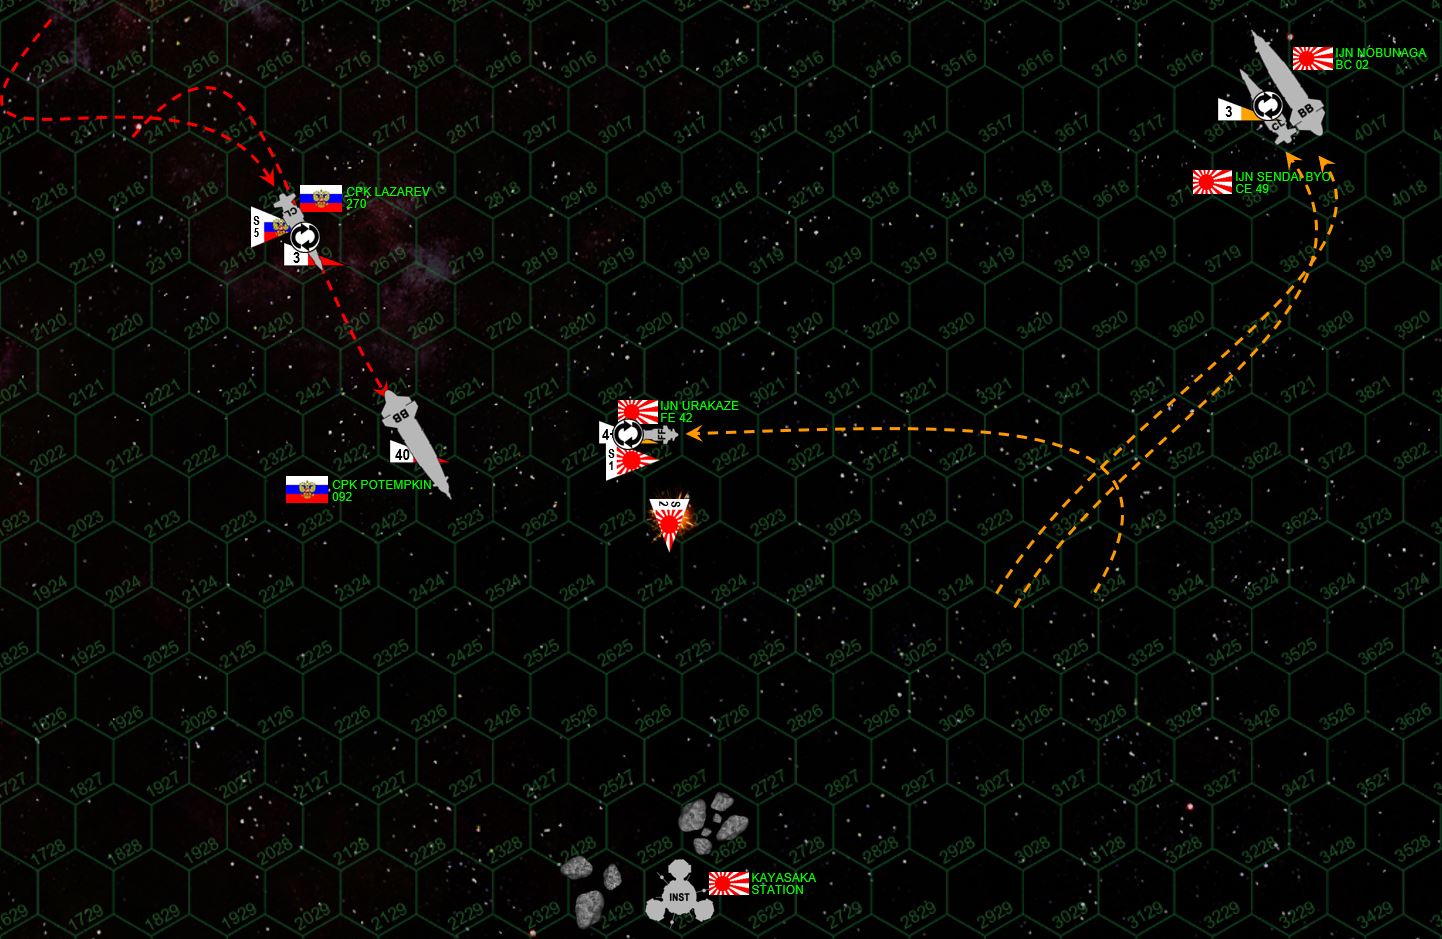 At last, the Russian “gravity gauge” tactics pay off when the Japanese FINALLY turn toward them. Yet Nobunaga and Sendai Byo also backstep as they do so, keeping the engagement ranges long and open even as they are forced to finally turn toward the Mikumi Jima moon. The frustrated Russians manage to get their formation back together in a classic line-ahead, their broadside hammering the starboard bow of the Sendai Byo again. The only outlier is the Urakaze, turning directly TOWARD the looming Potemkin, the 27,000 ton frigate charging headlong toward an opponent almost fourteen times her size. But this is an Akashi class strike frigate, ALL guns are mounted forward, and she’s aiming straight for the badly-damaged armor plating melting off Potemkin’s port bow. A second Russian torpedo wave does slightly better this time, still nowhere near enough to cripple the Sendai Byo. The Lazarev’s three warheads are also sent at the Urkaze, and as the Japanese scouts again try to engage, two more are shot down by Potemkin’s mass drivers.
 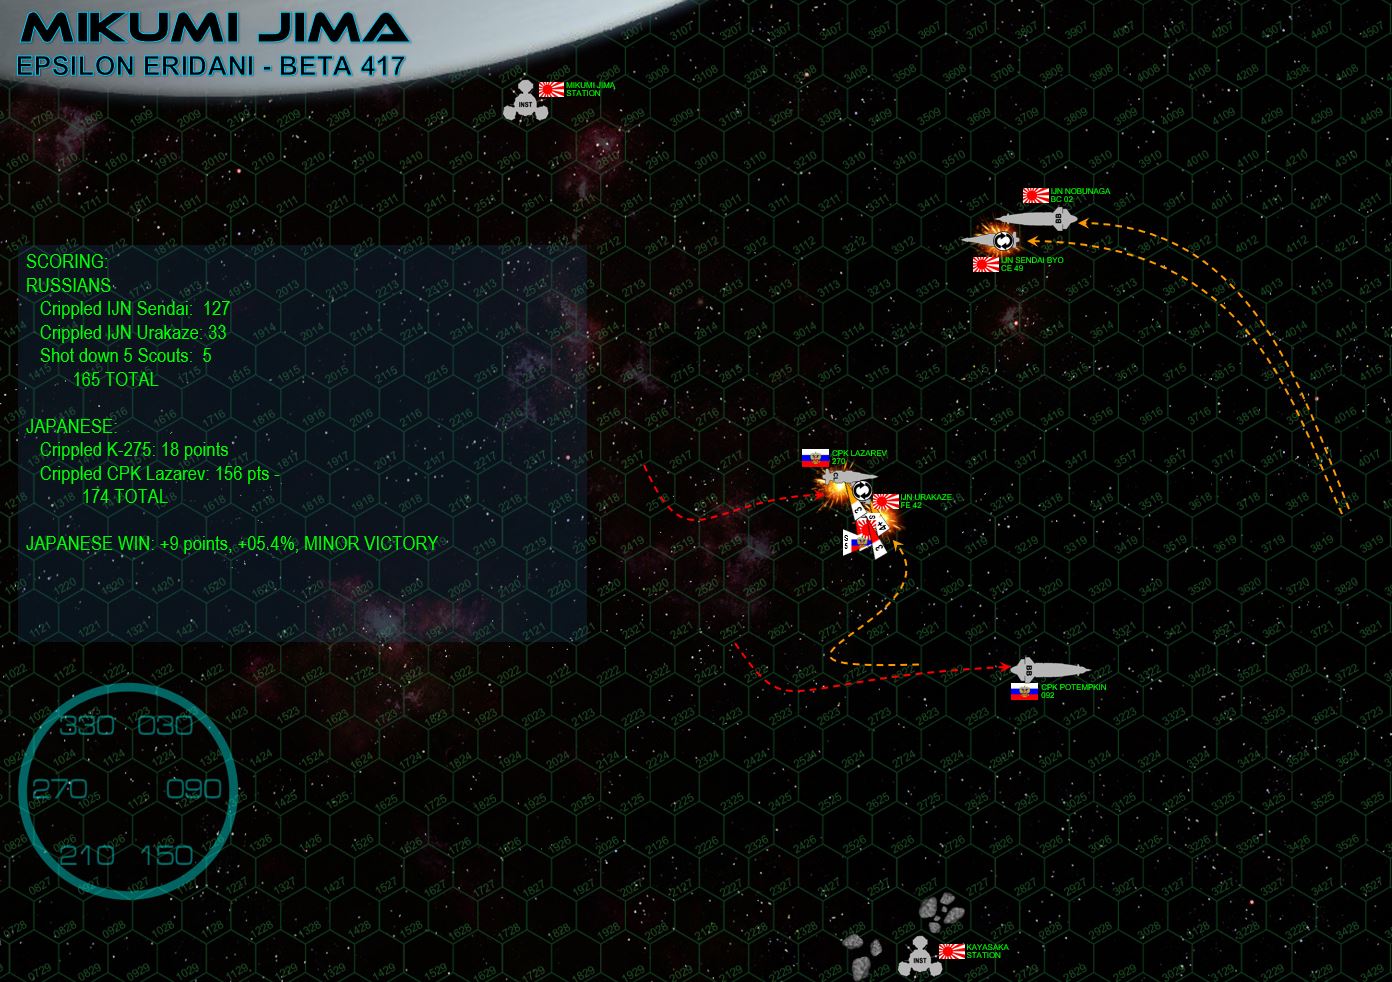 After a long, patient, deadly, and sometimes frustrating dance, the two sides finally come to grips in a furious exchange of torpedoes, particle cannons, and rail guns. The Potemkin lumbers forward in a port turn, the Nobunaga countering in a graceful matching turn, using Mikumi Jima’s gravity to tug her just a little further out of Potemkin’s reach. At 1800 kilometers, however, the Potemkin is finally in good range, only the fact that her sensors are partially brinded save Nobunaga from worse damage. The Sendai Byo is worse off, damaged maneuvering thrusters means she cannot decelerate against the moon’s gravity or re-roll off her back to protect her wounded starboard bow. The Lazarev is thus able to make her port turn much faster, cutting inside to broadside Sendai while avoiding the broadside of the Nobunaga. The Lazarev’s broadside hammers into the Sendai, the EPCs and plasma emitters burning into her fo’c’sle and setting off the forward magazine. Combined with earlier damage to Sendai’s port reactors, its enough to leave her crippled and adrift. However, the battered little Urakaze continues to burn, hammer, and slash into Lazarev’s starboard bow, and now at point blank range (under 180 kilometers), even a frigate’s plasma projectors are fearsome. A lucky plasma strike scorches into the Lazarev’s bridge, leaving Captain Myshaga wounded but alive, his ship adrift but salvageable. The Urakaze has little time to celebrate the victory, however, the valiant little ship then hit by the massive THIRD wave of Russian torpedoes. Even with the repairs Urakaze’s resilient crew has been making all game, up to and including bringing the bridge back on line, the ship’s stern is all but blown apart and she is left crippled as well.
 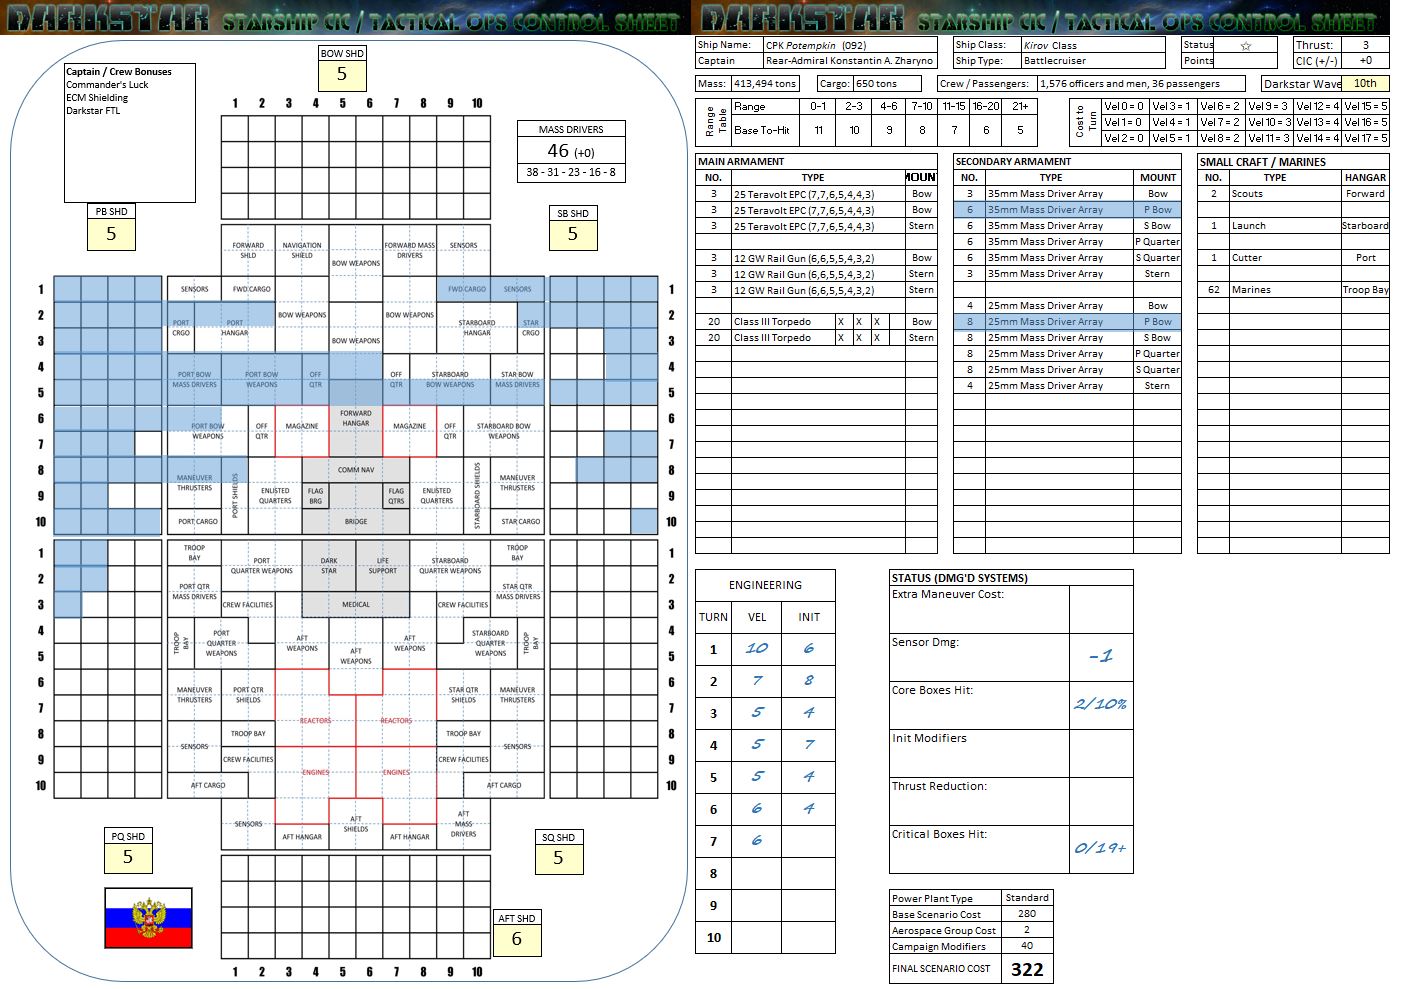 The battle is over (“Raid” model scenarios end after six turns). Although the battleships never closed the range to where they could really inflict lethal damage on each other, the cruisers and smaller escort ships ripped each other apart plenty. The Russians have BARELY managed to score the 165 points required (30% of original total scenario points, 497 in this case) to even qualify this as a raid, but the Japanese have outscored them with 174. That nine-point margin is JUST enough to clear the +5% victory margin, handing Rasmus’ Japanese a razor-thin (but still legitimate) 5.4% minor victory. CONGRATS TO RASMUS! Also note the Urakaze is considered NOT to be destroyed by hitting the moon, as the game technically ends before the impact (in narrative terms, the Mikumi Jima Station’s tractor beams manage to sling her wreck into a wobbly orbit). I’m not 100% that’s how it’s been interpreted in the past, but for now it’s more than fine, the Urakaze’s gallantry against first the Potemkin and later the Lazarev shouldn’t be punished. Also, this scenario was a little weird… battleships aren’t usually used in “raids” (6-turn games) but more often full-scale assaults (8-turn games), meaning Urakaze would have smacked the Mikumi Jima moon on Turn 8. But again, it’s fine.
 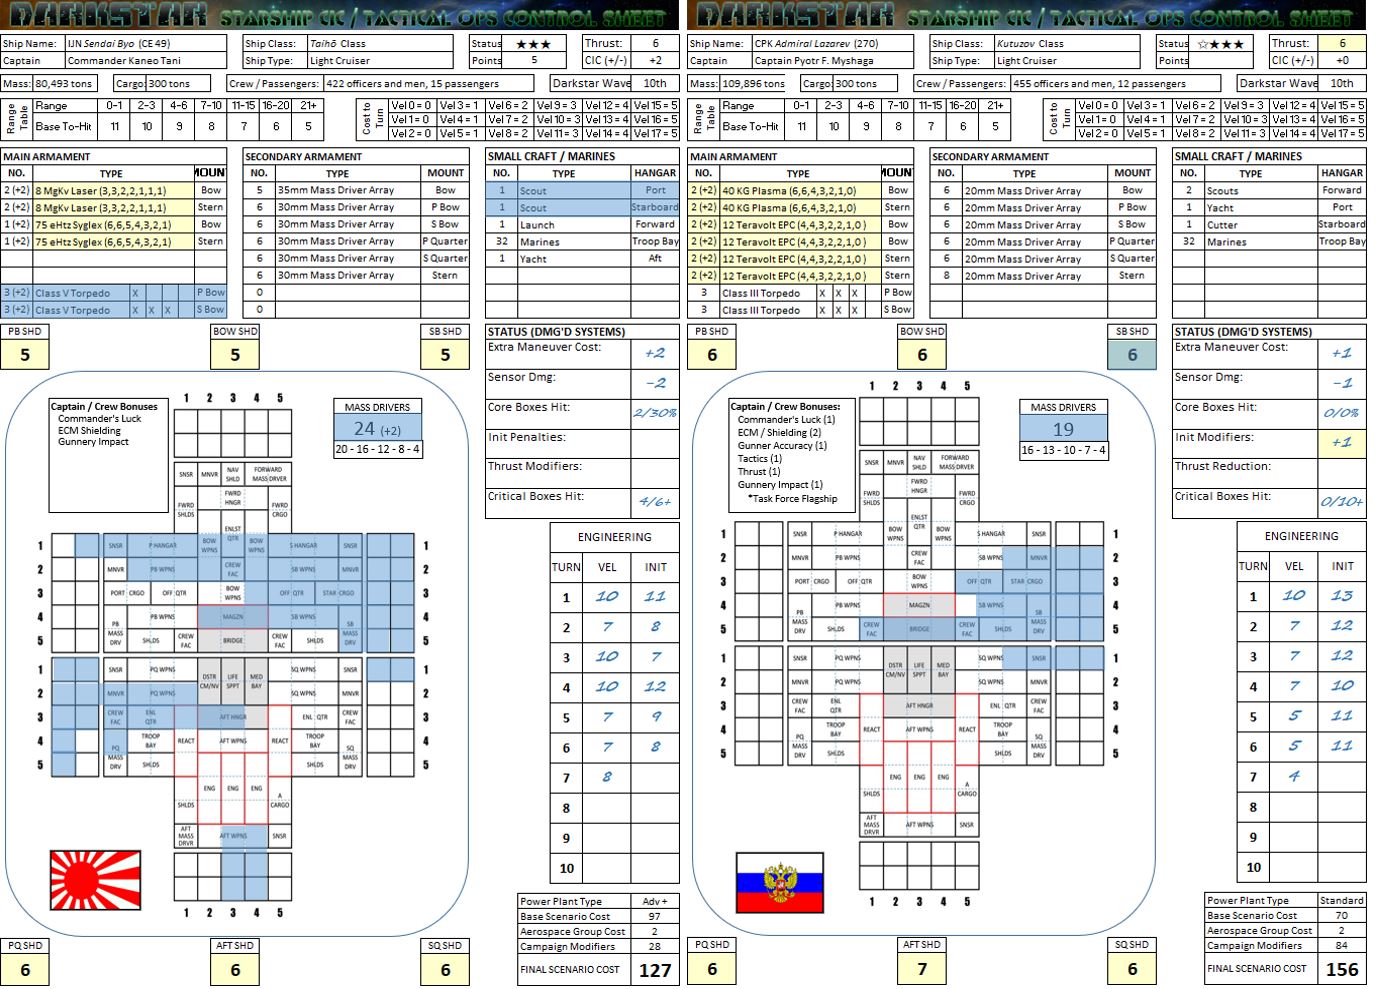 Here are the two real combatants in this scenario, the two light cruisers who so bitterly mauled each other. The comparison is an interesting one, with the Russian ship’s tougher shielding nevertheless lanced by a smaller (but more precise) damage profile, hitting the crucial bridge and CIC (ERRATA: Lazarev’s sheet should reflect 45% chance of break-off based on three core compartment boxes hit, while Sendai should be showing 75%). The Sendai, meanwhile, has taken much more damage, but less precise … in fact I only knocked her out with a lucky “6” cripple check thanks to the magazine and port reactor hits.


Leave a Reply