Tuscany Hill Village Terrain Build
Choosing the printing medium
In the last project update, I had designed a simple Italian house and given it a monk and nun roof. I now needed to get this printed off to see how it looked.
Using the Treatstock website, I was able to upload the files and selected the cheapest option, in this case an fdm print. I think this is where the printer extrudes the plastic, printing from the bottom up. Here’s the result
As you can see from the above, the stepping that is common in fdm printing is really noticeable in the roof tiles. So much so, I don’t think this printing technique is going to work for the roof, although it is less noticeable for the walls and other features of the building.
Returning to treatstock, I ordered up a resin version. This was almost twice the price, which may get expensive for a whole village, but as a one off test piece, it was ok.
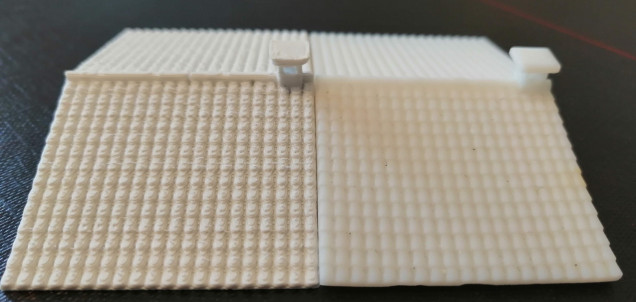
You really notice the difference between the two printing methods when you put the two roof pieces next to each other
So clearly resin printing for the roof to get the clarity. To keep the cost down, I can always print the building itself in fdm and then just the roof in resin.
The only problem that I have now is getting texture onto the walls. I don’t fancy trying to model individual bricks, render etc as this will likely take too much time so I have a couple of options,
- Add the texture after the models have been printed by using some textured card
- Figure out if there is some software out there that will allow me to ‘wrap’ texture around the buildings. Apparently Blender might be able to help, so I will take a look at that
But at least now I can start modelling more buildings in 3d for the village.


Leave a Reply