
Battlestar Galactica The Thin Red Line
Gemenon Traveller
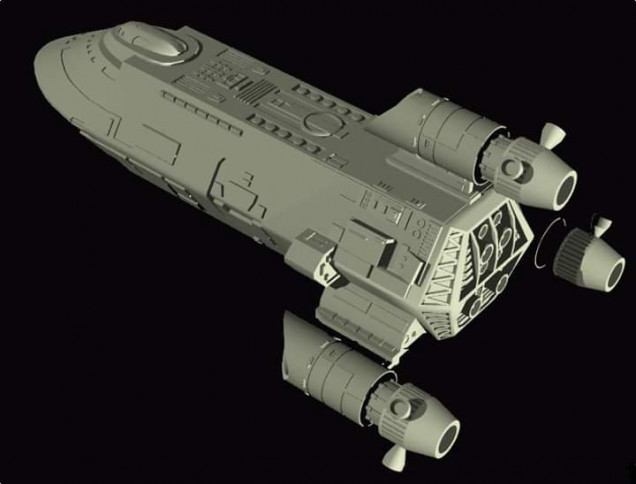
When you design an object to be 3D printed. You want to maximize the best print quality you can get. All FDM printers have the best resolution in the Z axis (Vertical). So by example this ship would be best printed Nose Up.
Now with that in mind, printers have a real hard time with 55 degree angels or more. Some times you can do 60 or 70 degrees but it requires you to do .04 Layer Heightes. But back to the over hangs, some 90 Degree over hangs can work if they are very small 1-4mm’s.
So all those little square boxes you see on the side have a very slight angel to them to help over come dealing with over hangs. Yes you can do supports to stabilize those over hangs but that causes extra print time and often does not produce a smooth surface on the underside of the over hang.
The other way to deal with over hangs, is to cut the model right in the middle of an over hang. So when the model is printed nose up, the cut in half section of the over hang is the base of the print.
But what about the other side of that over hang? Basically the from that over hang to the aft engines is all one piece now. Well simply you still use that cutting section as the base of your next print again going vertical.
Next you have to look for the next trouble area that has an over hang. And Cut the model in half before it. Again by doing this process it eliminates the need for supports and produces a cleaner 3D print.
You just keep cutting up the model this way until its done.
Now you will notice each engine has 3 little nozzles sticking out its side. I order to get those to print. I made sure those can be printed seperately and glued in place later. But this also means you need to build a base for these to be glued to, to make you lifer easier when it comes time to assemble.
In the future I may do a series of screen shots to show this process better.
I use a free program called Meshmixer to do all my cutting of my models.



























Leave a Reply